*This post may contain affiliate links for which I earn commissions.*
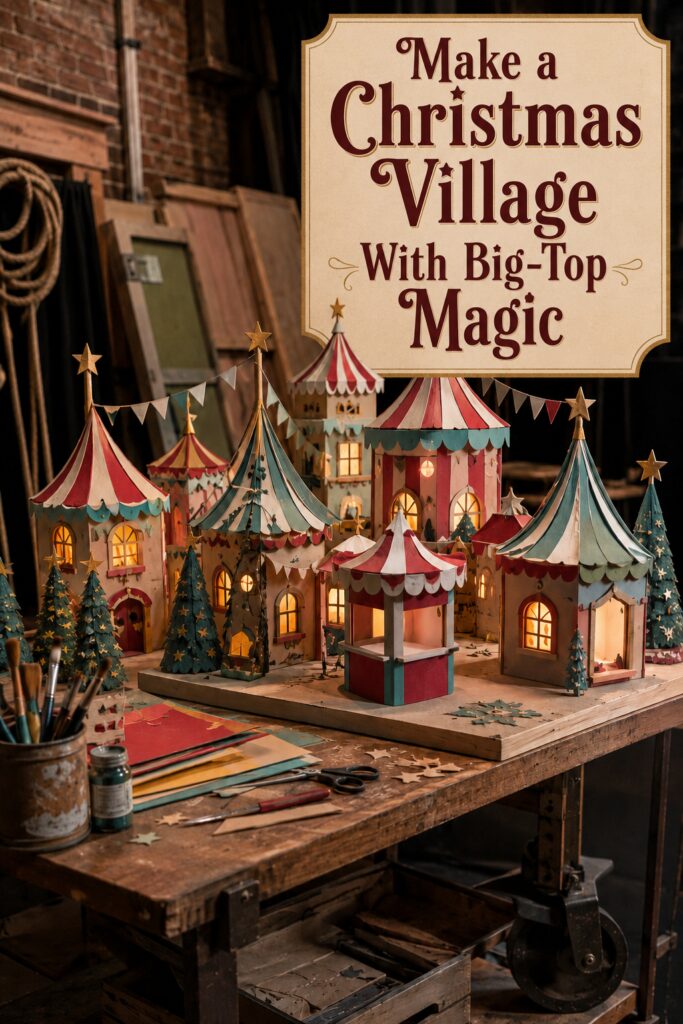
A traditional Christmas village usually draws inspiration from snowy cottages, Victorian streets, or alpine shops. This handmade display takes a more imaginative route. Its striped towers, peaked tents, tiny ticket booth, pennant banners, and star-topped spires turn a familiar holiday project into a miniature circus midway.
The concept feels nostalgic without reproducing one particular era or real attraction. Cranberry red, aged cream, muted teal, and antique gold give it the romance of an old circus poster, while warm window lights and miniature evergreens keep it firmly connected to Christmas.
It is the kind of project that can begin with one small building and expand over several seasons. Each new structure can be different, as long as the palette and a few repeating architectural details remain consistent.
Plan the Midway Before Building It
It is tempting to begin by cutting individual buildings, but a rough plan will prevent scale and placement problems later.
Start by choosing the maximum size of the finished display. A village intended for a mantel needs a long, shallow arrangement. One made for a console, buffet, or dedicated tabletop can include greater depth and several rows of buildings.
Sketch the platform as a rectangle and mark the locations of the largest structures first. The image uses taller towers toward the back and sides, with smaller buildings and a kiosk in front. This creates the impression of a substantial village without hiding important details.
Leave narrow paths between buildings. Even when no miniature figures are included, these open areas make the scene feel navigable and provide places for trees, banners, and scattered stars.
Plan the lighting at the same time. Battery cases, cords, switches, and access openings are much easier to conceal before everything is attached to the base.
Establish a Limited Midway Palette
The palette is central to the project’s identity. Cranberry and cream create the classic circus stripes, while muted teal prevents the display from looking like conventional red-and-white Christmas decor.
A useful palette includes:
- Cranberry or faded red
- Warm cream rather than stark white
- Dusty teal
- Soft blush
- Antique gold
- Deep blue-green for the trees
- Natural kraft brown in small areas
Use the three primary shades on every major building, but change their proportions. One structure might have a cream body and striped red roof. Another might have pink walls, teal trim, and a red-and-cream canopy.
Gold works best as an accent. Reserve it for stars, roof points, window details, and occasional surface marks rather than covering large areas.
Testing the paint on scraps will help you see how it behaves on chipboard. Some surfaces absorb paint unevenly and may need a suitable primer or an additional coat.
Choose the Right Material for the Buildings
Chipboard is a practical choice because it is firmer than card stock but easier to cut than wood. Heavy card stock can work for small roof details, pennants, scalloped borders, and window frames.
Thin basswood is another option for anyone who prefers a more rigid structure or plans to keep the village for many years. It requires tools appropriate to its thickness and may be less forgiving when creating curved or conical roofs.
Foam board can simplify the construction of large rectangular walls, but exposed cut edges need to be concealed. It is also less suitable for tiny scallops and narrow decorative pieces.
Whichever material you choose, make one prototype before cutting the full village. A single test building will reveal whether the walls remain square, the adhesive holds, and the lighting method fits inside.
Create a Small Family of Building Shapes
The village appears complex because it contains several buildings, but most can be developed from a few repeatable forms:
- A tall rectangular tower with a conical roof
- A shorter square building with a tent-shaped peak
- A narrow facade with an arched doorway
- A simple open-front kiosk
- A small house with a low pitched roof
Changing the height, roof width, trim color, and window arrangement will make repeated templates look different.
Begin with the largest tower because it establishes the scale of everything around it. If its doorway and windows are too small or too large, correct the proportions before producing the remaining structures.
Number the pieces as they are cut. Several similarly sized walls can become confusing once painting begins.
Build the Walls Before Adding Decoration
Cut the window and door openings while each wall is still flat. It is much harder to make clean cuts after a building has been assembled.
Use a metal ruler, a protected work surface, and a sharp craft knife suitable for the material. Make several controlled passes rather than attempting to cut through thick chipboard at once. Replace dull blades promptly because they can drag, tear the surface, and require excessive pressure.
Dry-fit each structure before applying adhesive. Check that opposite walls are the same height and that the base sits flat.
Interior corner supports can strengthen larger buildings. Narrow strips of chipboard or small wood blocks provide more gluing surface without being visible from the outside.
Allow every joint to dry fully before adding a roof. A slightly crooked wall can distort the entire conical top.
Turn Simple Cones Into Circus Roofs
The alternating roof stripes give the village its big-top character. They can be painted directly onto each cone or created from individual paper sections.
For a painted roof, lightly mark evenly spaced guidelines from the point to the lower edge. Paint alternating cranberry and cream sections, then add a thin gold line where desired.
For a paper-covered roof, use the cone template to create tapered stripe pieces. Attaching the pieces separately can produce sharper divisions and allows patterned or textured paper to be introduced.
A little variation suits the handmade style. The stripes do not need to look mechanically perfect, but they should meet neatly at the peak and remain reasonably consistent around the roof.
Add a small collar or cap at the top to hide the joins. This also creates a stronger attachment point for the star-topped spire.
Give Every Roof a Scalloped Edge
Scalloped borders repeat beneath nearly every canopy and roof. This one detail helps an ordinary miniature house resemble part of the midway.
Cut long strips of card stock, mark evenly spaced semicircles, and trim the lower edge. A paper punch or compatible cutting machine can speed up the process, but hand-cut scallops can reinforce the crafted appearance.
Use teal trim beneath red-and-cream roofs, cranberry beneath teal-and-cream roofs, and cream where a quieter edge is needed.
For greater depth, attach the trim slightly away from the wall instead of pressing it completely flat. Small adhesive spacers can produce a shallow shadow line beneath the roof.
Check that the scallops do not conceal the tops of the windows. The trim should finish the roof rather than compete with the facade.
Repeat Stars From the Roofs to the Trees
Gold stars form the visual thread that connects the architecture to the Christmas landscape. Large stars crown the towers, while tiny ones appear on the trees and base.
Make roof toppers from sturdy card stock, thin wood, or lightweight chipboard. Attach each star to a painted skewer, narrow dowel, or rigid paper tube.
The spire should pass securely into the roof cap rather than resting loosely on the cone. Keep the stars lightweight so they do not pull the roofs out of shape.
Small punched stars can decorate the trees and paths. A few scattered pieces are enough. Covering every surface would weaken the impact of the larger toppers.
Antique gold paint or paper is more harmonious with the aged palette than highly reflective glitter. If glitter is used, apply it sparingly and seal loose particles when the chosen materials permit it.
Add Windows That Glow
Illuminated windows turn the project from a collection of painted models into a miniature nighttime destination.
Line window openings with translucent vellum, tracing paper, or another material appropriate for the selected lights. Warm amber or cream backing can make the illumination feel softer.
Black, brown, or gold window frames provide definition when the lights are off. Arched windows reinforce the storybook architecture, while a few rectangular openings keep the buildings from becoming too uniform.
Use only cool-running miniature LEDs. Follow the light manufacturer’s instructions, keep batteries accessible, and avoid combining electrical components with materials or adhesives that are not suitable for the application.
Test every light before permanently attaching a building to the platform. Also view the structure in a darkened room. Small gaps at wall seams may allow unwanted light to escape, but they can usually be covered from inside.
Construct a Tiny Ticket Booth
The freestanding kiosk in front gives the village a recognizable midway feature. Its open window and striped canopy distinguish it from the surrounding houses.
Build it as a small square box with one or more service openings. Add a shallow counter ledge beneath the front window and a conical or gently peaked roof above it.
Repeat the cranberry, cream, and teal palette, but reverse the placement used on the larger buildings. A deep red lower section and teal panels help the booth stand apart.
The kiosk does not need interior furnishings to be effective. Its silhouette alone suggests tickets, treats, or miniature holiday souvenirs.
Because it sits in front, make sure it does not block the illuminated doorways behind it. Shift it slightly off center if necessary.
String Pennants Across the Midway
Tiny triangular flags create a sense of celebration and connect separate buildings without filling the base with more objects.
Cut triangles from lightweight paper in cream, red, teal, and muted gold. Fold the top edge over fine cord or thread, then secure it with an appropriate adhesive.
Avoid making every pennant identical. Slight differences in size and spacing support the vintage handmade character.
Anchor the banners to star-topped poles or to sturdy points on the buildings. Keep the lines high enough that they do not obscure windows and roofs.
Do not pull the thread so tightly that it bends the poles. A gentle curve will look more natural and reduce tension on the miniature structures.
Transform Bottle-Brush Trees to Match
Ordinary green bottle-brush trees would work, but the deep teal versions make this village more distinctive.
Trees can be purchased in a compatible shade or carefully tinted with paint or dye suitable for their fibers. Always test one first. Some materials become stiff, clumped, or uneven when recolored.
Vary the heights and trim a few trees into narrower silhouettes. Arrange them in small groups rather than placing one beside every building.
Add tiny gold stars, dots, or simple painted marks. The decorations should relate to the roof toppers without overwhelming the trees.
A small bare area around each trunk will make the miniature landscape feel more deliberate. Crowding every gap with greenery can hide the architecture that required the most work.
Use Distressing to Unify the Village
The surfaces in the image are not perfectly smooth or newly painted. Subtle wear gives the village the atmosphere of a treasured stage set brought out each December.
Apply distressing after the main colors have dried. A nearly dry brush can add small streaks of cream, brown, or muted gold along edges and roof panels.
Concentrate wear where it would naturally occur: corners, window frames, roof edges, counters, and doors. Random marks across every surface can look messy rather than aged.
Work gradually. It is easier to add another thin layer than to remove heavy distressing.
If the village contains both chipboard and wood pieces, a shared finishing technique will make those different materials feel like one collection.
Mount Everything on a Sturdy Platform
A single base makes the village easier to arrange, light, store, and move. It also turns the collection into one finished project.
Thin plywood or another rigid craft board can support the buildings without excessive flexing. Sand unfinished edges where appropriate and seal or paint the surface before attaching the village.
A natural wood edge suits the workshop quality of the design. It can also be painted teal, burgundy, cream, or antique gold for a more finished presentation.
Drill or cut any necessary light-access openings before attaching buildings. Battery cases and switches should remain reachable from the back or underside.
Test the complete layout one final time before gluing anything down. Photographing the arrangement from several angles can reveal hidden windows, awkward gaps, or buildings that need to be shifted.
Build It in Manageable Stages
A village with numerous towers does not need to be completed in one crafting session.
A practical order is:
- Design the palette and overall layout.
- Build and test one large structure.
- Create two smaller buildings from related templates.
- Add the kiosk and pennant poles.
- Paint and finish all roof pieces.
- Install and test the lights.
- Arrange trees and ground decorations.
- Secure the village to its base.
Working in batches can save time. Cut all scalloped strips together, paint related roof sections at once, and prepare the window backing in one sitting.
Stop periodically and view the project from several feet away. Miniature details are satisfying to create, but the larger silhouettes and balance matter most when the village is displayed.
Create a Smaller Version for a Mantel
The same concept can be reduced to three buildings:
- One tall star-topped tower
- One lower striped-roof shop
- One open-front ticket booth
Connect them with a single pennant banner and add five or seven teal trees. Warm window lights and one shared platform will make the smaller collection feel complete.
For a very shallow mantel, line the buildings up with slight overlaps instead of creating multiple rows. Keep the tallest structure toward one side rather than exactly in the middle.
This smaller version preserves the midway story while requiring fewer templates, lights, and storage space.
Why the Village Feels Like a Complete Little World
The display succeeds because its Christmas and circus references are carefully balanced.
The striped roofs, pennants, scalloped awnings, ticket booth, and star-topped towers establish the midway. Evergreen trees, warm window lights, gold accents, and the tabletop village format establish the holiday setting.
Repetition makes the many individual parts feel connected. The same three main colors appear throughout, roof shapes recur at different sizes, and stars move from the highest spires to the smallest trees.
The result is more than a row of miniature houses. It feels like a destination with its own architecture, paths, gathering places, and nighttime atmosphere, all built from accessible craft forms that can be adapted from year to year.
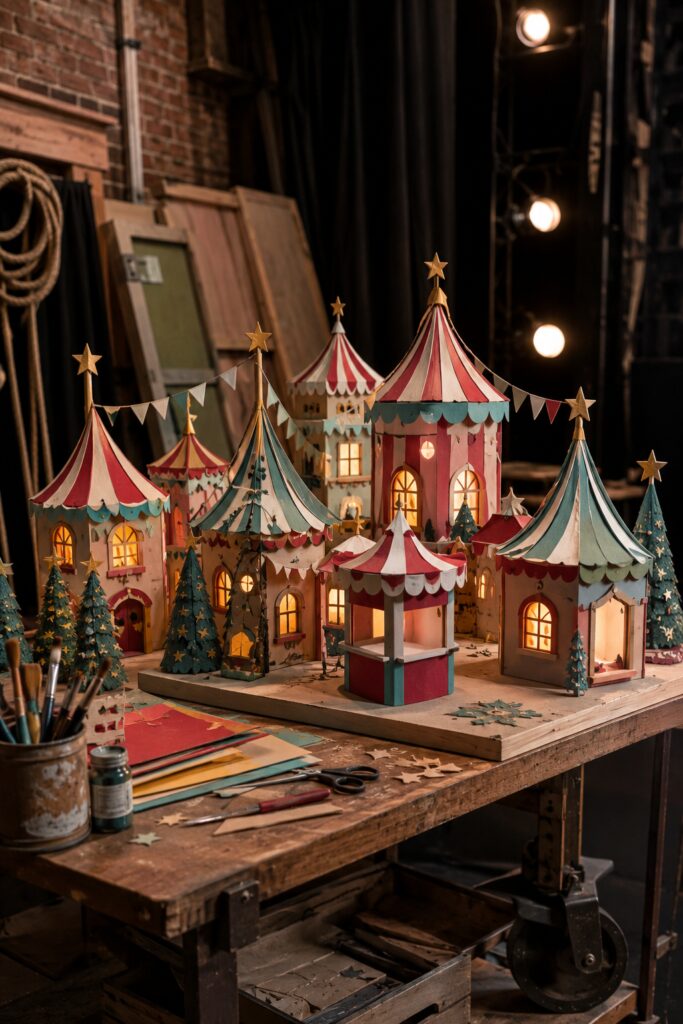
Image disclosure: This AI-generated image is presented as crafting and decorating inspiration. Suggested materials are alternatives rather than claims that exact supplies shown are available. Product details, dimensions, prices, ratings, and availability may change.