*This post may contain affiliate links for which I earn commissions.*
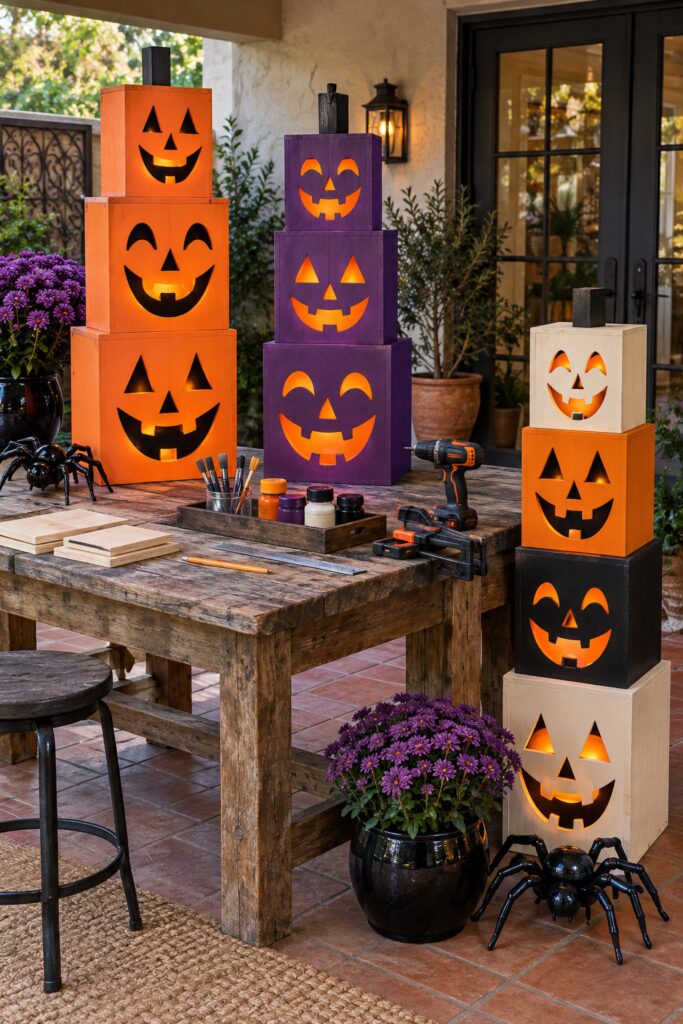
Stacks of smiling pumpkin faces give this display the height of porch columns and the warm glow of carved jack-o’-lanterns, but the painted orange, purple, cream, and black palette makes it feel more playful than traditional. This tutorial turns that visual idea into a practical set of modular wooden boxes that can be assembled one at a time, stacked securely, and stored after Halloween.
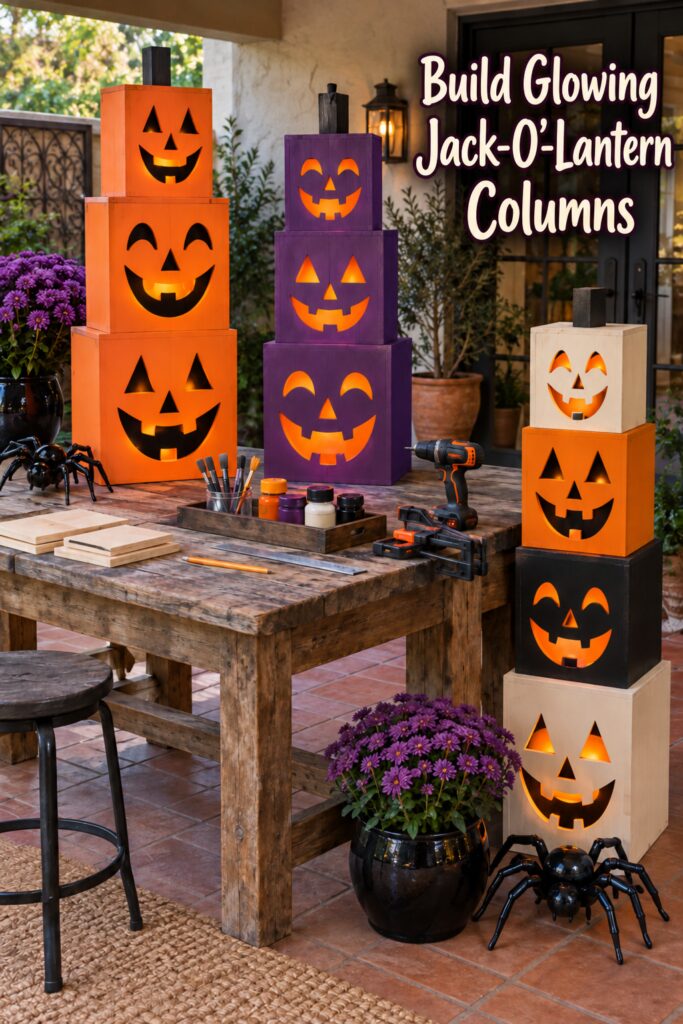
The inspiration image and the instructional demonstration images for this project were created with AI. They are visual planning aids rather than photographs of a completed physical build. The construction method below is a practical interpretation designed for a real home workshop.
What You’re Making
Each face is a shallow, open-back wooden box with cutout eyes, nose, and mouth. Frosted plastic behind the openings softens the light from a battery-operated LED puck. Small alignment cleats and removable screws join the boxes into columns, while a wider weighted base helps prevent tipping.
The suggested box is roughly a 12-inch cube, but 10- to 14-inch boxes also work. Build three boxes for one column, or repeat the method to make a grouping of two-, three-, and four-box towers like the inspiration image. The removable modular construction is easier to light, repair, carry, and store than one tall sealed structure.
Materials and Supplies
Materials
- 1/2-inch sanded plywood, enough for one front, two sides, one top, and one bottom per box (you can buy pre-cut craft pieces but if you might find it cheaper to buy sheets from a place like Home Depot and either cut them yourself or have them do it for you – you could also skip doing a bottom for the top boxes if you’re going to keep them stacked)
- 1 x 2-inch wood strips for interior corner blocks and alignment cleats
- 3/4-inch plywood for each wide base
- Wood glue
- 1 1/4-inch wood screws
- Short black-finish screws for removable stacking connections
- Sandable wood filler
- Medium- and fine-grit sandpaper or sanding sponges
- Wood primer
- Craft, exterior-safe, or spray paint in pumpkin orange, rich purple, warm cream, and black
- Clear water-based protective topcoat
- Thin frosted acrylic, translucent polypropylene, or LED diffuser sheets
- Removable hook-and-loop dots or narrow strips
- One low-heat, battery-operated warm-white LED puck light per box
- Optional adhesive-backed foil tape to bounce light inside the boxes
- Optional weight for the base, such as a flat paver secured inside a low wooden base frame
Tools
- Tape measure, pencil, straightedge, and carpenter’s square
- Drill/driver and drill bits
- Jigsaw with a fine wood blade
- Clamps that fit the size box you’re making – you may need a couple of different sizes if you decide to make boxes greater than 12″
- Circular saw or table saw, unless the plywood is cut to size for you
- Small paint roller and brushes
- Safety glasses and hearing protection
- Dust mask or respirator appropriate for cutting, sanding, and the finishes used
Want to Make These Boxes?
I’ve put together a convenient Amazon supply list featuring hand-picked, well-rated products for the non-tool items that are in the materials list so you won’t have to search around for them yourself.
See My Hand-Picked Supply ListAs an Amazon Associate I earn from qualifying purchases but this doesn’t increase your price at all!
Before You Start
Decide how many boxes each tower will contain and mark every part by tower and position. For a nominal 12-inch box made from 1/2-inch plywood, cut the front and back-height side pieces to suit your preferred joinery rather than relying on one universal cut list. The important point is that every finished box in a tower has the same outside width and depth.
Make one complete test box before cutting parts for the entire display. Dry-fit it on a level surface, confirm that it is square, and test the face template at full size. Leave the rear open for access to the light and stacking hardware. Protect the work surface, plan for drying time between coats, and use only low-heat LEDs inside the boxes. Never use candles or incandescent bulbs.
Step 1: Design a Family of Pumpkin Faces
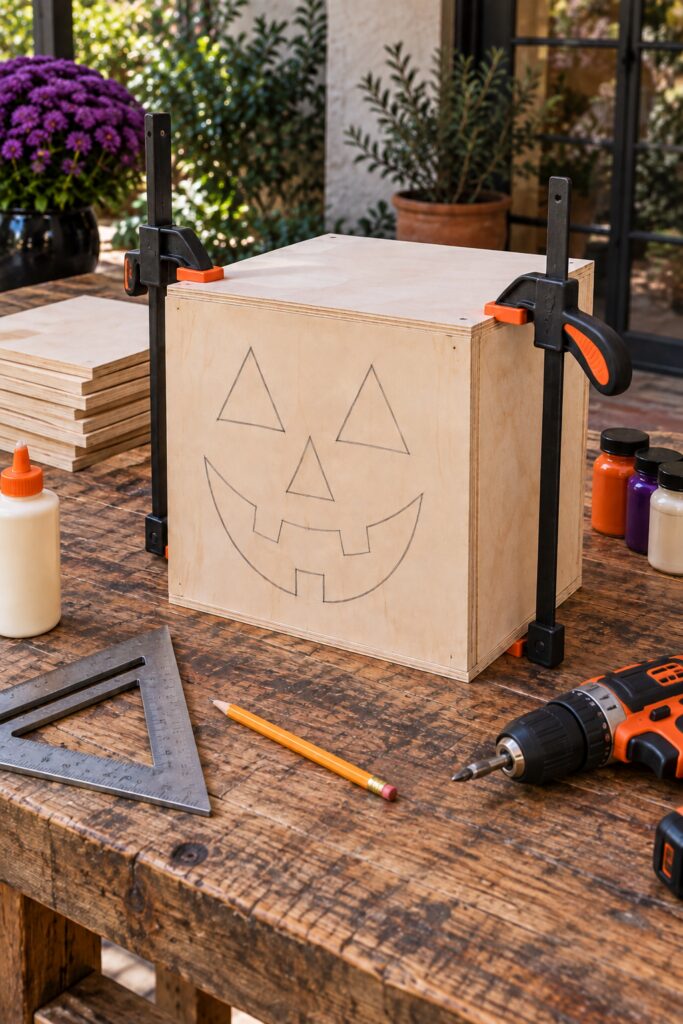
Cut kraft paper to the size of a front panel and sketch a friendly jack-o’-lantern face. Keep narrow wood bridges between the eyes, nose, mouth, and panel edges so the front remains strong. Avoid very thin teeth or tight inside corners because they are difficult to cut cleanly and may break.
Create two or three related expressions rather than making every face identical. Fold the paper vertically while refining the eyes and nose if you want symmetry, then open it before drawing the smile. Transfer the design to the plywood with graphite paper or by tracing around cut paper shapes.
Step 2: Cut and Dry-Fit the Box Parts
For each module, prepare a front, two sides, a top, and a bottom. Sand splinters from the cut edges, then arrange the parts around the front panel. Clamp the pieces without glue and use a carpenter’s square to check all four front corners. Mark the location of small 1 x 2-inch interior corner blocks that will give the screws more wood to grip.
If the tower will contain several boxes, cut the matching pieces as a batch after the first dry fit succeeds. Recheck the dimensions every few cuts so a small measuring error does not repeat through the whole project.
Step 3: Cut the Jack-O’-Lantern Openings
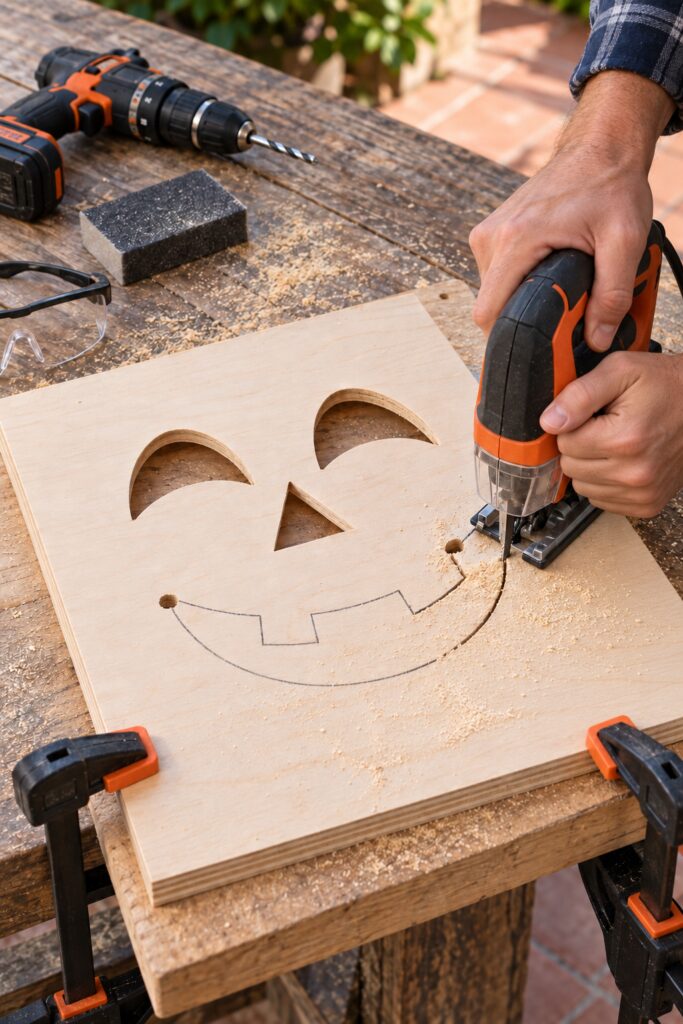
Remove the front panel and clamp it over a sacrificial board with the cutting area supported. Drill a starter hole inside each eye, nose, and mouth opening. Choose a bit large enough for the jigsaw blade to enter without forcing it.
Insert a fine-tooth blade through a starter hole and cut slowly just inside the pencil line. Stop and reposition the clamps whenever they interfere with a safe cutting path. Keep both hands controlling the saw and never use a hand to steady the panel near the blade. Disconnect the tool before changing the blade or clearing a jam.
Smooth the openings with folded sandpaper, a sanding sponge, or a small file. Slightly rounding the front edges helps the paint cover evenly and makes the glowing shapes look cleaner.
Step 4: Assemble Each Open-Back Box
Glue and clamp the sides, top, and bottom around the front panel. Fit the interior corner blocks behind the joints, predrill to prevent splitting, and add screws where they will not break through the face. Wipe away squeezed-out glue before it dries.
Measure both diagonals across the open back. When the two measurements match, the box is square. Let the glue cure according to its instructions before removing the clamps. Fill visible screw holes and imperfect seams, allow the filler to dry, then sand the entire box smooth.
Step 5: Add the Stacking and Anti-Tip System
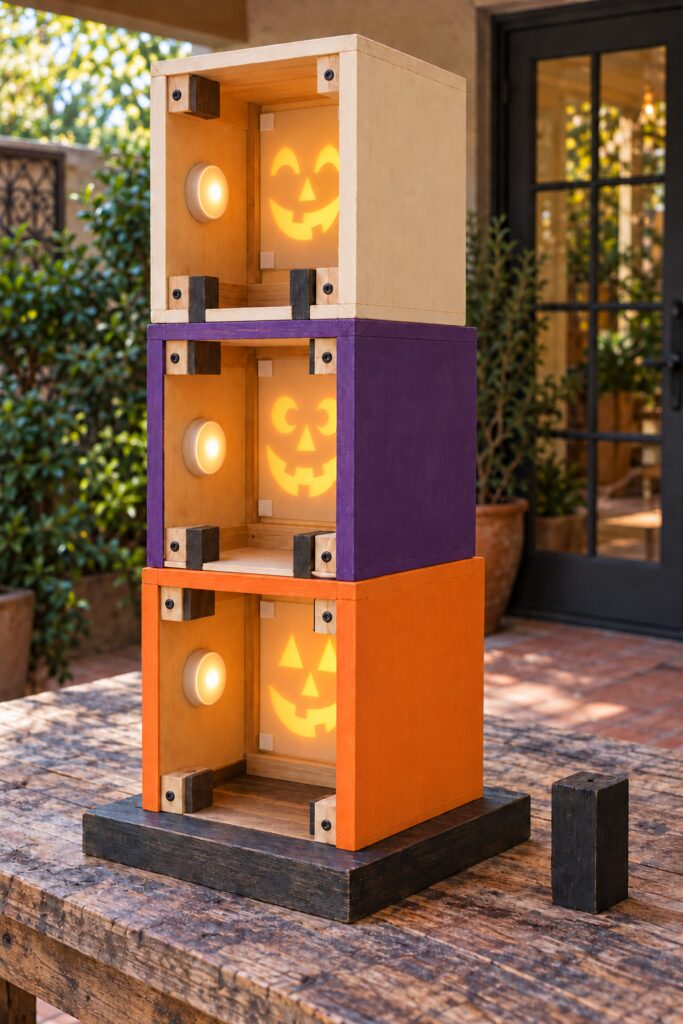
Cut four short alignment cleats for the underside of every upper box. Position them so they nest just inside the open top perimeter of the box below without binding. Glue and screw the cleats to the upper box only. They should prevent sideways movement while still allowing the modules to separate.
Add two rear corner blocks at every joint and drill pilot holes for short removable screws. These screws lock the boxes together from the back but can be removed for storage. Attach the lowest box to a plywood base several inches wider than the box on every side. For a tall display, build a shallow cavity under the base for a flat weight, or anchor the base to a wall or porch post with suitable outdoor-rated anti-tip hardware.
Do not place a tall column where it could fall into a walkway, stair, doorway, or seating area. If children or pets can reach it, use a positive wall or post connection rather than relying only on base weight.
Step 6: Prime and Paint the Boxes
Remove sanding dust, prime the wood, and sand lightly once the primer dries. Roll paint over the broad areas and use a small brush along the face openings. Two thin coats usually look smoother than one heavy coat.
For the varied look in the inspiration image, distribute orange, purple, cream, and black through the grouping instead of repeating the same sequence on every tower. Paint the alignment cleats and visible stacking hardware black so the connections visually recede. Once the color coats are fully dry, add a clear protective topcoat appropriate for the display location.
Step 7: Diffuse the Face Openings
Cut a frosted plastic sheet slightly larger than the combined face openings but small enough to fit flat against the inside front. Attach it from the open back with removable hook-and-loop dots. This hides the direct point of light and creates a more even amber glow. Removable attachment makes it easy to repaint the box or replace a damaged sheet later.
If the light appears dim, line the side walls with small pieces of adhesive-backed reflective tape, keeping the tape away from screws and moving parts. Do not seal the box or cover the light’s battery compartment.
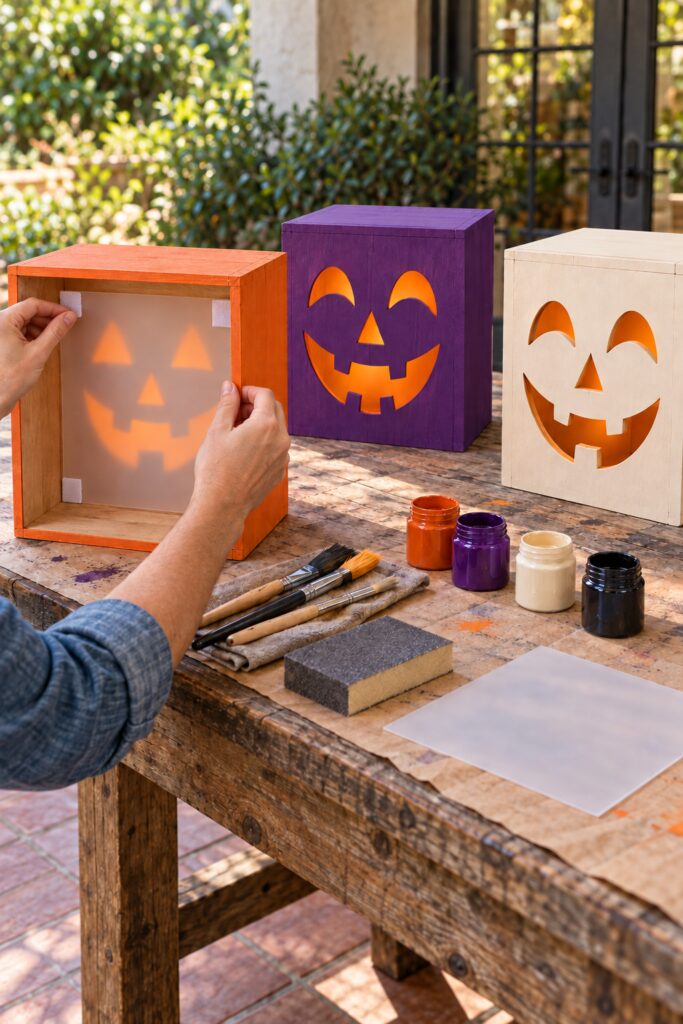
Step 8: Install the LED Lights
Center one battery-operated warm-white puck light on the interior surface opposite the front panel. Place it several inches behind the diffuser so the light can spread. Use a removable mounting method approved for the light, and orient the battery cover so it remains accessible from the open back.
Test the light in a darkened room before mounting all the pucks. If the face has a bright circular hotspot, move the light farther from the diffuser, add a second layer of frosted material with an air gap, or mount the puck slightly off center so its beam reflects from an interior wall.
Choose LEDs with a timer or remote if the backs will be inconvenient to reach. Use the battery type specified by the manufacturer, inspect the lights before each season, and remove batteries before long-term storage.
Step 9: Stack and Secure the Columns
Set the weighted base on a flat, dry surface and attach the lowest box. Lower the next module so its alignment cleats fit inside the lower box, then install the two removable rear screws. Continue one module at a time, checking the tower with a level as you work.
Finish the top box with a simple black-painted stem block. Attach it from inside the top panel with a screw so it can be removed. Turn on the lights, step back, and rotate or rearrange the colored boxes until the grouping feels balanced.
Tips for Getting the Finished Look
The strongest version combines height, varied expressions, and controlled color. Keep each face large enough to read from the sidewalk. Let orange dominate, then use purple, cream, and black as interruptions rather than dividing the colors equally.
Warm-white light creates the candlelike effect without an actual flame. Frosted diffuser material is worth using because it prevents the puck lights from looking like small white dots. A matte or eggshell painted finish also suits the slightly handcrafted character better than a high gloss.
Leave a little breathing room between separate towers. The display should read as a group, but each silhouette needs to remain visible. If all the columns are the same height, remove one box from one tower and add it to another to create a stepped skyline.
Easy Ways to Customize It
Use muted terracotta, dusty plum, and parchment for a vintage palette, or keep every box orange and vary only the faces for a more traditional look. A single three-box tower can flank a front door, while two matching towers can frame a covered entry.
For an easier version without a jigsaw, paint the faces black on solid box fronts and place warm LED strip lighting around the rear perimeter for a halo effect. It will not glow through the faces, but it keeps the stacked pumpkin idea intact. For a smaller tabletop version, use thin craft plywood and compact battery lights, then reduce the base and height proportionally.
Displaying the Finished Columns
These columns are best on a dry interior floor or a covered porch protected from direct rain and strong wind. Plywood edges, battery lights, hook-and-loop fasteners, and many craft finishes are not automatically weatherproof. If the display will be exposed, choose exterior-rated plywood, paint, clear coat, fasteners, lights, and anchors, and seal every cut edge.
Keep the open backs accessible but turned away from the main viewing angle. Maintain a clear path around doors and steps. At the end of the season, remove the joint screws, lift the boxes apart, take out the batteries, and nest smaller components inside larger boxes if your dimensions allow.
The finished display does not need to copy every face or color from the inspiration image. The recognizable idea comes from the stacked wooden pumpkins, the friendly cutout expressions, and the warm light shared across towers of different heights.