*This post may contain affiliate links for which I earn commissions.*
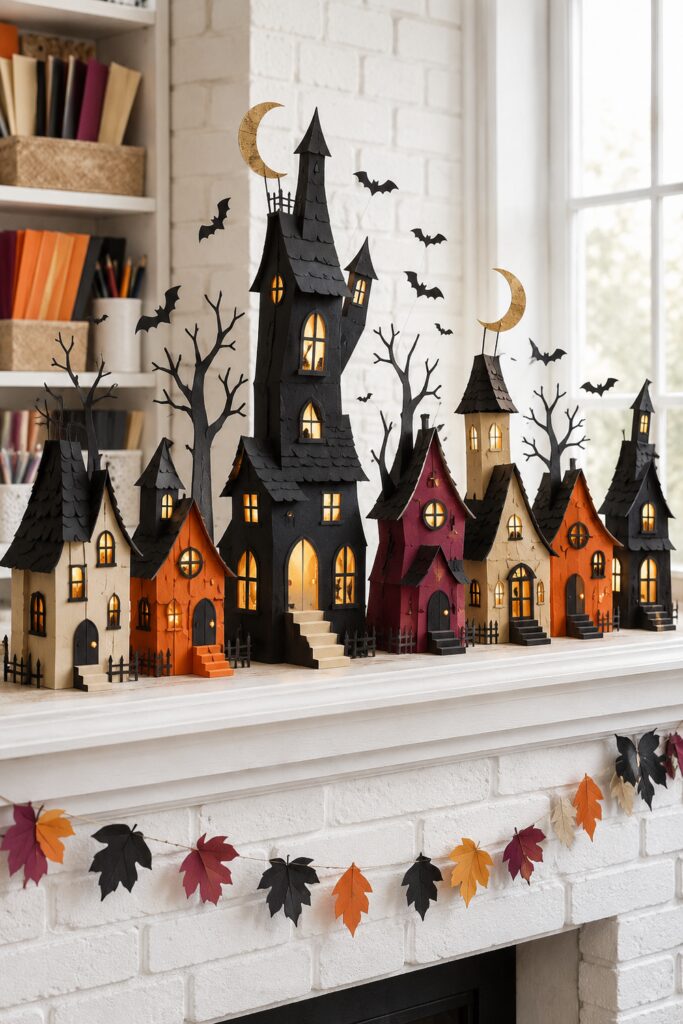
A row of crooked paper houses can turn a plain mantel into a tiny Halloween neighborhood. The inspiration image uses seven buildings in black, cream, pumpkin orange, and dusty berry, with glowing windows, bare trees, crescent moons, and bats creating a surprising amount of depth. The tallest black house anchors the center while the remaining rooftops step down naturally toward both ends.
This tutorial translates that imaginative display into a realistic cardstock project. You will make one reusable house pattern, resize it for several heights, and vary the peaks, roofs, windows, and colors so the finished village feels collected rather than copied. Battery-operated lights create the window glow without placing a flame inside paper structures.
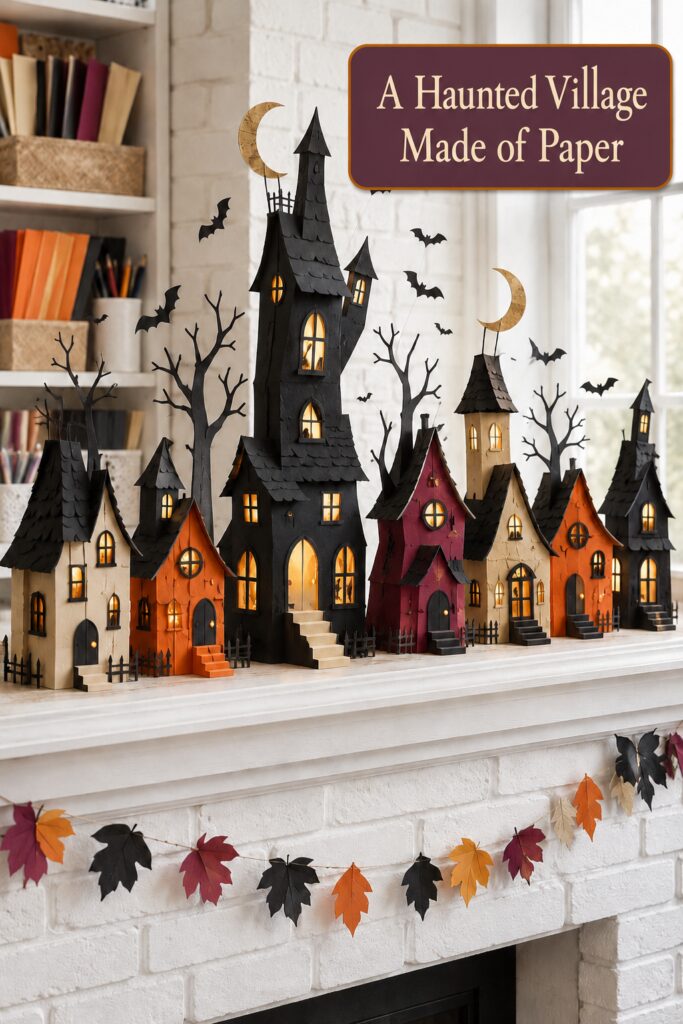
The inspiration and instructional images for this project were created with AI. This tutorial translates the visual idea into a practical project you can recreate at home; the images are illustrative rather than photographs of a completed build.
What you are making
The finished village contains seven freestanding folded-cardstock houses arranged across a wide shelf or mantel. A useful collection includes one tall focal house, two medium houses, and four smaller buildings. Each one is a hollow tabbed shell with translucent paper behind the windows, an open bottom, and a separate folded roof.
The tiny stairs, fences, trees, moons, shingles, and bats are added as lightweight paper details. Several impossibly thin or elaborate features in the inspiration are simplified into folded bases and paper supports so the display remains stable. Make the village for a cool shelf first, then determine whether the intended mantel is a safe display location.
Materials and supplies
Materials
- Heavyweight cardstock in black, cream, pumpkin orange, and dusty berry
- Translucent vellum or tracing paper for the windows
- Strong paper craft adhesive that dries clear
- Scrap cardstock for tabs, window muntins, steps, fences, and bases
- Fine dark craft wire for optional suspended bats
- Warm amber battery-operated LED tea lights, one per illuminated house
- Removable museum wax or another surface-safe temporary anchor
Tools
- Self-healing cutting mat
- Metal ruler with a nonslip back
- Sharp precision craft knife
- Fine-tip paper scissors
- Bone folder and scoring board or scoring stylus
- Pencil, eraser, and plain pattern paper
- Fine-tip glue applicator, small clips, and tweezers
- Wire cutters if adding suspended bats
Optional finishing supplies
- Small circle punch for round windows
- Metallic or opaque paint pen for restrained surface details
- Low-profile risers for varying the finished roofline
- Wax paper to protect glued pieces while they dry
Before you start
Measure the usable shelf or mantel depth and length. Leave room around the houses so their roofs and trees do not project beyond the edge. Plan the village on a strip of paper, placing the tallest structure slightly off-center or at center and reducing the heights toward both ends.
A practical small house might begin around 3 to 4 inches wide and 6 to 8 inches tall. The focal house can be roughly twice as tall, provided the cardstock stays rigid. These are suggested proportions, not fixed dimensions. Wider wall panels and internal braces will help a tall building stand straighter than an extremely narrow tower.
Check the fireplace manual and required clearances before placing paper decor on a mantel. Remove the entire village before operating a fireplace unless its manufacturer specifically permits combustible decorations at that location and all required clearances and temperature limits are met. Never use real candles, plug-in bulbs that become warm, or an exposed flame inside or near the houses.
Step-by-step tutorial
1. Draw a repeatable house pattern
On plain paper, draw four connected wall panels in a row: front, side, back, and side. Add a narrow glue tab along the final edge and small tabs at the bottom. Give the front and back peaked tops that match the roof angle. Keep the back simpler if it will face the wall.
Add windows and a door, leaving enough cardstock between openings to keep the walls strong. An arched window can be made from a rectangle topped with a half circle. Draw simple crossbars as separate strips rather than trying to cut very thin bars from the wall itself.
Copy the pattern at three sizes. Change a roof angle, add a side tower, or shift the windows on each version so the seven houses do not look identical.
2. Cut and score the house shells
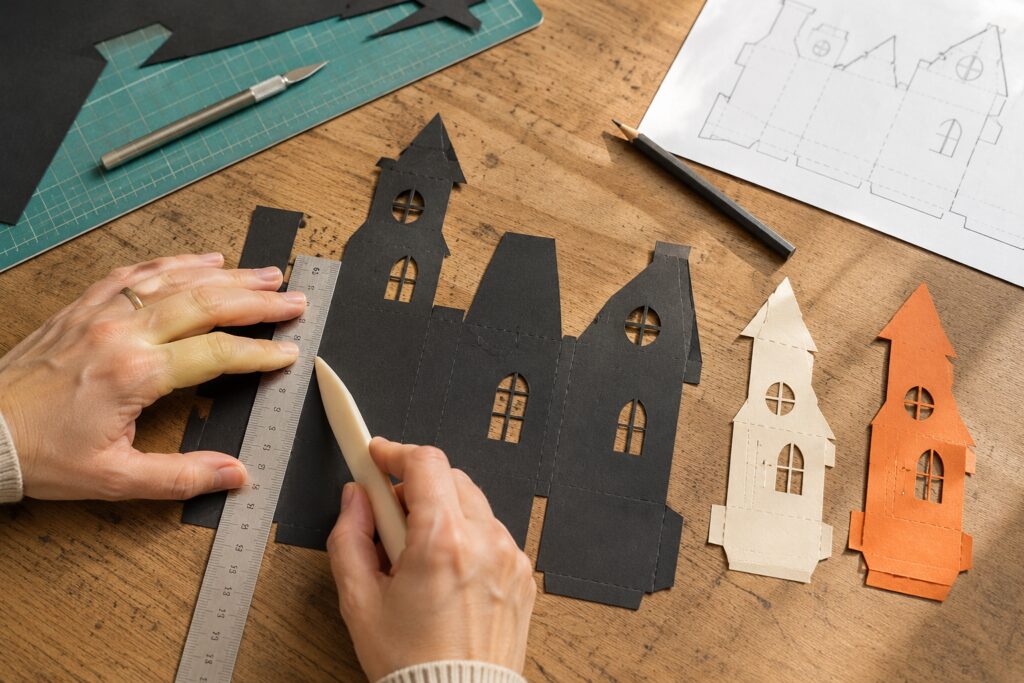
Trace the first pattern onto heavyweight cardstock. Cut the outside shape with a ruler and craft knife, then cut the window and door openings. Work slowly from the smallest openings to the outside edges so the sheet stays easy to handle.
Score every wall division, bottom tab, and glue tab without cutting through the paper. Test the folds before applying adhesive. Heavy cardstock should fold cleanly along the compressed line without cracking or bowing.
3. Back the windows with vellum
Turn the template face down. Cut translucent paper patches slightly larger than the windows and glue them over the openings from the inside. Use a thin adhesive line around each opening so glue does not show through the lit window.
Add narrow cardstock strips over the vellum to form simple window crossbars. Keep them sturdy enough to handle. Let every window dry flat under wax paper before folding the shell.
4. Fold and glue each building
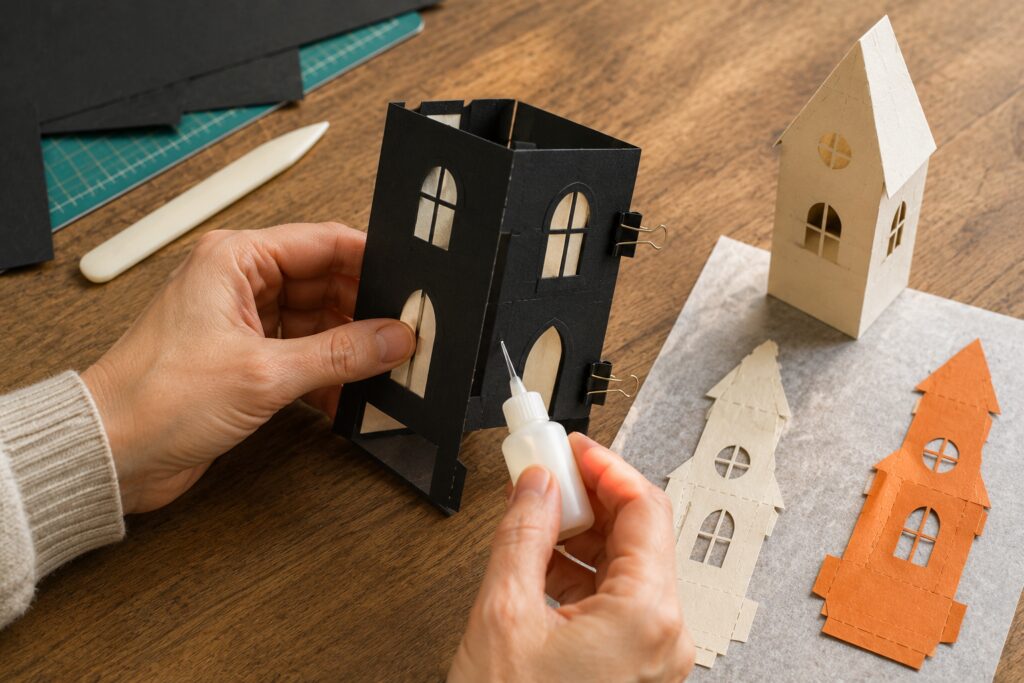
Pre-fold all scored lines with the bone folder. Bring the wall panels together, apply a thin line of adhesive to the side tab, and clip the seam until it holds. Check that the shell is square before the glue sets.
Fold the bottom tabs inward but do not cover the bottom permanently. The opening allows a battery light to slide underneath and makes it easier to switch the light on and off. If the walls spread, glue a narrow cardstock cross-brace between the two side walls above the opening.
5. Build the separate roofs
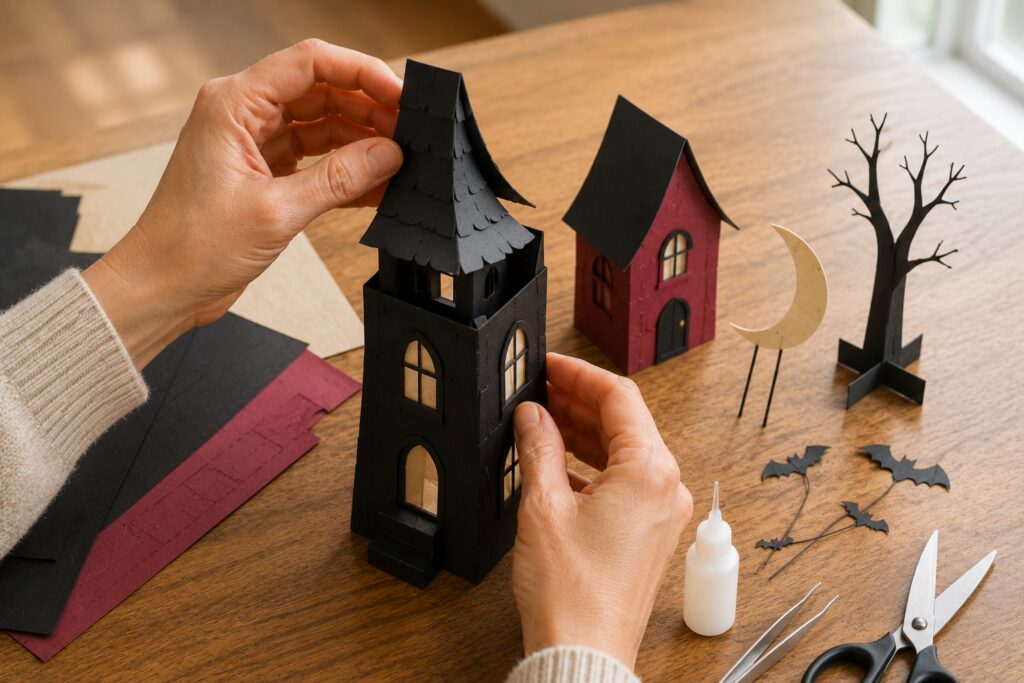
Cut a rectangle of cardstock long enough to overhang the front and back walls slightly. Score it along the ridge, fold it, and test it over the peaked shell. For a crooked look, make one roof edge longer or curve the lower edge gently, but keep the ridge centered enough that the roof stays balanced.
For the layered texture in the inspiration, cut narrow strips of black cardstock and snip shallow rounded shingle shapes along one edge. Glue the strips to the roof from bottom to top, overlapping each row. Trim the sides only after the glue dries.
Tall towers can use folded cone-like or narrow peaked roofs. Keep these hollow and lightweight. Attach each roof to the house with small interior tabs or leave it removable for easier access to the light.
6. Add doors, steps, and fences
Layer a second cardstock door over the front opening or draw a small knob with an opaque pen. Make steps by accordion-folding a narrow strip, then glue the upper fold to the house and the lower fold to a flat base.
Cut fences as short repeating pickets connected by two horizontal rails. Mount them to an L-folded base so they stand independently. Avoid attaching wide fences permanently to the houses because separate pieces are easier to arrange and store.
7. Make trees, moons, and bats
Cut bare trees from doubled black cardstock, keeping the branches wider than they appear in the inspiration. Slot two matching base pieces together at right angles to create a stable cross-shaped foot. A tree can also be glued to a folded triangular easel hidden behind its trunk.
Cut crescent moons from cream or muted gold paper and attach them to two narrow cardstock supports. Fix the supports to a broad folded base or tuck them behind a roof. For bats, fold small black silhouettes slightly at the body. Display them on fine dark wire anchored inside a paper base or behind a building. Bend the wire ends inward and keep them away from children and pets.
8. Create the seven-house rhythm
Place the tallest black house first. Add a medium cream or berry building on either side, then position the smaller orange, cream, and black houses toward the ends. Avoid perfect mirror symmetry. Similar overall height changes will give the village balance, while varied rooflines keep it lively.
Set trees in the gaps instead of directly in front of windows. Place one moon high near the focal roof and another farther across the village. Use bats sparingly in open areas where their silhouettes can be seen.
View the arrangement from across the room. If one side feels heavy, move a dark house or tall tree rather than adding more pieces.
9. Add safe window light
Switch on a cool-touch battery-operated amber LED tea light and slide it beneath an open-bottom house. Confirm that the light does not contact the vellum, wire, or walls and that the switch remains accessible. Use only the type and battery specified by the light maker.
Place a small removable wax dot under each house base if the product is suitable for the mantel finish. Test it first in an inconspicuous spot. Turn off the lights when the display is unattended, follow battery safety directions, and keep button batteries secured away from children and pets.
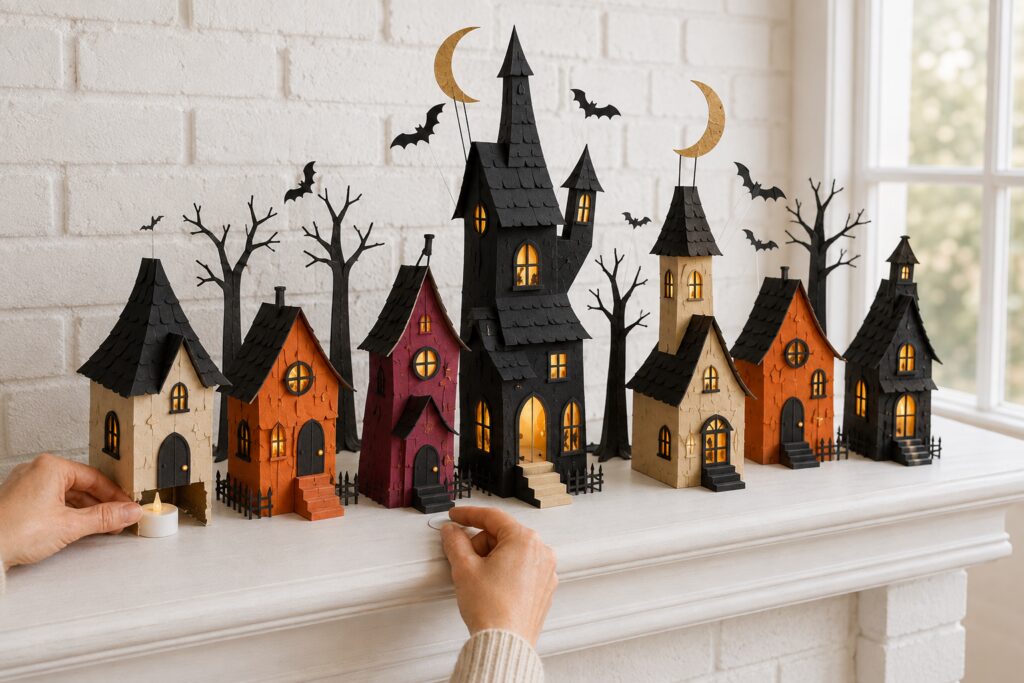
[STEP IMAGE 4: Place after this paragraph. Show seven houses being arranged across a white mantel with the tallest house centered, an LED tea light sliding beneath an open-bottom house, and a removable anchor being placed under another house.]
Tips for getting the finished look
- Repeat black across the display. Black roofs, trees, fences, and bats tie the cream, orange, and berry houses together.
- Change scale more than color. The dramatic central tower creates the impact. A row of seven similarly sized houses will feel flatter.
- Use warm translucent windows. Cream vellum softens the amber LEDs and prevents the openings from looking harsh.
- Layer selectively. Shingle the most prominent roofs and leave a few secondary roofs simpler so the focal building keeps its visual weight.
- Preserve negative space. Gaps between roofs help the crooked silhouettes, moons, and bats remain readable.
Easy ways to customize it
- Use ivory, charcoal, and muted gold for a quieter vintage village.
- Replace dusty berry with plum, teal, or moss green while keeping the black roofs consistent.
- Make three larger houses for a narrow shelf instead of seven small ones.
- Add paper cats in doorways or tiny pumpkins beside the steps.
- Display the houses on a long console or bookcase when the mantel is too warm or shallow.
Practical note
The inspiration includes extremely narrow towers, delicate branches, and suspended elements that would be fragile in ordinary cardstock. This version widens the structural pieces, gives every tall accessory a folded base, and keeps the light removable. Those changes preserve the enchanted silhouette while making the village easier to assemble, store, and use safely.