*This post may contain affiliate links for which I earn commissions.*
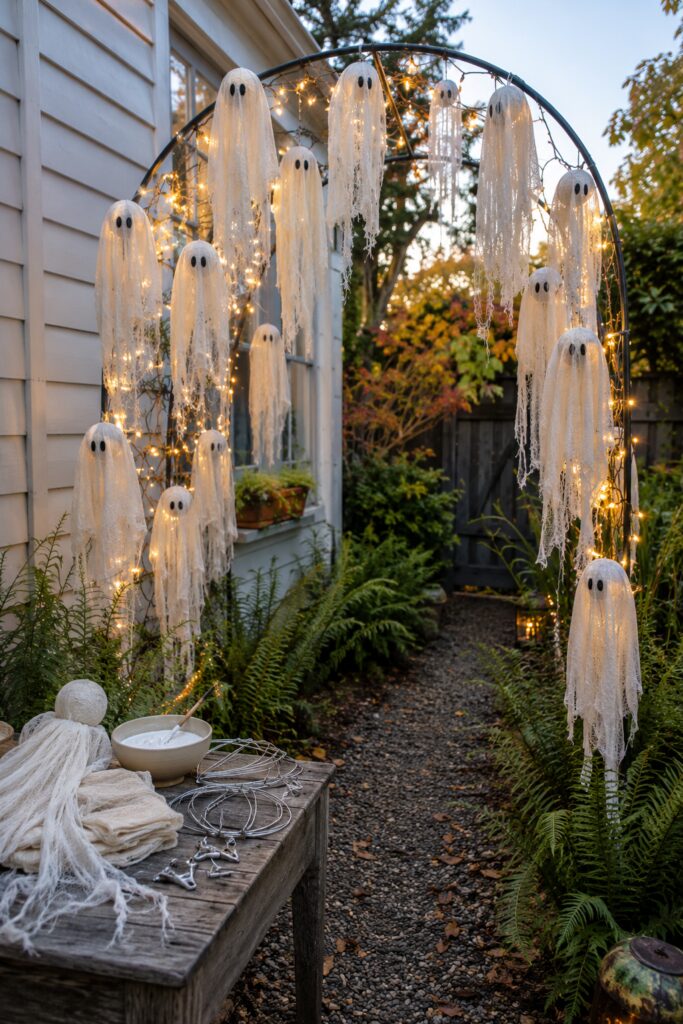
A simple metal garden arch becomes a gathering place for floating ghosts in this enchanting outdoor Halloween display. Handmade cheesecloth figures hang at different heights while warm white lights wind around the frame, making the entire arch glow as evening approaches.
The ghosts are sweetly spooky rather than frightening. Their tattered fabric, simple oval eyes, and varied sizes give each one a little personality. Together, they transform an ordinary garden path into a magical Halloween passageway.
This project can be adapted for an existing arbor, a freestanding metal arch, or a smaller frame positioned near a porch or walkway.
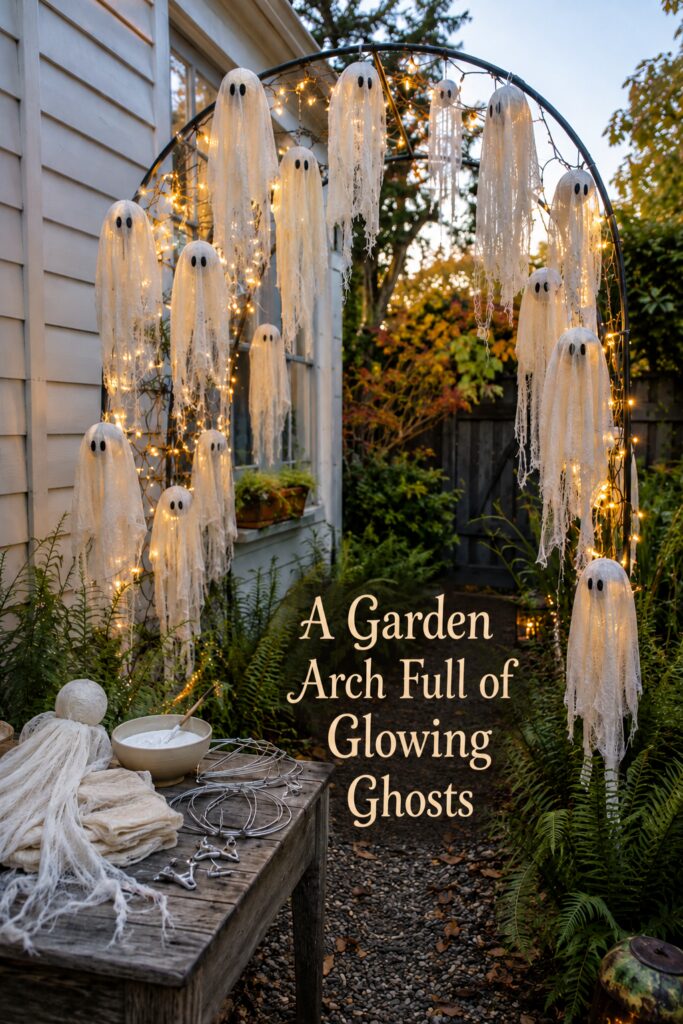
This inspiration image was created with AI. It is intended to help you imagine a similar project using a secured garden arch, cheesecloth, lightweight forms, outdoor lights, and hanging supplies.
What Makes This Ghost Arch So Memorable
The number of ghosts gives the installation its first layer of impact. Instead of hanging two or three matching figures, the arch holds an entire community of them.
Their arrangement feels spontaneous, but there is a clear structure behind it. The largest ghosts occupy the upper curve and outer sides of the arch. Smaller figures fill the gaps, creating depth without blocking the path.
The glowing frame provides the second layer. Warm lights outline the arch, shine through portions of the fabric, and visually connect all the separate ghosts.
White gauze looks soft and delicate against the dark metal. The surrounding greenery makes the pale figures stand out while keeping the display connected to the garden setting.
Start With a Stable Garden Arch
A black metal arbor provides the framework for the project. A simple curved silhouette works especially well because it resembles a doorway and gives the ghosts plenty of places to hang.
Measure the walkway before choosing a frame. The opening should remain wide enough for people to pass through without brushing against the fabric or lights.
The arch must also be anchored securely. Lightweight arbors can shift in wind after decorations are attached, particularly when hanging fabric acts like a sail. Use the anchoring method recommended by the manufacturer and add appropriate ground stakes when necessary.
If the arch will stand on a hard surface, use a base or attachment method designed for that location. Avoid improvising with unstable weights near a walking path.
Make the Ghosts From Lightweight Forms
Each ghost begins with a round form that creates the head. Foam balls, small balloons, wire shapes, or other lightweight craft forms can provide the basic silhouette.
Use more than one size. Larger forms will anchor the upper part of the display, while smaller ones can fill narrow spaces around the sides.
Drape cheesecloth over each form and let it fall naturally. Two overlapping layers can give the ghost more substance while preserving the loose, airy texture.
If you want the figures to retain a shaped silhouette, apply fabric stiffener and allow them to dry over temporary forms. Follow the product directions and protect the work surface before beginning.
Some ghosts can remain softer and less structured. Combining shaped figures with looser hanging fabric will make the collection feel more animated.
Give Every Ghost Ragged, Uneven Edges
The irregular hems are one of the most important details. Perfectly straight fabric would make the ghosts appear more like little curtains.
Cut or gently pull the bottom of the cheesecloth into uneven lengths. Create narrow trailing sections, wispy strands, and a few larger pieces that hang lower than the rest.
Vary the fabric length from ghost to ghost. The larger figures near the top can have longer bodies, while the small ones along the sides should remain compact enough to avoid plants and the walking path.
Avoid making the fabric too shredded. Leaving some wider sections intact allows the lights to illuminate the cloth and keeps the face connected to the body.
Add Simple Black Oval Eyes
The ghosts have only two small black eyes. This restrained expression makes them charming and recognizable without introducing cartoonish smiles or scary faces.
Cut oval eyes from black felt or another lightweight material. Slight variations in size and spacing can give the ghosts individual expressions.
Attach the eyes after the fabric has dried and the final front of each ghost has been determined. Positioning them too early can leave the faces turned toward the arch rather than toward the viewer.
If the ghosts will remain outdoors, choose an adhesive suitable for the fabric and expected weather conditions.
Wrap the Frame With Warm White Lights
The lighting should define the arch without overpowering the handmade figures. Warm white micro lights create the gentle golden effect visible in the inspiration image.
Begin at the bottom of one side and wind the strand around the frame. Continue over the curve and down the opposite side. If enough length remains, weave a few sections through the upper center to place light behind the ghosts.
Use lights rated for outdoor use, and follow all manufacturer instructions. Keep plugs and connections protected from moisture and use an appropriate outdoor electrical source.
Battery-operated lights may be more convenient for an arch located away from an outlet. Plug-in strands can be practical for a longer display if the electrical setup is suitable and safely protected.
Arrange the Ghosts at Different Heights
Install the largest ghosts first. Position them along the upper curve and outer sides, but keep the center opening clear.
Add medium figures beneath and between them. Finish with the smallest ghosts in remaining gaps.
Use clear hanging line to make the support less noticeable. Keep each loop short enough to prevent excessive swinging while still allowing a little natural motion.
Face the ghosts in slightly different directions. Most should look toward the main viewing area, but a few can turn toward the path as if watching visitors walk beneath them.
Step back after attaching every few ghosts. It is easier to correct the balance before the arch becomes crowded.
Preserve a Safe, Walkable Opening
The finished display should frame the path rather than obstruct it. Keep dangling fabric away from visitors’ faces and make sure no wires cross the walking surface.
Low-hanging ghosts can decorate the outside edges of the arch. Position them over planted areas instead of the center of the pathway.
Inspect the hanging lines, lights, anchors, and fabric regularly. Wind and weather can loosen outdoor decorations over time.
Fabric stiffener does not automatically make cheesecloth weatherproof. Bring delicate ghosts inside during heavy rain or make replacement figures if the display will remain outdoors for an extended period.
Create the Look With Fewer Ghosts
The image contains an unusually large collection, but the idea can work with a smaller group.
Five to seven ghosts may be enough for a compact arch. Place one large figure near the top, two medium ghosts on each side, and several smaller ones in the remaining spaces.
You could also decorate only one side of the arch and allow the lights to continue across the empty curve. An asymmetrical design can feel intentional while requiring fewer supplies.
The important qualities to preserve are the mixture of sizes, varied hanging heights, tattered fabric, and warm illumination.
Key Pieces for the Project
The main supplies needed to recreate the effect are:
- A stable black metal garden arch
- White cheesecloth or gauze in a long roll
- Lightweight round forms in several sizes
- Clear-drying fabric stiffener
- Warm white outdoor fairy lights
- Clear hanging line
- Black felt for the eyes
- Suitable ground anchors and outdoor fasteners
The exact quantities will depend on the size of the arbor and the number of ghosts you plan to make.
How to Assemble the Display
Secure the arch before adding any decorations. Wrap it with lights and test them so you know the entire strand is working.
Create the ghosts separately and allow any stiffener or adhesive to dry completely. Add the black eyes after deciding which side will face forward.
Hang the largest figures first, followed by medium and small ones. Adjust their heights until the arrangement feels full without blocking the passage.
Turn on the lights at dusk and inspect the display from both ends of the walkway. Small changes in angle or height can make the ghosts easier to see and give the arch a more finished appearance.
Shop a Black Metal Garden Arch
Look for a weather-resistant steel or iron arbor with a simple rounded top, adequate pathway clearance, and a reliable anchoring system.
Find Cheesecloth for Handmade Ghosts
A long roll allows you to cut different lengths for large and small figures. Choose white cloth with an open weave that can be shaped, frayed, and illuminated.
Add Lightweight Forms for the Ghost Heads
Round foam forms are reusable and easy to hang. Use at least two sizes so the finished collection has more variety.
Shape the Ghosts With Fabric Stiffener
A clear-drying draping liquid can help create softly structured figures. Use a lighter application if you want the fabric to retain some movement.
Wrap the Arch in Warm Outdoor Lights
Select a long strand of warm white micro lights with an outdoor rating. Measure the arbor before deciding how many feet of lights you need.
Hang the Ghosts With Clear Line
Transparent monofilament helps the figures appear to float. Select a strength suitable for the weight of each completed ghost.
Final Styling Tip
Do not hang every ghost at the same height or angle. A mixture of sizes and positions will make the little figures feel as though they have gathered naturally around the glowing arch.