*This post may contain affiliate links for which I earn commissions.*
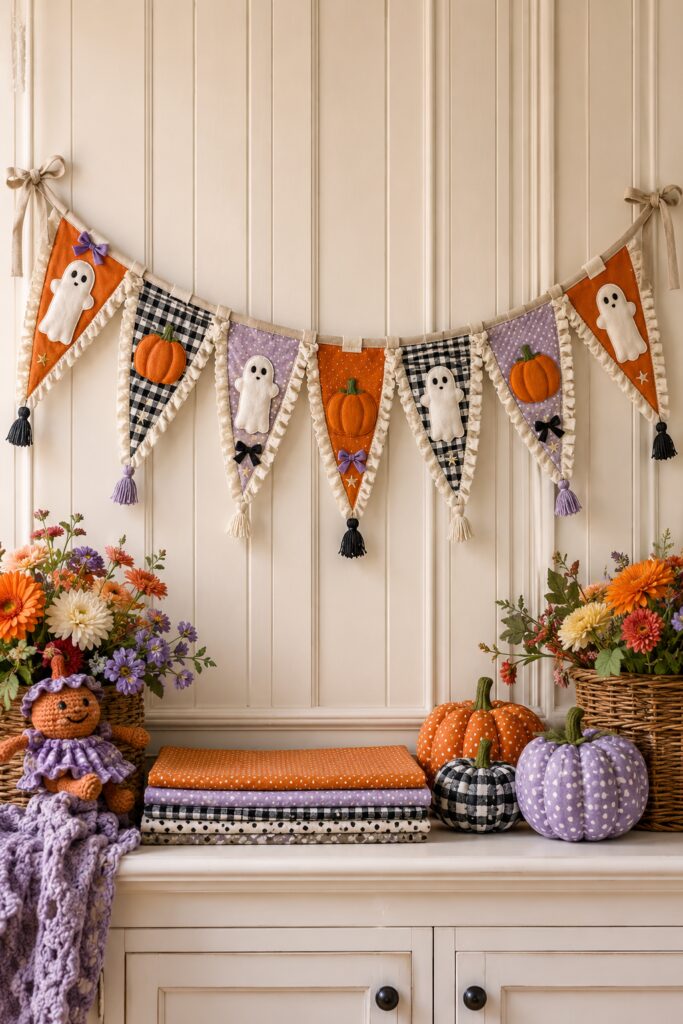
This fabric Halloween garland combines softly ruffled pennants with friendly felt ghosts, dimensional pumpkins, tiny bows, and dangling yarn tassels. Burnt orange, lavender, cream, and black gingham give it a playful vintage character without making it frightening or overly childish.
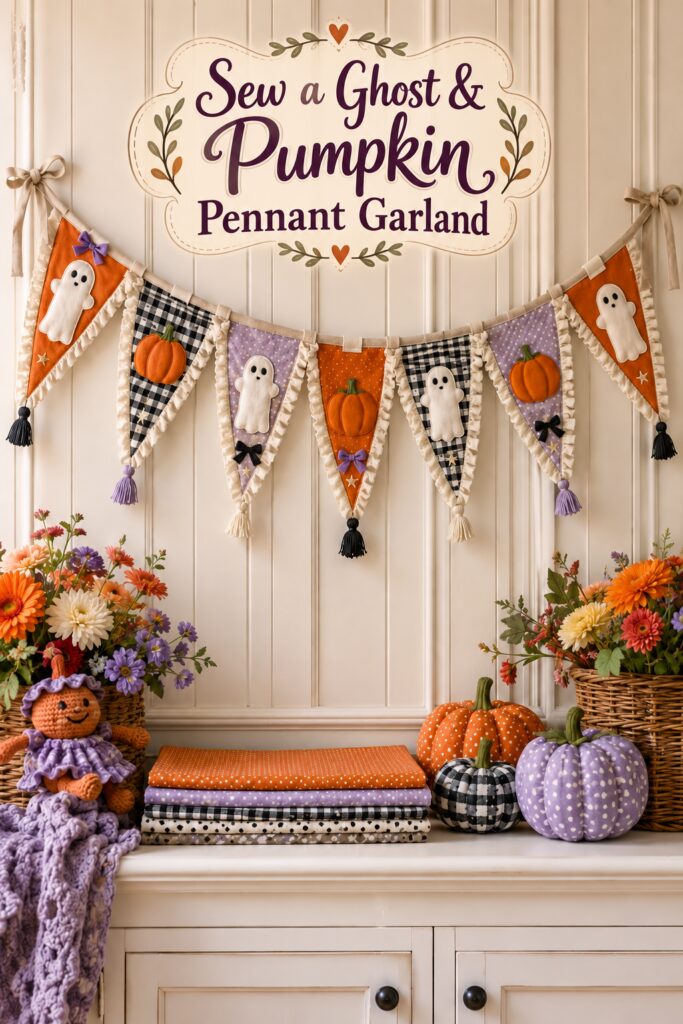
The inspiration image for this project and the instructional demonstration images were created with AI. This tutorial translates the visual idea into a practical sewing project you can recreate at home.
What You’re Making
This tutorial creates a garland of seven long fabric pennants attached to sturdy cotton tape. The flags alternate among orange, lavender, and black-and-cream gingham, with cream ruffles running along their angled edges.
Felt ghosts and pumpkins become the focal points, while small bows, stars, and yarn tassels add the handcrafted detail seen in the inspiration image. The appliqués and ruffles have been simplified into shapes and techniques that are manageable with an ordinary sewing machine or basic hand-sewing skills.
A finished garland with seven pennants will usually span approximately 4 to 5 feet, depending on the width of the flags and the spacing between them.
Materials and Supplies
Quantities can be adjusted if you want a shorter or longer garland.
Fabrics and Trims
- Burnt-orange cotton fabric
- Lavender cotton fabric with a small dot or subtle print
- Black-and-cream gingham cotton fabric
- Cream cotton fabric for the pennant backs
- Lightweight cream cotton fabric or premade cotton ruffle trim
- Natural cotton twill tape, approximately 3/4 to 1 inch wide
- Cream, white, orange, black, and green (this craft felt kit may be all you need)
- Narrow black velvet ribbon
- Narrow purple velvet ribbon
- Black yarn, cream yarn, and lavender yarn for tassels (I’ve linked to Red Heart yarn because it’s one of the cheapest but if you’re a crafter, check your own stash first and don’t be afraid to do the tassels in all one color to save money)
- Coordinating all-purpose sewing thread
- Cream embroidery floss or strong hand-sewing thread
Tools
- Sewing machine
- Fabric scissors or rotary cutter and cutting mat
- Paper or lightweight cardboard for templates
- Ruler
- Fabric marker or pencil (remember to wash fabric after marking)
- Straight pins or sewing clips
- Hand-sewing needle
- Iron and ironing surface
- Point-turning tool or blunt knitting needle
Optional Supplies
- Fabric-safe craft glue
- Fusible web for stabilizing appliqués
- Lightweight batting or felt scraps for padded pumpkins
- Tassel-making tool
- Fray-preventing liquid
- Small safety pin or loop turner
Want to Make This Pennant?
I’ve put together a convenient Amazon supply list featuring hand-picked, well-rated products that match the materials list for this project.
See My Hand-Picked Supply ListAs an Amazon Associate I earn from qualifying purchases but this doesn’t increase your price at all!
Before You Begin
Choose the wall, mantel, shelf, or cabinet where you intend to display the garland. Measure the available width before deciding how many pennants to make.
For a medium garland, a useful starting point is a triangular template approximately 6 to 7 inches wide across the top and 10 to 12 inches long. These are suggested dimensions, so adjust them to fit your display space.
Add a seam allowance around the two angled sides and leave enough fabric at the top to create a neat finished edge. Cut one patterned front and one cream backing for each pennant.
Before cutting all your fabric, make one paper triangle and hold it against the intended display area. Several long, narrow pennants usually create a more graceful drape than a few short, wide ones.
Press all fabric before cutting. If you plan to use fusible web behind the felt pieces, follow its heat and ventilation instructions.
Step-by-Step Tutorial
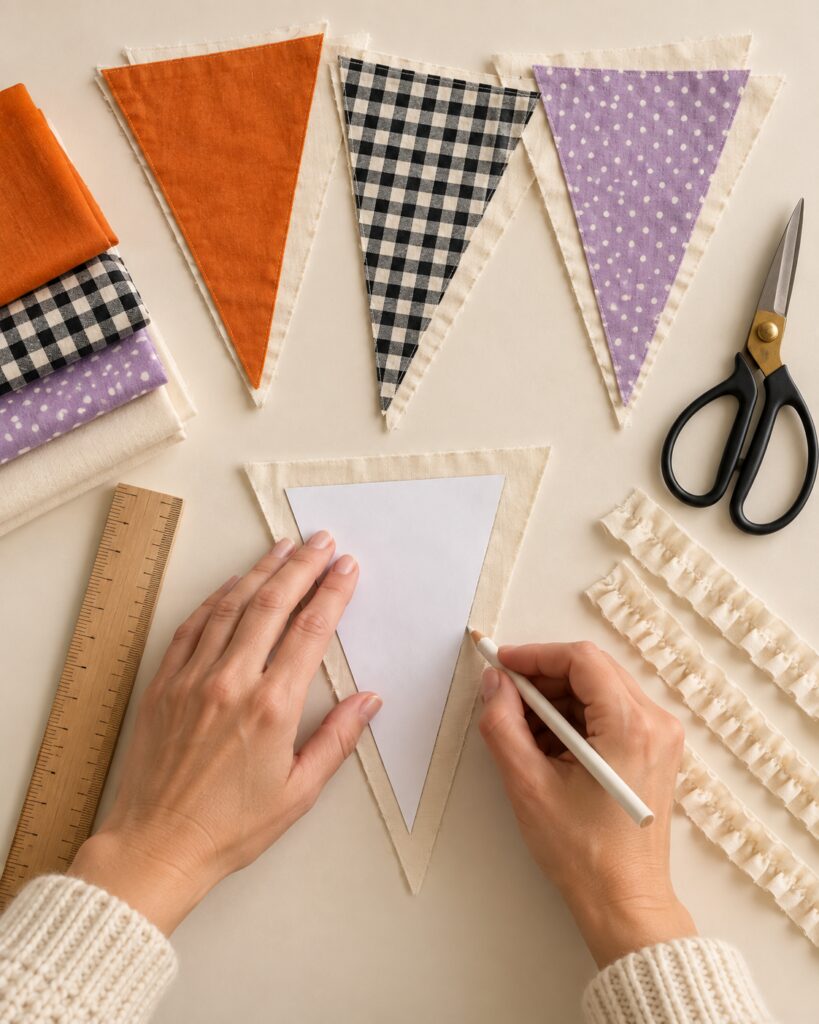
1. Make the Pennant Template
Draw a horizontal line for the top of the pennant. Mark its center, then measure downward to establish the point. Connect both top corners to the lower point with a ruler.
Cut out the paper template and fold it vertically to check that both angled sides match. Correct any unevenness before transferring the shape to fabric.
Use the template to cut seven patterned fronts, alternating your orange, gingham, and lavender fabrics. Cut seven matching cream backing pieces.
2. Prepare the Cream Ruffles
For handmade ruffles, cut cream fabric into narrow bias or straight-grain strips. Join shorter pieces if necessary, then finish one long edge with a narrow hem or zigzag stitch.
Sew two rows of long gathering stitches near the unfinished edge. Leave long thread tails instead of backstitching. Pull the bobbin threads gently to gather each strip.
Make enough ruffle to cover both angled sides of every pennant. A ruffle strip generally needs to be about one-and-a-half to two times the length of the edge it will cover.
Premade gathered cotton trim can replace this step and reduce the sewing time considerably.
3. Add Ruffles to the Pennant Edges
Place a patterned triangle right side up. Position the gathered edge of the ruffle along one angled side, with the decorative portion pointing toward the center of the pennant.
Distribute the gathers evenly and pin or clip them in place. Repeat on the other angled side. Keep the ruffle away from the top edge so it will not interfere with the hanging loops.
Baste the trim to the pennant within the final seam allowance. Pay particular attention to the lower point, where the two ruffles meet. Trim excess bulk there rather than stacking several thick layers.
Place the cream backing over the decorated front with right sides together. Stitch along both angled sides, enclosing the ruffles between the layers. Leave the top open.
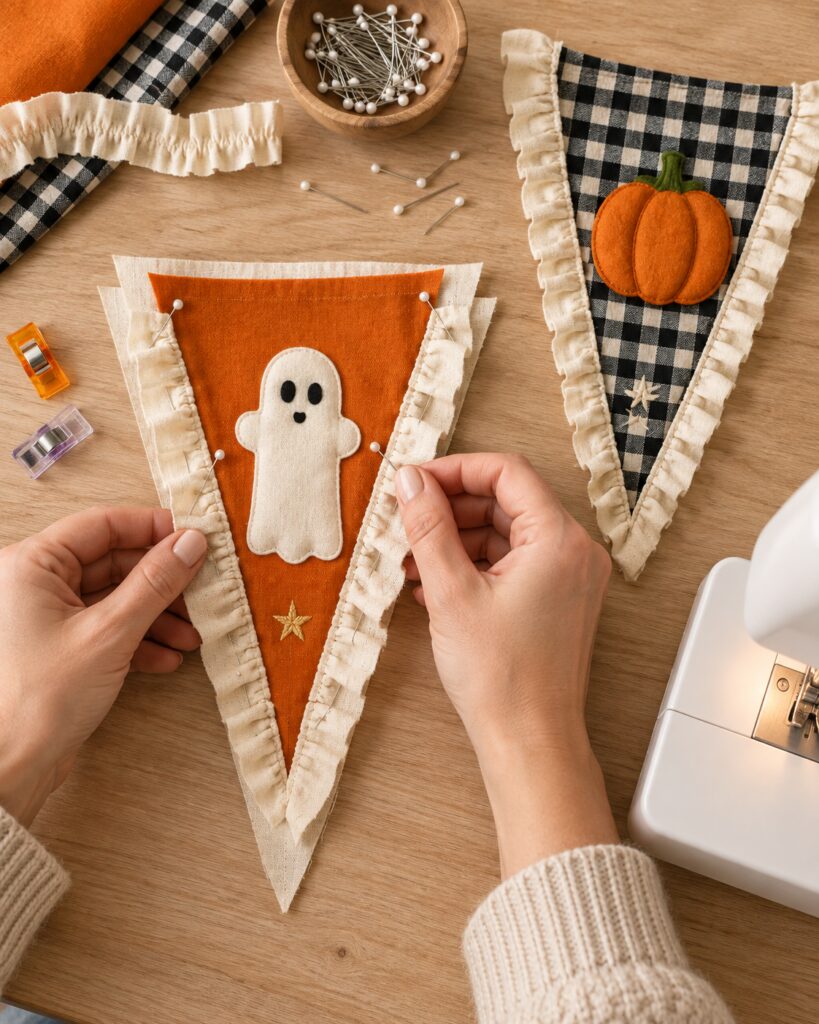
Clip the seam allowance near the lower point without cutting through the stitching. Turn the pennant right side out and gently shape the point with a blunt tool.
Press from the back using a heat setting appropriate for the fabric. Topstitch close to the angled edges if you want the pieces to lie especially flat.
4. Finish the Top of Each Flag
Fold the raw top edges toward the inside and press. A narrow double fold gives the top a neat finish, but a single fold can work if the edge will be enclosed beneath a fabric strip.
Cut short lengths of twill tape or sturdy cream fabric for hanging loops. Fold each one in half and position it at the top center of a pennant, with the loop extending above the edge.
Stitch across the top of the flag several times to close the opening and secure the loop. Confirm that each loop is large enough to slide over the main hanging tape before sewing all seven.
5. Cut the Ghost Appliqués
Draw a simple ghost template with a rounded head, small arms, straight sides, and a softly scalloped bottom. Keep the shape uncomplicated so it remains easy to cut and stitch.
Cut the ghost bodies from white felt. Cut two small oval eyes and a tiny oval mouth from black felt for each one.
Arrange the facial pieces before attaching them. Tiny changes in their spacing can make the expression look surprised, shy, or curious. Secure them with small hand stitches or a modest amount of fabric-safe glue.
Position each ghost on its pennant, leaving room for a bow, star, or other small accent. Glue-baste it in place if desired, then sew around the outer edge with cream thread or embroidery floss.
6. Build the Layered Felt Pumpkins
Cut three overlapping oval shapes from orange felt for each pumpkin. Make the center oval slightly narrower or taller than the side pieces.
For a dimensional effect, place a small piece of thin batting or an extra felt layer beneath the center oval. Do not overfill it, since the garland should remain light enough to hang without sagging.
Arrange the side lobes first, then place the center section over them. Add a short green felt stem behind the top edge. Sew around the pieces using matching thread or contrasting running stitches.
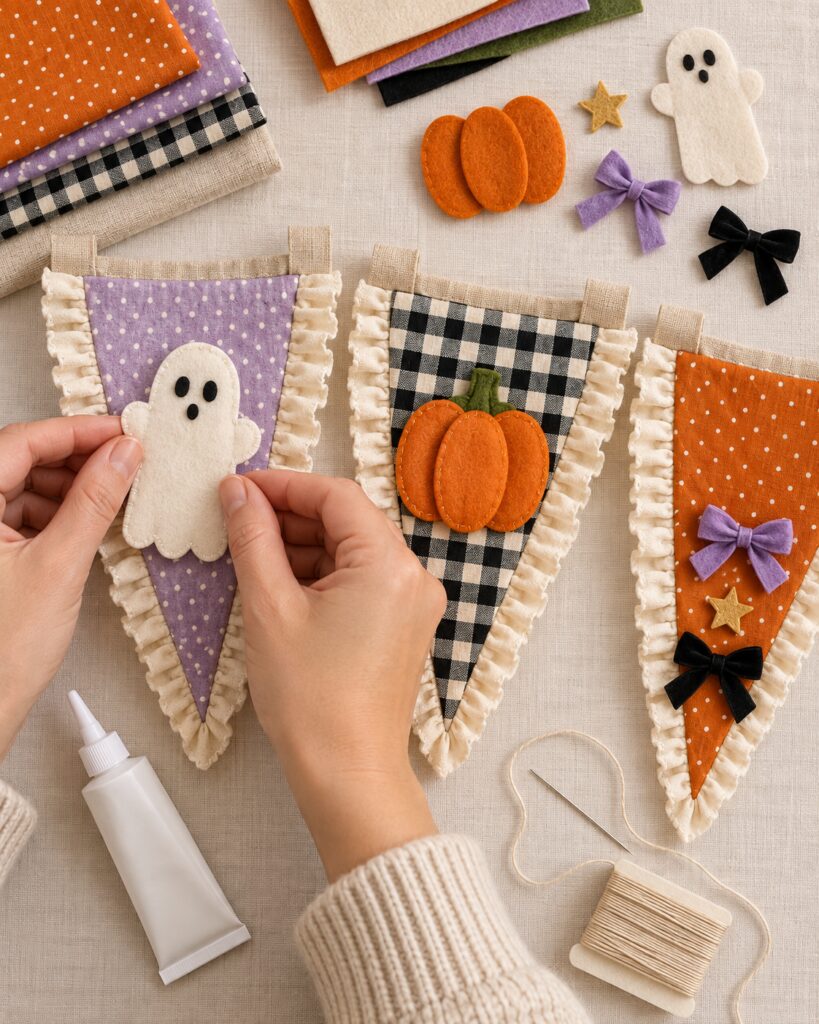
Attach the completed pumpkin to a gingham, lavender, or orange pennant. Alternating pumpkins and ghosts will make the finished garland feel balanced without looking rigid.
7. Add Bows and Small Accents
Tie small bows from narrow black and purple ribbon. Tack each bow through its center so it cannot loosen.
Use the bows sparingly. Placing one above a ghost and another near the lower portion of a pumpkin flag will create variety while keeping the decorations from becoming crowded.
Cut small stars from cream felt. Attach one or two to selected flags with tiny hand stitches. Avoid using the same arrangement on every pennant. The slight differences help the finished piece feel handmade.
8. Make the Yarn Tassels
Wrap yarn around a small piece of cardboard or a tassel-making tool until the tassel looks full. Slide a separate length of yarn beneath the wraps and tie it securely at the top.
Remove the wrapped yarn from the form. Tie another strand around the bundle a short distance below the top, then cut through the loops at the bottom.
Trim the yarn ends evenly. Make tassels in black, cream, and lavender, then arrange them beneath the flags before attaching them. This lets you adjust the color sequence.
Hand-stitch one tassel securely to the point of each pennant. Sew through the tassel’s top knot rather than catching only a few loose yarn strands.
9. Assemble the Garland
Cut the main twill tape long enough to hold all seven pennants, plus generous tails at both ends. Slide the pennant loops onto the tape and arrange the flags in your preferred order.
Begin with approximately 1 to 2 inches between neighboring flags. Spread the garland on a table, then lift it from both ends to see how the spacing changes when it curves.
When the arrangement looks balanced, pin each loop to the tape. Stitch through the loop and tape by hand or machine so the pennants cannot slide together during hanging.
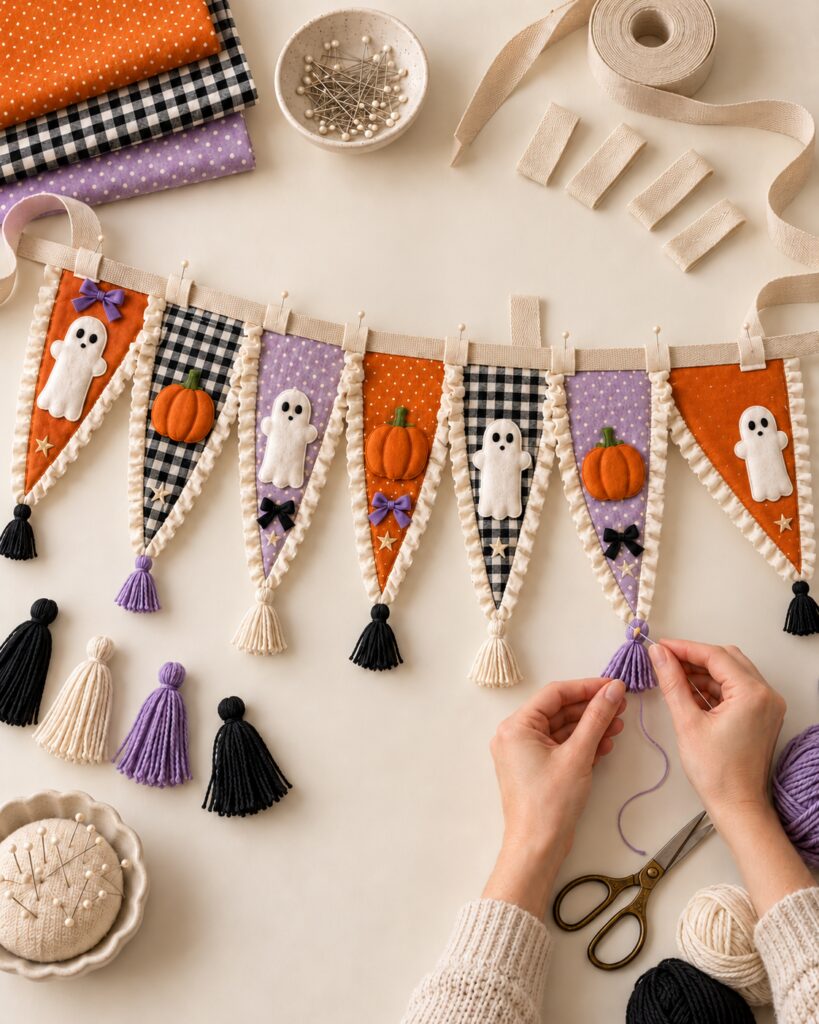
Fold and stitch the cut ends of the tape to prevent fraying. You can leave the tails plain, form a hanging loop at each end, or tie them into soft bows like those in the inspiration image.
Tips for Capturing the Handmade Look
Keep the fabric palette balanced. Orange should provide warmth, gingham should add graphic contrast, and lavender should soften the familiar Halloween combination.
Use cream rather than stark white for the ghosts, backing fabric, and ruffles. This small choice gives the project a gentler, slightly vintage quality.
Make the appliqués large enough to remain recognizable from across the room. Tiny ghosts and pumpkins may disappear against patterned fabric.
Distribute the dimensional details across the full garland. If every bow, star, and tassel is concentrated near the center, the outer flags may look unfinished.
A lightly irregular ruffle suits this project. Aim for even fullness without trying to make every gather identical.
Easy Ways to Customize It
For a shorter garland, make three or five pennants and use one above a doorway, shelf, or Halloween beverage station.
A no-machine adaptation can be made with felt pennant bases, premade ruffle trim, fabric glue, and reinforced hand stitching. Glue alone is less durable, especially for the tassels and hanging loops.
You could replace lavender with muted olive, dusty rose, or deeper plum. Keep the cream ruffles and gingham to preserve the graphic character of the original idea.
For a simpler version, omit the stars and bows while retaining the ghosts, pumpkins, ruffles, and tassels. Those four elements carry most of the design.
Displaying the Finished Garland
Hang the garland from removable wall hooks, small nails, or an existing mantel hook. It can decorate a mantel, buffet, entry cabinet, interior doorway, craft-room shelf, or Halloween party table.
This construction is intended for indoor use. Ordinary cotton, felt, yarn, and interior craft adhesives should not be exposed to rain or prolonged outdoor moisture.
Keep long hanging tails and tassels away from candles, hot light fixtures, cooking surfaces, and frequently opened cabinet doors. If small children or pets may pull on the yarn, hang it beyond their reach.
A Handmade Halloween Accent Worth Keeping
Your garland does not need to duplicate every bow, stitch, or fabric shown in the inspiration image. The alternating patterns, friendly felt characters, soft ruffles, and dangling tassels are what give the design its memorable personality. Preserve those features, then let your own fabric collection shape the final version.