*This post may contain affiliate links for which I earn commissions.*
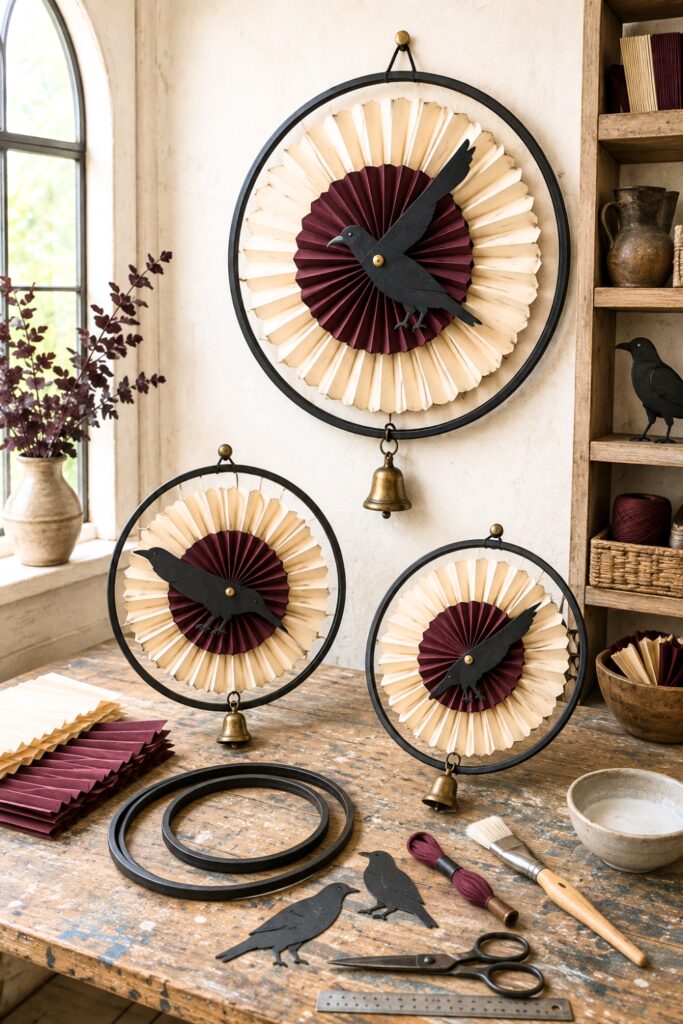
Accordion-folded paper, graphic raven silhouettes, and slender black hoops give these Halloween wreaths the character of antique clock faces. The cream and cranberry layers feel warm and vintage, while small brass bells add just enough movement and shine.
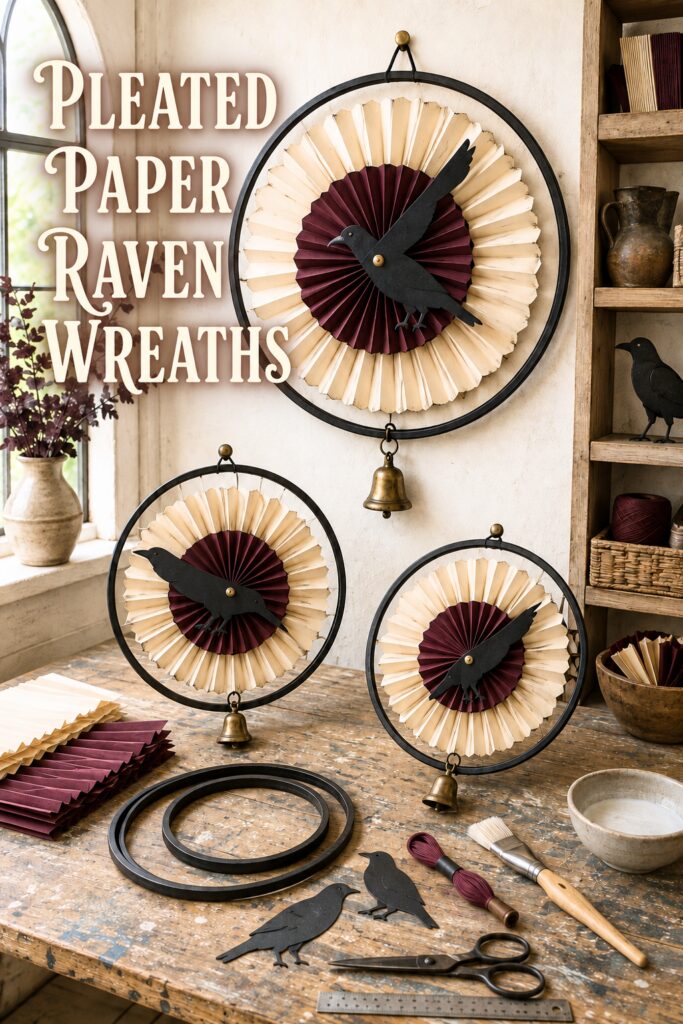
The inspiration image for this project and the instructional images were created with AI. This tutorial translates the visual idea into a practical project you can recreate at home. The demonstration images illustrate the proposed construction method rather than documenting a physical project being made.
What You’re Making
This tutorial creates one layered paper wreath featuring a cream outer rosette, a smaller cranberry center, and a black raven mounted like the hand of an old clock.
A hoop approximately 12 to 16 inches across works well for the main wreath. Once you understand the construction, you can make two smaller versions to form a coordinated trio.
The inspiration image suggests that the raven pivots from the center of the pleated paper. For a sturdier real-life version, both rosettes and the raven are supported by concealed cardstock discs. The decorative fastener passes through this reinforced center rather than through unsupported paper folds.
Materials and Supplies
Materials
- Lightweight wooden embroidery or craft hoop
- Cream paper, approximately 65 to 80 lb.
- Cranberry, wine, or deep berry paper of a similar weight
- Matte-black cardstock for the raven
- Heavy cardstock or thin chipboard for backing discs
- Black craft paint
- Double-sided craft tape
- Strong paper-craft adhesive
- Decorative brass paper fastener
- Small brass bell
- Small split ring or short length of narrow cord
- Narrow black ribbon or cord for hanging
The paper should be firm enough to hold crisp pleats but flexible enough to fold repeatedly. Very thick board-like cardstock will be tiring to crease and may resist flattening into a rosette.
Tools
- Paper trimmer or craft knife and metal ruler
- Cutting mat
- Scoring board or ruler with a scoring tool
- Bone folder
- Pencil
- Scissors
- Hole punch or awl
- Paintbrush
- Compass, plates, or other round objects for tracing
- Raven template
- Small binder clips or clothespins
Optional Finishing Supplies
- Dark brown ink pad or watered-down craft paint
- Small foam applicator
- Fine-tip black marker
- Clear matte craft sealer
Before You Start
Protect the table and paint the hoop matte black so it can dry while you prepare the paper. Paint both sides and the edges because portions of the hoop will remain visible around the rosette.
Measure the hoop’s inside diameter. Plan for the outer rosette to be approximately 1 to 2 inches smaller so a narrow black border remains visible. The cranberry rosette can be roughly half to two-thirds the diameter of the cream one.
Test one short paper strip before cutting the entire batch. Pleats around ½ to ¾ inch deep suit a medium wreath. Wider folds look more rustic, while narrow folds create a denser clock-face effect.
Step-by-Step Tutorial
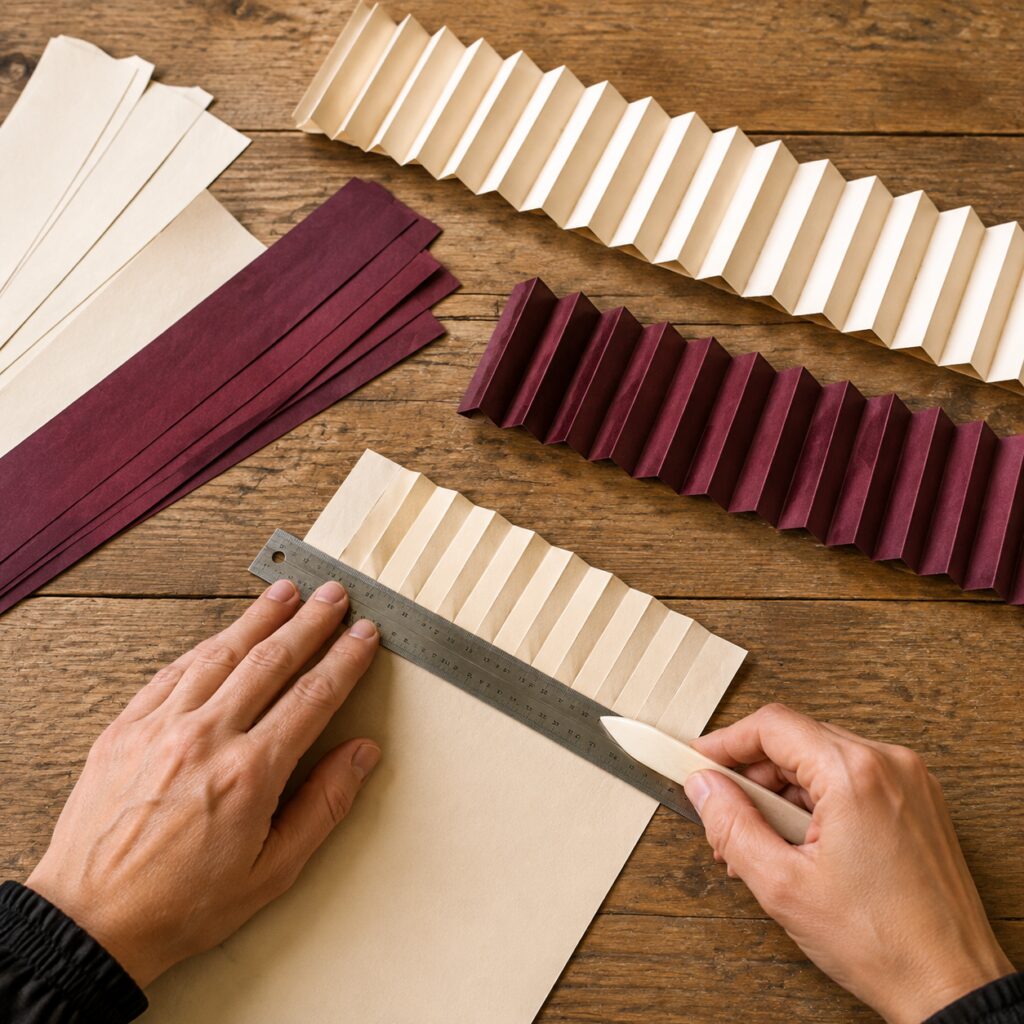
1. Cut and Score the Paper Strips
Cut several equal-width strips of cream paper. Their width will become the radius of the outer rosette, so a 5-inch-wide strip produces a circle close to 10 inches across.
You’ll need thinner strips for the center circles and wider strips for the larger outer circles.
The combined length of the strips determines whether the paper can open into a full circle without pulling apart. A useful starting point is a total folded strip length equal to approximately five or six times the planned rosette diameter. Keep an extra strip available in case the first assembly feels too tight.
Score every strip at consistent intervals. Use the same spacing on every piece so the joined sections appear continuous.
Repeat with narrower strips of cranberry paper for the center rosette.
2. Accordion-Fold Every Strip
Fold each strip back and forth along the score lines. Sharpen every fold with a bone folder, but avoid pressing so hard that the surface coating cracks.
Check the ends as you work. For the cleanest joins, each connected strip should continue the alternating mountain-and-valley pattern rather than creating two identical folds side by side.
Stack the completed strips under a book for a few minutes if they keep springing open.
3. Join and Shape the Cream Rosette
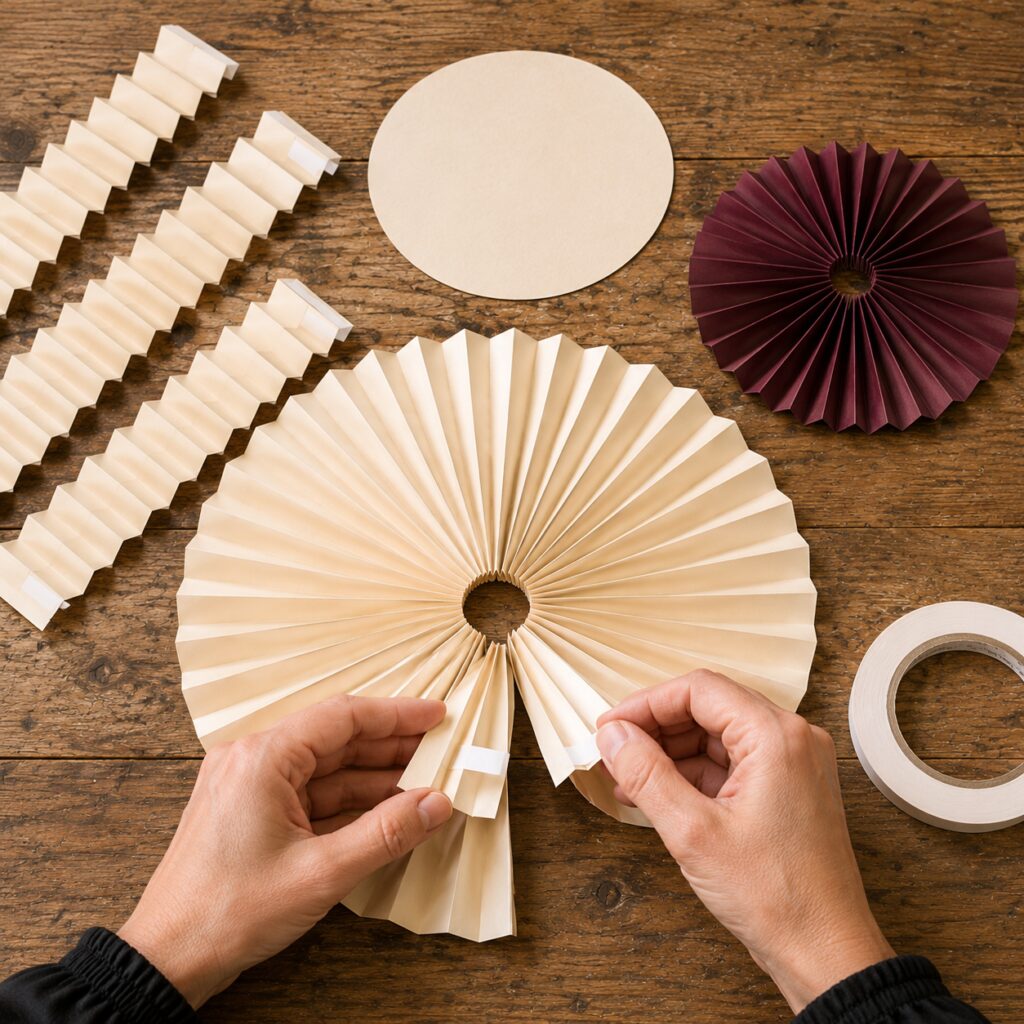
Join the short ends of the cream strips with narrow double-sided tape. Keep the tape close to the edge and align each fold carefully. Once all the strips form one long accordion, connect the two remaining ends to make a loop.
Stand the loop upright on the table. Gather its inner edge toward the center while gently pressing the outer edge down. The paper should spread into a flat circular fan.
If the center opening remains large or the paper pulls upward, add another folded strip. If it overlaps excessively and will not lie flat, remove one section.
Trace and cut two backing discs from heavy cardstock or thin chipboard. Each should cover the center opening and extend onto enough pleats to provide a secure gluing surface.
Apply strong paper adhesive to one disc. Hold the rosette flat and press the disc over its center. Weight it gently until the adhesive has set. Attach the second disc to the back for additional strength.
4. Make the Cranberry Center
Construct the smaller cranberry rosette in the same way. Because it has a smaller diameter, narrower strips usually create better proportions.
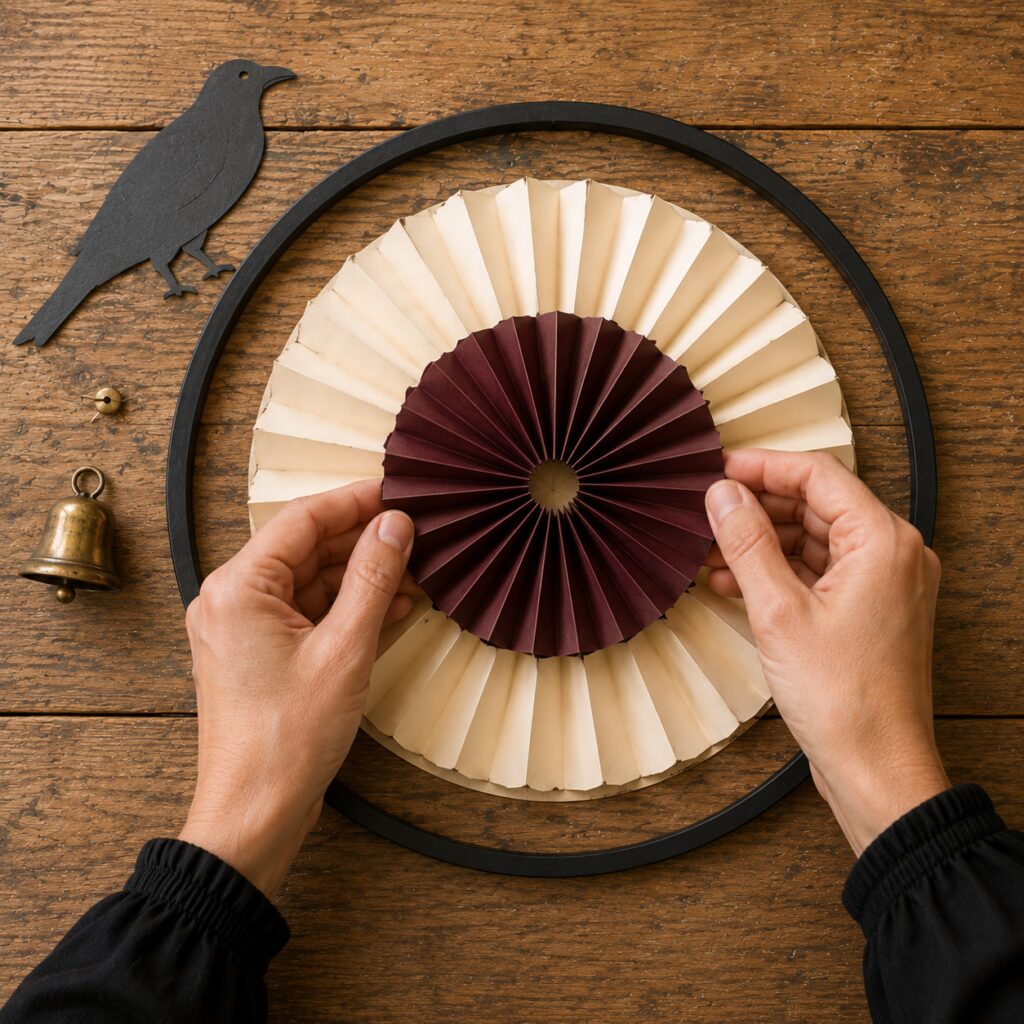
Attach a cardstock disc to the back, then position the cranberry circle over the cream one. Before gluing, measure the cream border in several places to make sure the smaller rosette is centered.
Adhere the two layers through their backing discs. Do not rely on glue applied only to the raised pleats. Place a flat board or book over the protected surface while the adhesive sets.
5. Mount the Paper Assembly Inside the Hoop
Place the dried black hoop over the layered rosettes and adjust the position until the visible border appears even.
Cut several narrow cardstock tabs. Attach one end of each tab to the rear backing disc and wrap the other end around the hoop. Space the tabs evenly around the circle, then secure them with strong adhesive.
This method allows the paper to appear suspended inside the hoop while transferring its weight to the concealed backing. If the wreath will remain flat against a wall, you can also bridge the back of the hoop with two taut lengths of sturdy cord and adhere the backing disc to them.
6. Cut a Layered Raven
Print or draw a side-profile raven with a long beak and outstretched wing. Size it so the body crosses the cranberry circle while the wing or tail reaches slightly into the cream layer.
Trace the silhouette onto black cardstock and cut it out. For a dimensional folk-art effect, cut the body and one wing separately. Layer the wing over the body with a small foam adhesive square or folded cardstock spacer.
Add a simple feather line with a fine-tip marker if desired. Keep the marks subtle so the silhouette remains bold from across the room.
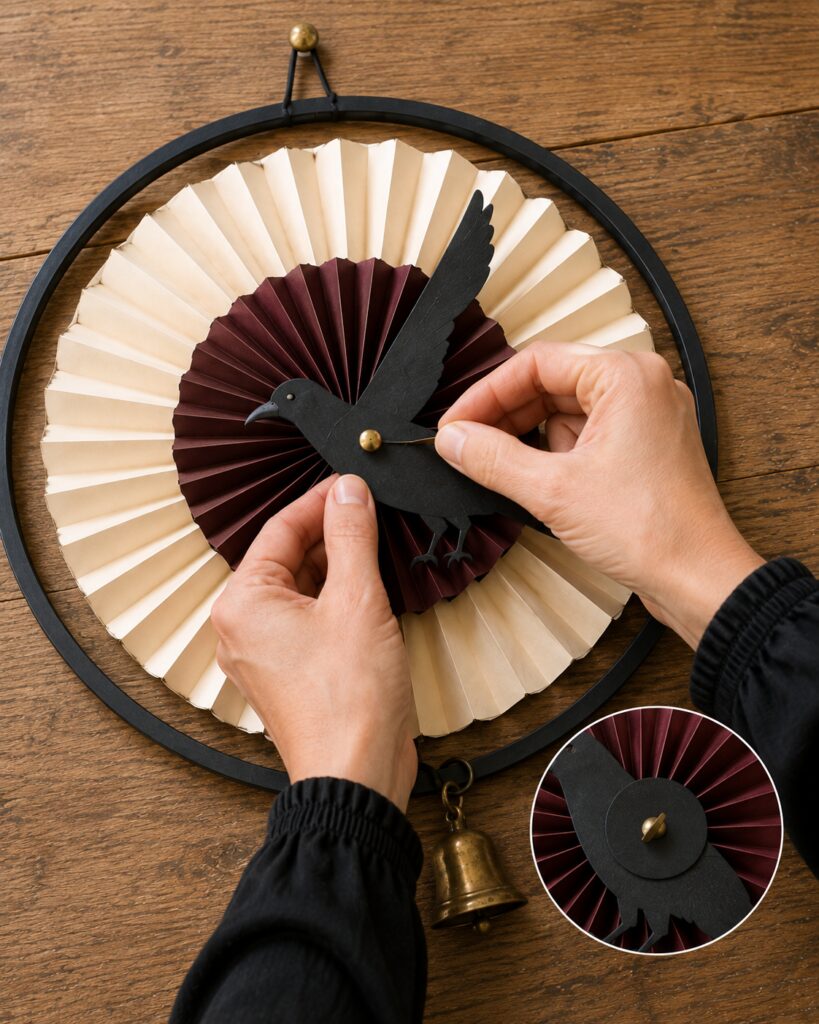
Punch a small hole through the raven near the center of its body. Place it over the wreath and mark the corresponding location on the reinforced backing.
7. Secure the Raven at the Center
Use an awl to make a small hole through the center assembly. Protect the work surface and keep your fingers away from the point.
Insert a decorative brass paper fastener through the raven and the reinforced center. Open the prongs securely at the back. If the fastener is too short to pass through every layer, glue the raven to the front and use the fastener head as a decorative cap instead.
Avoid punching through unsupported pleats. The hidden disc is what prevents the center from tearing or sagging.
8. Add the Bell and Hanging Loop
Attach a small bell to the bottom of the hoop using a split ring or short loop of cord. Keep it light enough that it does not pull the wreath out of balance.
Tie narrow black ribbon or cord around the top of the hoop. Lift the wreath and check that it hangs level before tightening the knot.
If it tilts, move the top loop slightly toward the heavier side or shift the bell’s position. Trim loose ends and cover any visible rear attachment tabs with black paper.
Tips for Capturing the Clock-Face Character
The cream outer layer should remain wider than the cranberry center. That contrast produces the strong rings associated with a clock face.
Use warm ivory rather than stark white paper. A very light sweep of brown ink along the outer pleat edges can suggest aged paper, but keep the color irregular and restrained. Too much distressing will make the folds look muddy.
Let the raven cross the rings at an angle. A perfectly horizontal silhouette will feel more static and less like a clock hand.
Repeat the brass finish only two or three times. The center fastener, lower bell, and perhaps the wall hook provide enough metallic contrast without competing with the paper.
Easy Ways to Customize It
For a softer cottage palette, replace cranberry with muted pumpkin, dusty rose, or faded plum. A black-and-cream version will have a sharper Victorian silhouette.
Create a trio using different hoop sizes but keep the rosette proportions consistent. Turn the ravens in different directions so the group feels collected rather than duplicated.
A crescent moon, black cat, owl, or flying bat could replace the raven while preserving the layered clock-face construction.
For a quieter finish, omit the bell and suspend a small tassel from the bottom instead.
Displaying the Finished Wreaths
Hang one wreath above a mantel, on an interior door, or as part of a Halloween gallery wall. A trio works especially well over a console or arranged vertically in a narrow entry.
Paper wreaths are best kept indoors. Moisture and direct outdoor sunlight can warp or fade the rosettes. If you place one on a covered porch temporarily, bring it inside during damp or windy weather.
Use a wall fastener appropriate for the completed weight, and keep the hanging cord away from candles, heaters, vents, and frequently opened doors. Position the bell where children and pets cannot repeatedly tug it.
The most important features are the concentric pleats, angled black silhouette, and small touches of aged brass. Your folds and distressed edges do not need to match the inspiration image perfectly to preserve its charming folk-art character.