*This post may contain affiliate links for which I earn commissions.*
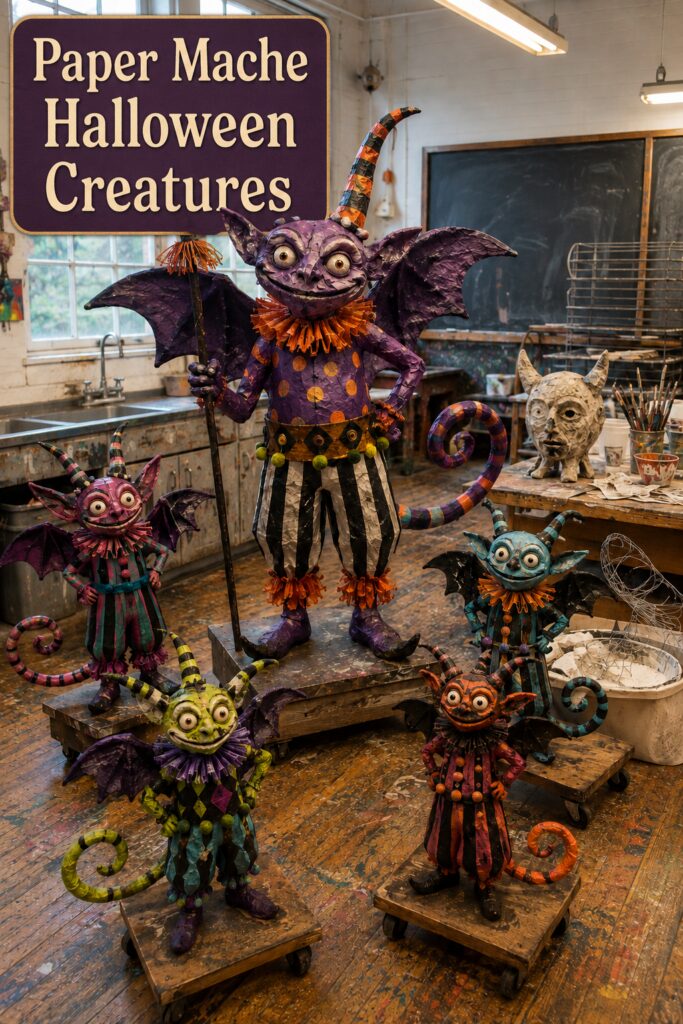
A collection of long-horned, bat-winged creatures brings an unexpected folk-art personality to Halloween decorating. The inspiration image combines lumpy handmade textures, wide round eyes, curled striped tails, theatrical collars, and a purple, orange, black, teal, and acid-green palette. Each figure looks related to the others without being an exact copy.
This tutorial turns that visual idea into a practical tabletop project. You will make one lightweight creature approximately 18 inches tall, then use the customization ideas to build a coordinated group over time. The inspiration and instructional images were created with AI. They illustrate the concept and key techniques rather than documenting an object that was physically constructed.
What You’re Making
The finished figure is a freestanding indoor Halloween creature secured to a small wooden base. A taped newspaper armature forms the body and head, dowels support the legs, foil creates the horns and curled tail, and light wire outlines the wings. Thin paper-mâché layers unify the structure. Paper clay provides raised eyes, cheeks, cuffs, and costume details without adding much weight.
The inspiration includes several large figures with elaborate appendages. This version is intentionally smaller, lighter, and permanently connected to its display base. The wings are thin decorative shapes rather than load-bearing structures, and every wire end is wrapped before the paper layers are added.
Materials and Supplies
Structure
- Small unfinished wooden plaque or thick wood block for the display base
- Two wooden dowels for the legs
- Crumpled newspaper or clean packing paper
- Cardboard scraps
- Heavy-duty aluminum craft wire for wings and arms
- Lighter aluminum foil for horns, tail, hands, and feet
- Masking tape in a medium width
- Strong craft adhesive suitable for wood and paper
- Optional screws or drilled holes for securing the dowels to the base
Paper-Mâché and Sculpting
- Brown kraft paper, newspaper, or uncoated packing paper torn into strips
- Prepared paper-mâché paste or a paper-safe adhesive mixture used according to its directions
- Lightweight air-dry paper clay
- Lightweight wood or paper half-spheres for the eye forms, optional
- Fine sandpaper or sanding sponge, optional
Paint and Finishing Supplies
- Matte acrylic craft paint in deep plum, black, burnt orange, cream, and two optional accent colors
- Medium and small paintbrushes
- Stencil brush or round sponge for dots
- Cream or orange tissue paper, crepe paper, or lightweight fabric for a ruffled collar
- Small pom-pom trim, paper fringe, or yarn embellishments
- Brush-on matte craft sealer appropriate for painted paper
Tools
- Drill and drill bit sized for the dowels, or help from someone comfortable making the base holes
- Wire cutters and needle-nose pliers
- Utility knife or craft knife for cardboard
- Scissors
- Sculpting tool or wooden craft stick
- Protective work covering
- Drying rack or tray
Before You Start
Choose a dry, well-ventilated indoor workspace and cover the table. Decide which personality you want the first creature to have before building. A simple sketch showing the horn shape, wing width, tail direction, costume pattern, and colors will prevent the design from changing midway.
Allow several days for this project. Thin layers are stronger and dry more reliably than one thick application. Depending on the paste, paper thickness, temperature, and humidity, each coat may require approximately 24 to 48 hours. Never paint or seal a damp sculpture because trapped moisture can soften the structure or encourage mildew.
Wear eye protection when cutting wire or drilling. Turn every wire end inward and cover it completely with tape. Use a craft knife on a cutting mat and cut away from your hands. Follow all ventilation and safety directions for adhesives, paint, and sealer.
Step-by-Step Tutorial
1. Secure the Legs to the Base
Mark two leg positions near the center of the wood base, leaving enough room for the feet and tail. Drill two snug holes partway into the wood, add a small amount of suitable adhesive, and insert the dowels. Keep them parallel while the adhesive sets.
If you do not have the tools or experience to drill the base safely, ask someone to prepare it. Do not substitute a loose cardboard base for an 18-inch figure because the tall horns and wings need stable support.
2. Form the Torso and Head
Compress newspaper into one oval for the torso and one slightly smaller round shape for the head. Wrap each form firmly with masking tape until it keeps its shape. Slide the torso over or around the two dowels and tape it tightly in place. Attach the head with a short internal cardboard tube or dowel stub, then reinforce the neck from several directions with tape.
Keep the body slightly narrower than the head. The oversized face is part of the playful character, and a lighter head reduces stress on the neck joint.
3. Shape the Horns, Tail, Wings, and Arms
Roll aluminum foil into two long tapered horns. Curve them differently so the figure feels handmade, then tape their wide ends securely to the head. Make the tail from a longer foil rope wrapped around a light wire core. Attach it low on the back and curl the end outward where it will remain visible.
Bend craft wire into two shallow bat-wing outlines. Add one or two interior ribs, twist the joins with pliers, turn cut ends inward, and cover every joint with masking tape. Glue thin cardboard or heavyweight paper across each frame. Attach the wings across the upper back and reinforce the roots with tape that extends onto both the wing and torso.
Build the arms from foil around a short wire core. Curve one hand toward the hip and let the other hang or hold a lightweight paper staff. Avoid poses that pull the figure off balance.
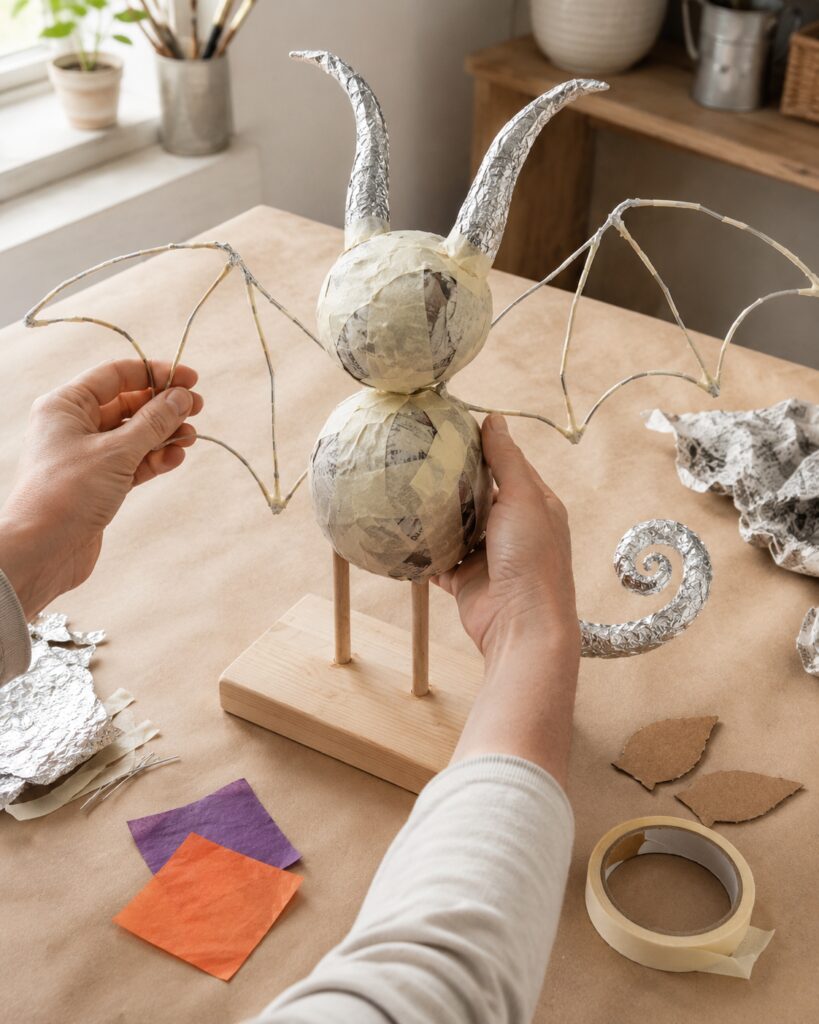
4. Test the Balance Before Adding Paste
Stand the armature upright and gently rotate the base. The figure should not lean forward or twist at the ankles. Shorten a heavy tail, reduce the wing width, or add a little weight beneath the wood base if needed. This is the easiest stage for structural corrections.
Add small foil shapes for pointed ears, rounded shoes, and simple hands. Tape each one from several directions. The figure should already be recognizable before any wet paper is applied.
5. Apply the First Paper-Mâché Layer
Tear paper into strips approximately 1 inch wide, with narrower pieces for horns and facial curves. Dip one strip into the prepared paste, pull it between two fingers to remove excess, and smooth it onto the armature. Overlap each strip slightly and change direction as you work.
Cover the torso, head, tail, shoes, and horns with one thin layer. Wrap short strips around the bases of the horns, ears, arms, wings, and tail to strengthen the joints. For the wings, cover both faces with thin paper and use narrow strips around the outer wire edges.
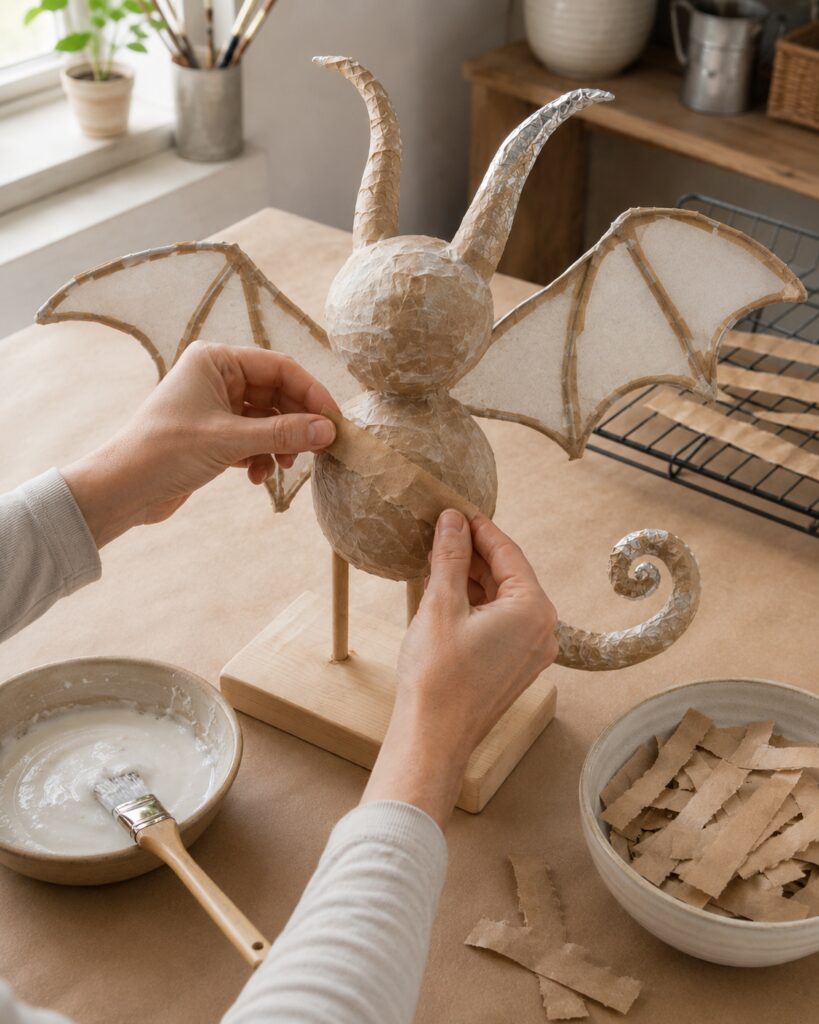
Place the figure where air can circulate around it and let it dry completely. A fan moving air across the room can help, but do not use strong heat that could warp the paper or create a dry shell over a damp interior.
6. Add a Second Strengthening Layer
Apply a second thin coat with the strip direction changed from the first layer. Concentrate on the neck, ankles, wing roots, horn bases, and tail attachment. Leave a little of the natural paper texture visible. The uneven surface contributes to the vintage handmade appearance.
Allow the second coat to dry fully. Press the torso, wings, and neck gently. They should feel firm rather than cool or flexible. Add a small patch only where an area still seems weak.
7. Build the Expressive Face
Position two lightweight half-spheres or shallow paper-clay domes for the eyes. Attach them securely, then add thin paper-clay rims around the outer edges. Sculpt a small pointed nose, raised cheeks, and a shallow curved smile. Keep all additions thin and press their edges smoothly into the dry paper surface.
Add ear texture, small round torso spots, wrist cuffs, ankle ruffles, or a narrow belt. Reinforce larger clay details with one or two short pasted paper strips once the clay has dried. Avoid thick clay masses because they can crack or make the head too heavy.
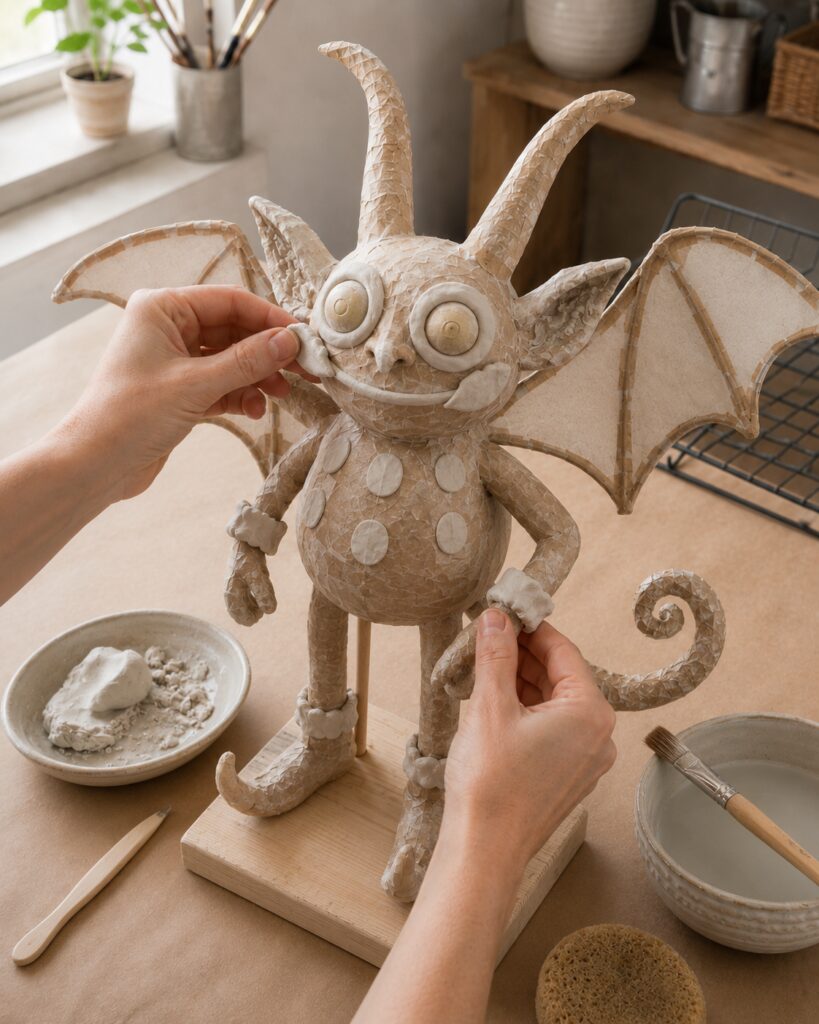
8. Apply a Dark Base Coat
Brush the entire creature with a thin matte base color. Use black on the costume and wing ribs, deep plum on the head and wings, and a darker related tone on the tail and shoes. Two thin coats are better than one heavy coat that fills the paper texture.
Paint the eyes cream and let them dry before adding dark pupils. Place the pupils slightly off-center in the same direction. That small choice gives the face more personality than perfectly centered eyes.
9. Add Stripes, Dots, and Dry-Brushed Texture
Paint alternating black and burnt-orange bands around the horns. Repeat narrower bands on the tail. Add orange dots to the torso and vertical black-and-cream stripes below the belt to suggest carnival trousers.
Use a nearly dry brush with a lighter plum or cream to skim the raised texture on the face, ears, wings, and shoes. This highlights the paper ridges without making the surface look newly manufactured. Add a thin dark line around the eyes, mouth, panel edges, and wing ribs for definition.
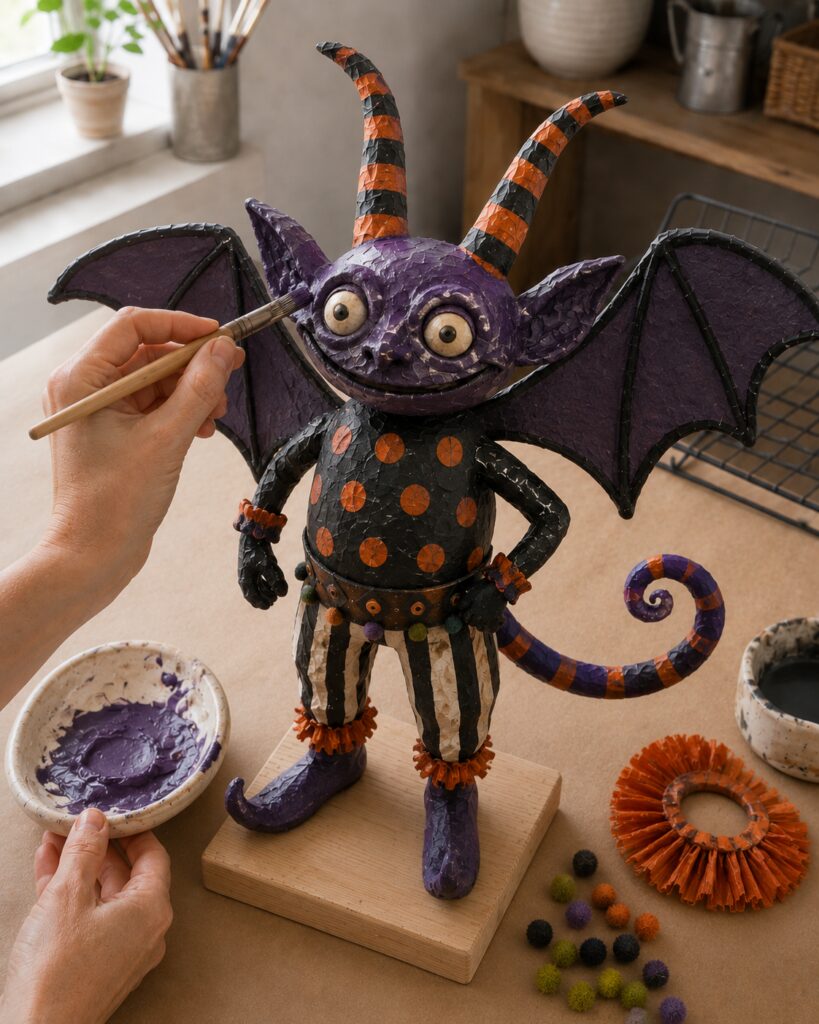
[STEP IMAGE 4: Place after this paragraph. Show the same creature during decorative painting, with striped horns, a plum head, charcoal-purple wings, orange torso dots, striped costume panels, a curled striped tail, cream eyes, and visible dry-brushing technique.]
10. Add the Collar and Small Trims
Gather a strip of tissue, crepe paper, or lightweight fabric around a narrow cord to make the collar. Tie or glue it around the neck only after all paint is dry. Add restrained pom-pom trim to the belt or cuffs, keeping every embellishment light.
If the creature carries a staff, use a lightweight dowel topped with a small paper orb. Secure the staff to the hand and base so it cannot tip the figure.
11. Seal the Finished Creature
Touch up any exposed paper and let the paint dry according to its directions. Apply a thin brush-on matte sealer in a ventilated area. Test it first on a painted scrap because some sealers can darken paper or react with specialty paints.
Seal the visible wood base or paint it to coordinate with the figure. Add felt pads underneath to protect furniture.
Tips for Capturing the Folk-Art Look
Keep the surface slightly uneven. The visible ridges, imperfect stripes, and asymmetrical horns are part of the charm. A perfectly smooth finish would lose the handmade quality seen in the inspiration.
Limit each creature to one dominant color, one secondary color, black, and cream. Repeat a few design elements across the collection, such as striped horns, round eyes, ruffled collars, and curled tails. Change the ear shape, wing width, costume pattern, or accent color to give every figure a separate personality.
Use matte paint and controlled dry-brushing rather than glossy color. A little cream brushed across purple or black will make the texture readable from across the room.
Easy Ways to Customize the Collection
Make a smaller companion figure with shorter dowel legs, one curled horn, and narrow teal wings. A second creature could use acid green with black diamonds, while another could wear rust and plum stripes.
For a creature without wings, enlarge the ears and curl the tail higher. Replace the paper collar with yarn fringe or narrow fabric strips. You can also give each figure a different lightweight prop, such as a paper lantern, tiny pennant, pumpkin orb, or miniature sign without wording.
Keep the same eye style and base treatment across the group. Those repeated features will make figures created months apart still feel like one collection.
Displaying the Finished Creatures
Arrange the figures at different heights on a console, mantel, covered shelf, or sturdy risers. Place the largest creature toward the back and let smaller companions face slightly inward, as if they are interacting.
These figures are indoor decorations. Paper, paste, air-dry clay, and acrylic paint can be damaged by moisture even after sealing. Keep them away from open flames, hot bulbs, active vents, sinks, and areas where children or pets might pull the wings or tails. They are decorations rather than toys.
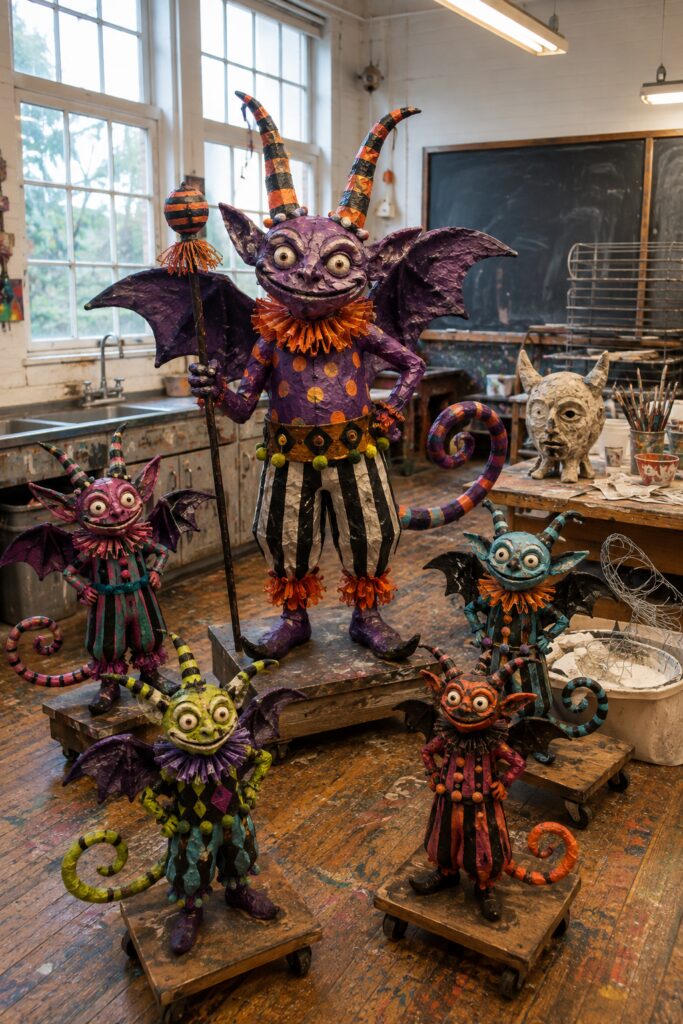
One Creature Is Enough to Start the Display
The inspiration image shows a full gathering, but the visual idea works with a single well-detailed figure. Concentrate on a stable structure, expressive eyes, dramatic horns, and a coordinated paint pattern. Once that method feels comfortable, changing a few shapes and colors is all it takes to create the next member of the collection.