*This post may contain affiliate links for which I earn commissions.*
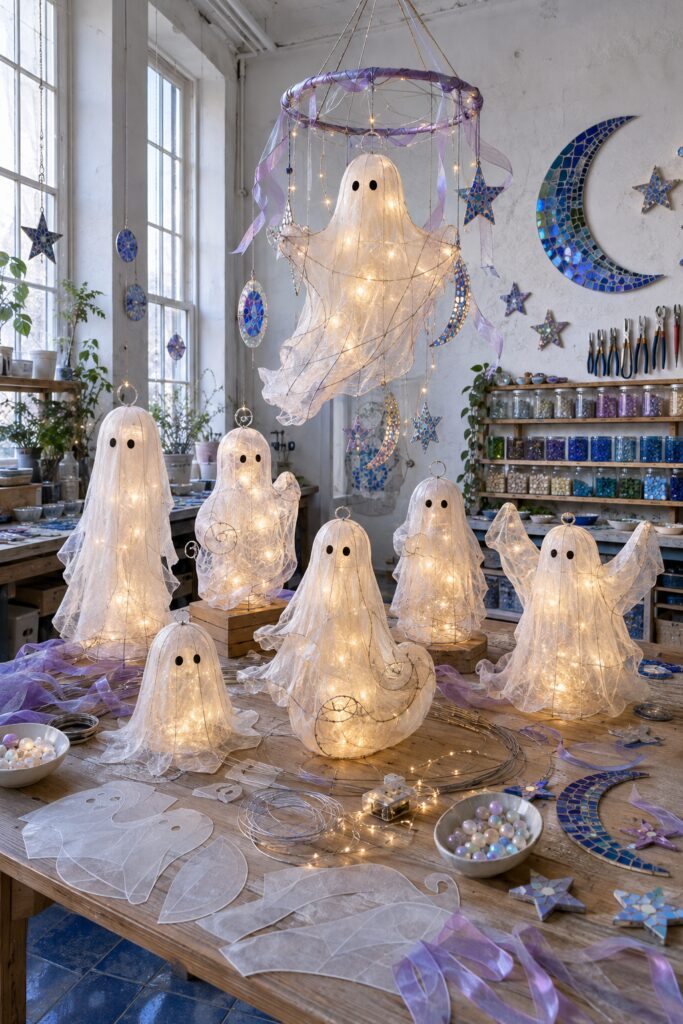
Ghost decorations can feel wonderfully atmospheric without becoming dark or frightening. The inspiration image shows a whole family of softly glowing figures made from translucent paper, delicate wire, and tiny warm lights. Their varied heights, scalloped hems, curled arms, and simple oval eyes give each one a little personality.
This tutorial translates that luminous workshop scene into a practical tabletop lantern. You will shape a lightweight wire cage, wrap it with battery-operated micro lights, and cover it with overlapping translucent panels. Once the first ghost works, the same construction can be adjusted into tall, round, waving, or hanging versions for a coordinated Halloween collection.
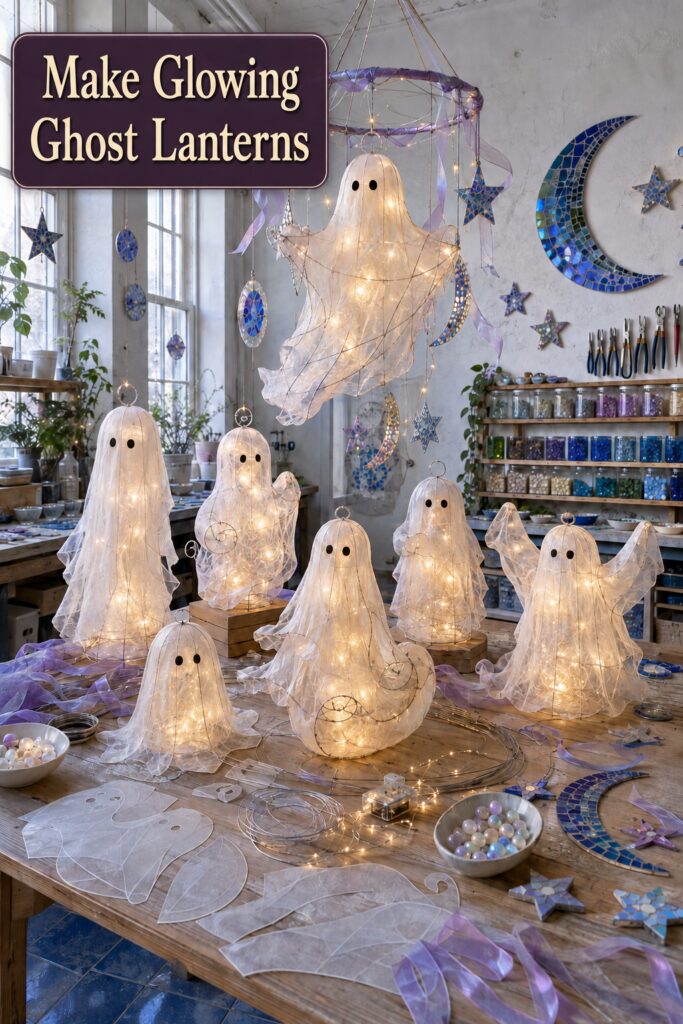
The inspiration and instructional images for this project were created with AI. This tutorial translates the visual idea into a practical project you can recreate at home; the images are illustrative rather than photographs of a completed build.
What you are making
The basic project is a freestanding ghost lantern approximately 12 to 18 inches tall. A wide wire ring supports the base, a smaller ring shapes the head, and curved ribs connect the two. Warm-white micro lights wind around the frame. Four to six overlapping translucent paper panels create the floating shell, while two outward-curving ribs support raised arms.
The inspiration includes highly fluid, almost fabric-like paper forms and a large suspended mobile. Ordinary vellum is crisper than the material appears in the image, so this version uses overlapping narrow panels rather than trying to drape one rigid sheet. The mobile variation uses smaller forms and keeps the battery packs on the hanging hoop, where their switches remain accessible.
Materials and supplies
Materials
- Flexible aluminum craft wire for the structural frame
- Thin jewelry wire or small clear ties for securing intersections
- White translucent vellum or fibrous translucent craft paper
- One short strand of warm-white, battery-operated micro-LED lights per tabletop ghost
- Black cardstock for the eyes
- Clear-drying paper adhesive or small clear adhesive dots
- Narrow organza ribbon in lavender, soft gray, or white
- Scrap cardstock for templates
Tools
- Round-nose and chain-nose pliers
- Flush wire cutters
- Metal ruler or flexible measuring tape
- Precision scissors
- Pencil and eraser
- Small hole punch or awl
- Bone folder
- Protective eyewear and work gloves for the wire-shaping stage
Optional mobile supplies
- Lightweight wood or metal hoop
- Clear monofilament or strong cotton cord
- Small ceiling hook and hanging hardware appropriate for the ceiling material
- Separate short micro-light strands with compact battery boxes
Before you start
Make one tabletop ghost before building a collection. A useful first size is about 14 inches tall with a base ring approximately 7 to 9 inches across. These are suggested proportions, not fixed measurements. The base needs to be wide enough that the finished ghost will not tip when its arms are extended.
Work on a clear table. Wear eye protection whenever cutting or bending wire, since an end can spring unexpectedly. Turn every clipped end inward and compress it against the frame with pliers. Use only intact battery-operated LED strands intended for decorative use. Do not substitute incandescent lights, plug-in light strings, candles, or flame-based tea lights.
Test a scrap of the chosen translucent paper over the switched-on lights. It should diffuse the points without hiding them. Confirm that the light maker allows use near paper and follow its operating, battery, and indoor-use instructions.
Step-by-step tutorial
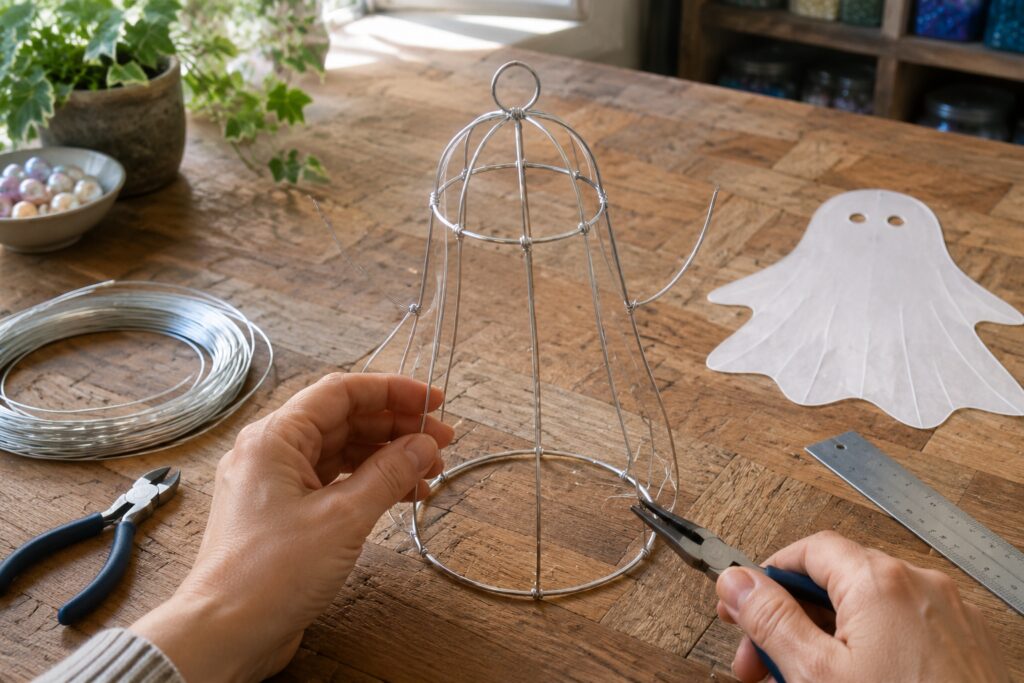
1. Form the base and head rings
Wrap the structural wire around a round container to form the base ring. Overlap the ends by an inch or two, then bind the overlap tightly with thin wire. Flatten the ring against the table and correct any wobble.
Make a smaller ring for the head, roughly half the diameter of the base. Add a neat loop above it if the ghost may eventually hang. The loop can also hold a ribbon on a tabletop version. Twist and tuck every connection so no sharp end projects outward.
2. Add the vertical ribs and arms
Cut six equal wire lengths long enough to curve from the base ring, over the head ring, and back down if using continuous ribs. Attach them at evenly spaced points around both rings. Shape each rib gently rather than making sharp bends. The top should feel rounded and the body should widen gradually toward the base.
For the arms, bend two side ribs outward in relaxed curves. Keep their ends rounded into small loops or turn them back toward the body. Set the frame upright and look at it from every side. Adjust the ribs until the weight feels centered and the base sits flat.
3. Route and test the micro lights
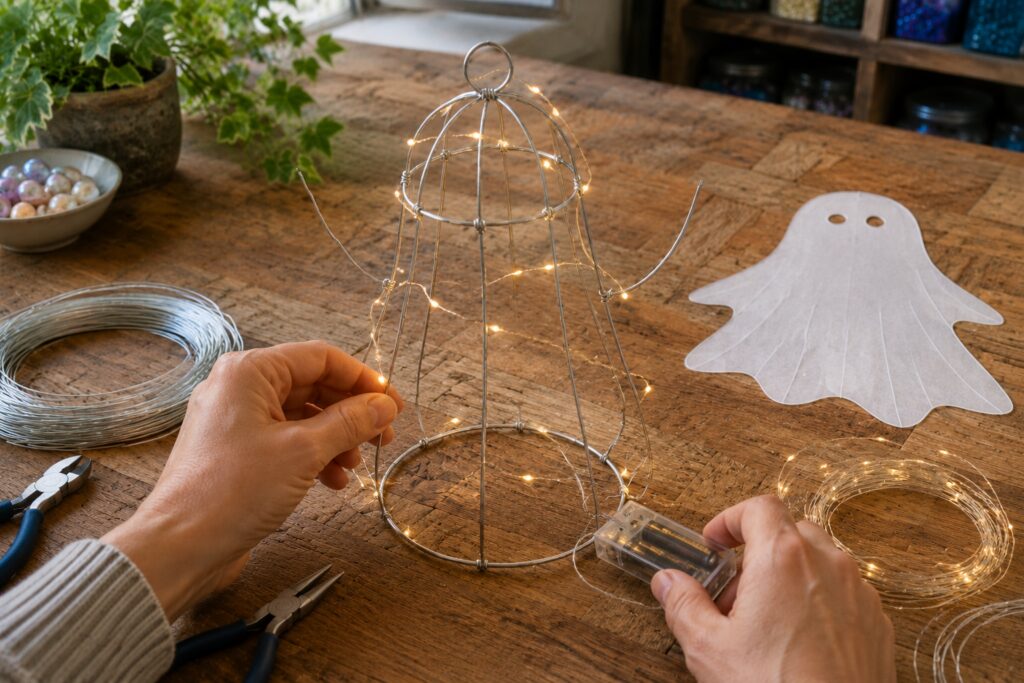
Switch on the light strand before installing it. Starting near the battery box, route the thin light wire around the base and upward along alternating ribs. Cross the head ring and return down another rib. Leave a little slack at each turn so the delicate conductor is not kinked or pinched.
Secure the strand at a few structural intersections with tiny clear ties or short pieces of fine wire. Do not twist the light strand into the frame connection. Space the illuminated points across the front, sides, and back rather than concentrating them in the center.
Mount the battery box on a small wire shelf or flat tab at the rear outside edge of the base. The switch and battery compartment must remain accessible after the paper shell is installed. Test the lights again before moving on.
4. Make the translucent panel template
Lay the wire frame on its side over a large sheet of scrap paper. Trace a loose panel that begins near the top loop, follows the curve of the head and body, and extends just beyond the base ring. Add a softly scalloped or uneven lower edge.
Cut the template and hold it against the upright frame. It should cover about one-quarter to one-third of the circumference. Shorten it if the lower edge puddles heavily on the table. Lengthen only a few scallops if a slight floating trail is desired.
Use the template to cut four to six translucent panels. Vary the scallops slightly while keeping the rounded top and overall width consistent. If the paper is very crisp, curve it gently over the edge of a table or use a bone folder with light pressure. Do not crease it.
5. Layer the vellum over the frame
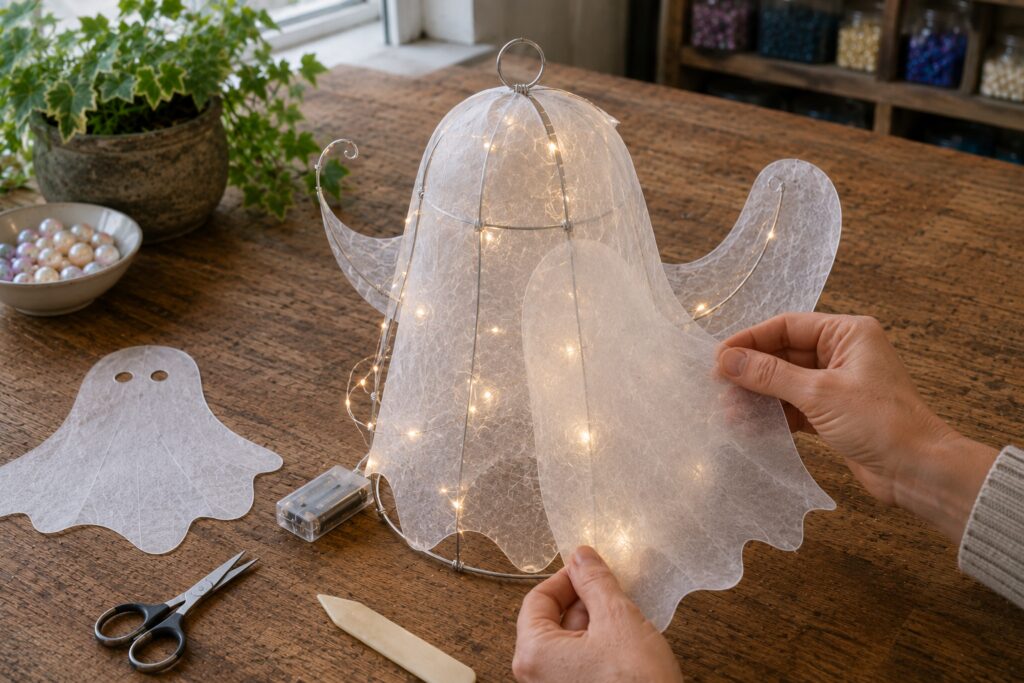
Begin at the back. Position the first panel with its rounded end overlapping the head ring and secure it at two or three wire junctions with tiny clear adhesive dots. Add the next panel with a generous overlap, continuing around the frame.
Drape the side panels over the curved arm ribs and let their edges fall naturally. Attach the paper only at structural points. Too much adhesive will create visible cloudy areas and prevent the panels from moving softly.
Keep the lower scallops just clear of the battery box. The box can hide behind a longer back panel, but the panel should lift easily for access. Turn on the lights and check for dark gaps. Shift an overlap rather than adding another full layer unless the paper looks too transparent.
6. Add the face and ribbon
Cut two simple black ovals. Place them slightly above the midpoint of the rounded head area, with enough space between them to remain readable when the lights are on. Test the position with removable tape, then attach them to the outside of the front panel.
Tie a narrow ribbon through the top loop. Allow short tails to fall along the back or sides rather than across the face. For the quiet expression shown in the inspiration, stop with two eyes. A mouth changes the personality and can make a collection feel busier.
Switch off the lights and inspect the lantern in daylight, then test it in a dim room. Reposition any paper edge that cuts directly across an eye or creates an unintended dark stripe.
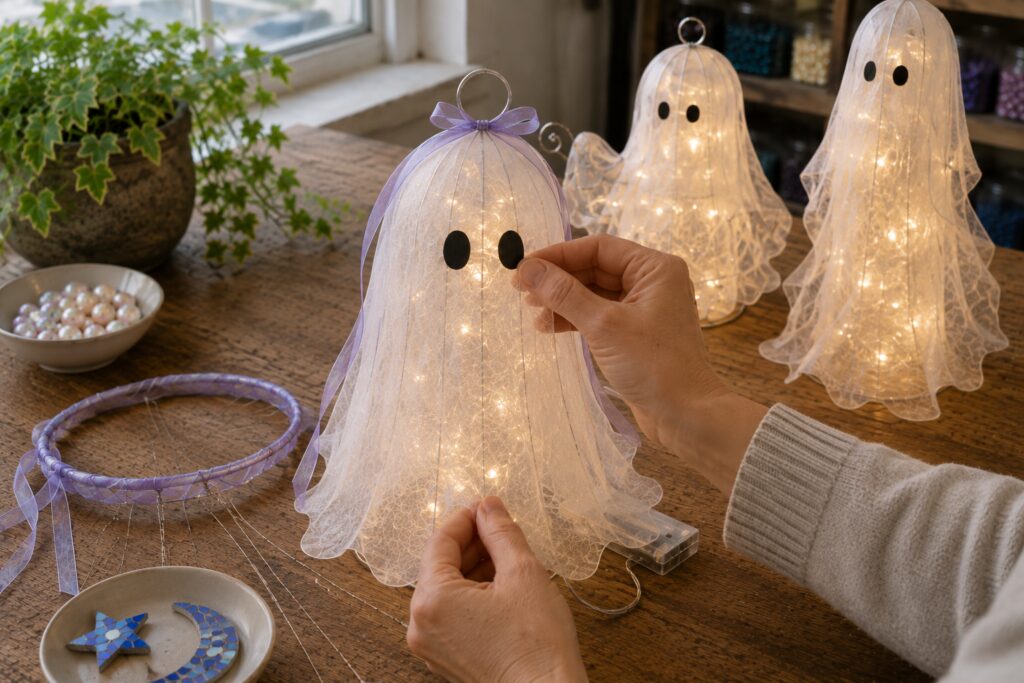
[STEP IMAGE 4: Place after this paragraph. Show the black oval eyes being attached to the finished glowing ghost, with a lavender ribbon at the top and two size variations in the background.]
7. Create a varied tabletop collection
Repeat the structure in three sizes, changing one feature at a time. Give one ghost a narrow body, another a rounder body, and a third one raised arm. Keep the same vellum, light color, eye shape, and ribbon family so the group feels intentional.
Arrange the figures in an uneven cluster with the tallest toward the back. Leave space around each face. Hide the battery boxes toward a wall or beneath a loose rear panel, but never glue or permanently cover them.
8. Adapt smaller ghosts for a hanging mobile
For a mobile, make small lightweight frames and omit the heavy freestanding base treatment. Suspend each ghost from its top loop using equal-strength cord. Secure the compact battery boxes to the upper hoop and route one short light strand down each suspension line into its ghost. Do not place a battery box inside a sealed paper form.
Balance the hoop at table height before hanging it. Shift the suspension points until it remains level and no ghost touches another. Use ceiling hardware rated for more than the total finished weight and suited to the ceiling material. Hang the mobile well above head level, away from fans, sprinklers, vents, fireplaces, candles, pets, and children’s reach.
Tips for getting the finished look
- Use warm-white lights. They give the translucent shell a soft lantern glow rather than a cold blue cast.
- Overlap unevenly. Narrow and wide overlaps create the feathery variation seen in the inspiration.
- Keep the face simple. Matching oval eyes unify ghosts with different body shapes.
- Let the wire show faintly. A trace of structure makes the lantern feel handcrafted and keeps the light points visually connected.
- Vary height more than decoration. Scale and arm position add personality without requiring different embellishments on every figure.
Easy ways to customize it
- Use soft gray or pale lavender translucent paper for one accent ghost.
- Curl one arm rib into a loose spiral before covering it.
- Give a small ghost a rounded, squat frame for a tabletop centerpiece.
- Add a few narrow ribbon tails to the mobile hoop rather than to every ghost.
- Make an unlit daylight version when the lantern will be displayed where lights are unnecessary.
Display and storage
These lanterns are designed for dry indoor display. Switch them off when unattended, before leaving home, and before going to bed. Remove batteries for long-term storage. Store each ghost upright in a roomy box so the vellum is not crushed. Small dents can often be eased out by gently reshaping the wire from inside the open base.
Practical note
The inspiration suggests very loose paper floating around complex wire forms. Real vellum has more body, so overlapping panels provide a similar luminous effect while remaining controllable. A freestanding version also needs a wide, level base and an externally accessible battery pack, even though those practical details are understated in the inspiration image.