*This post may contain affiliate links for which I earn commissions.*
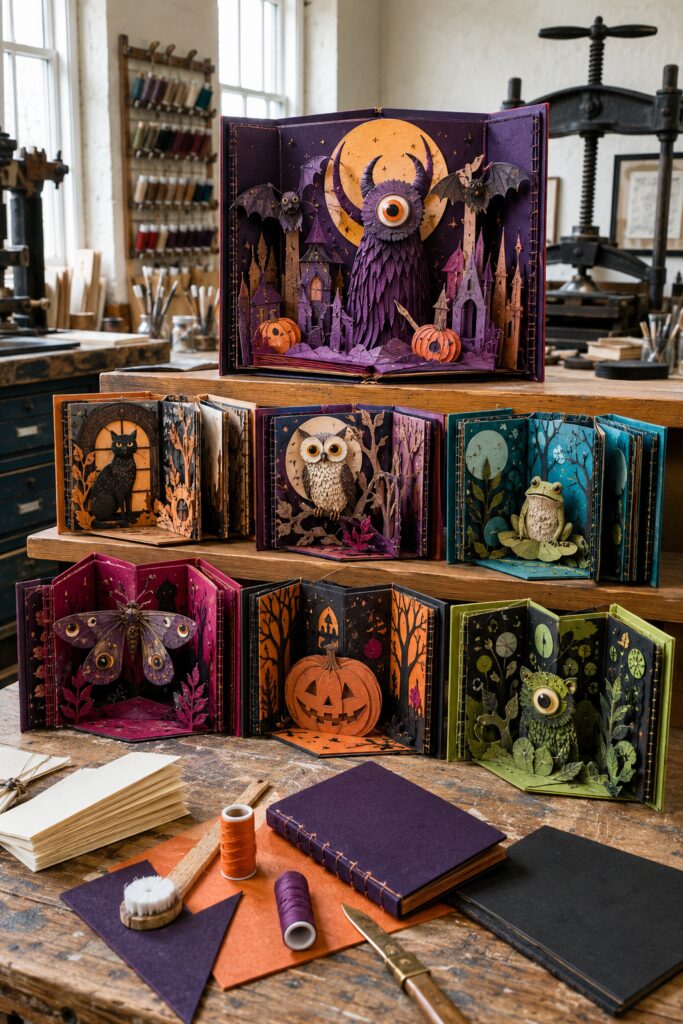
Some handmade books are meant to be read. Others unfold into tiny worlds. The inspiration image shows a whole collection of Halloween accordion books opened like miniature theaters, with cats, owls, frogs, moths, pumpkins, moons, and one-eyed creatures standing among layered paper scenery.
This tutorial turns that imaginative collection into one achievable fold-out creature stage. You will build a five-panel accordion between two hard covers, then add shallow hand-cut paper layers that spread apart when the book opens and nest together when it closes. Once the first book works, the same structure can become a coordinated set with a different creature and palette for every scene.
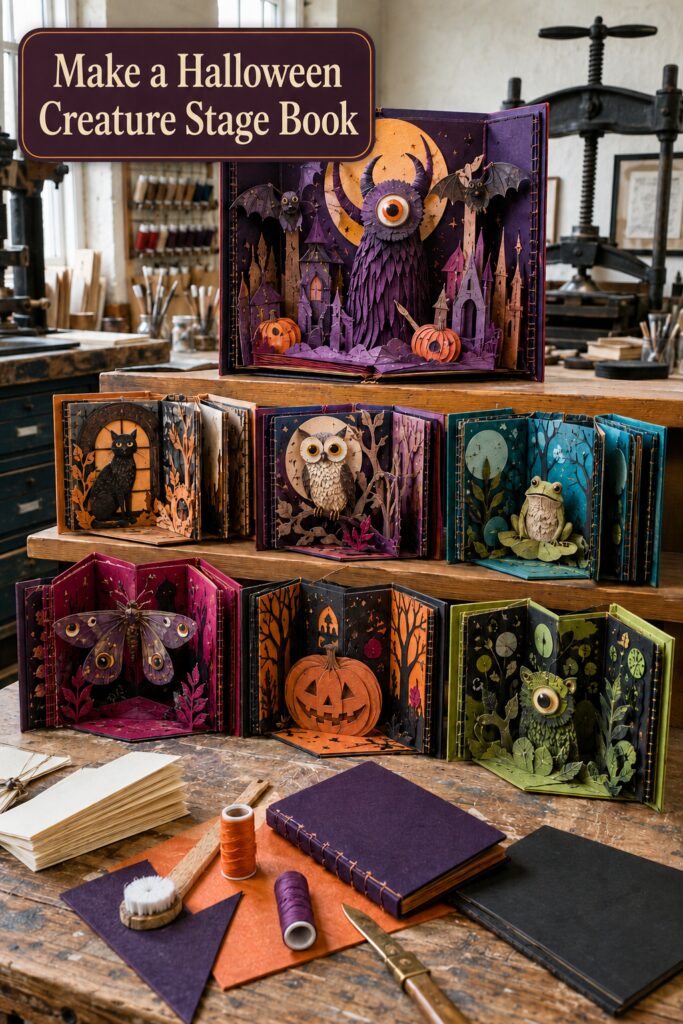
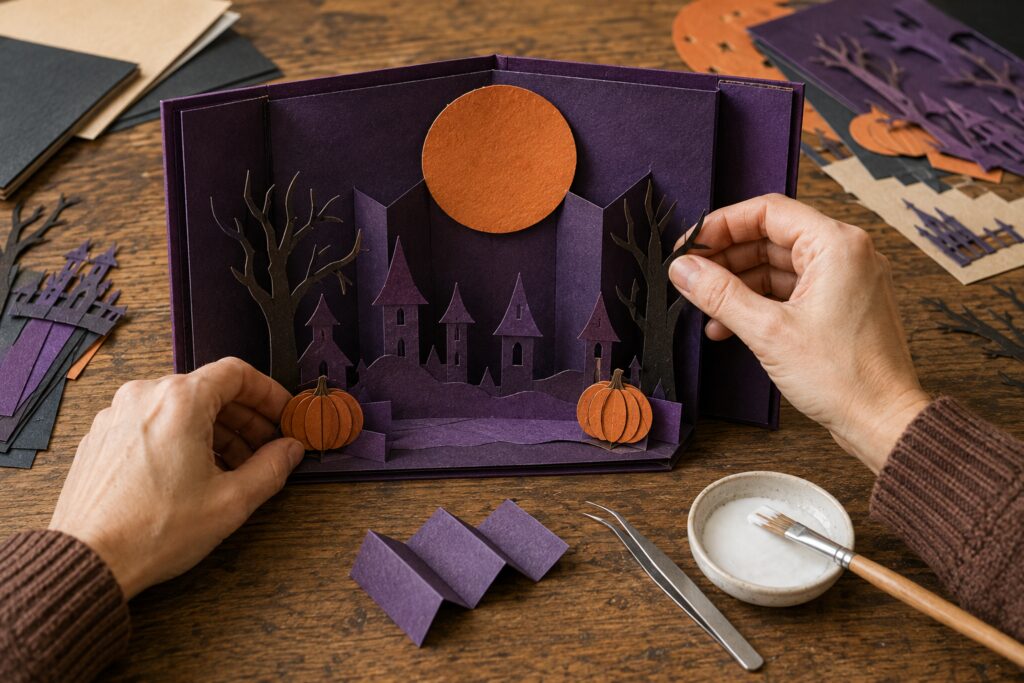
The inspiration and instructional images for this project were created with AI. This tutorial translates the visual idea into a practical project you can recreate at home; the images are illustrative rather than photographs of a completed build.
What you are making
The finished project is a small cloth-covered book that opens into a tabletop Halloween stage. A practical first size is approximately 5 by 7 inches when closed, although the method scales easily. Inside, an accordion-folded cardstock structure supports a moonlit background, middle-distance trees or towers, a central paper creature, and a few foreground shapes.
The inspiration includes seven extremely intricate books with thick sculptural figures and stitched bindings. This version simplifies the construction to one book with lightweight layered forms. The pieces are attached with narrow folded paper tabs and kept within a planned depth so the covers can still close without crushing the scene.
Materials and supplies
Materials
- Two pieces of book board or dense chipboard, cut to the same size
- Paper-backed book cloth or sturdy decorative paper for covering the boards
- Heavyweight cardstock for the five-panel accordion
- Assorted solid and textured cardstock for the creature and scenery
- Neutral-pH paper or bookbinding adhesive
- Thin paper for lining the inside covers
- Scrap cardstock for folded supports and a depth gauge
- Wax paper or reusable release paper
Tools
- Self-healing cutting mat
- Metal ruler with a nonslip back
- Craft knife with fresh blades
- Precision paper scissors
- Bone folder and scoring tool or scoring board
- Small glue brush
- Pencil, eraser, and tracing paper
- Fine tweezers
Optional decorative supplies
- Paper punches for circles, stars, and tiny moons
- Metallic pen or opaque paint marker for restrained details
- Bookbinding awl, waxed thread, and blunt needle for decorative stitching
- Small clips or lightweight boards for pressing the covers while they dry
Before you start
Choose one creature and one limited palette before cutting. Purple, black, and orange create the moonlit scene used in this tutorial. A single-eyed owl-moth is the focal figure, while a moon, crooked trees, castle towers, bats, and pumpkins provide the setting.
For a roughly 5-by-7-inch closed book, cut each cover board slightly larger than the accordion panels. Cut one long cardstock strip and divide it into five equal panels, adding a narrow attachment flap at each end if your design needs one. Exact measurements can vary, but every accordion panel must match and the folded stack must fit comfortably inside both covers.
Make a simple side-view plan. Background pieces stay nearly flat, middle layers project a little, and the central figure can project the farthest. Set a maximum interior depth of about 1/2 inch for a small book. Cut a scrap-cardstock strip to that width and keep it as a gauge while building.
Step-by-step tutorial
1. Score and fold the accordion
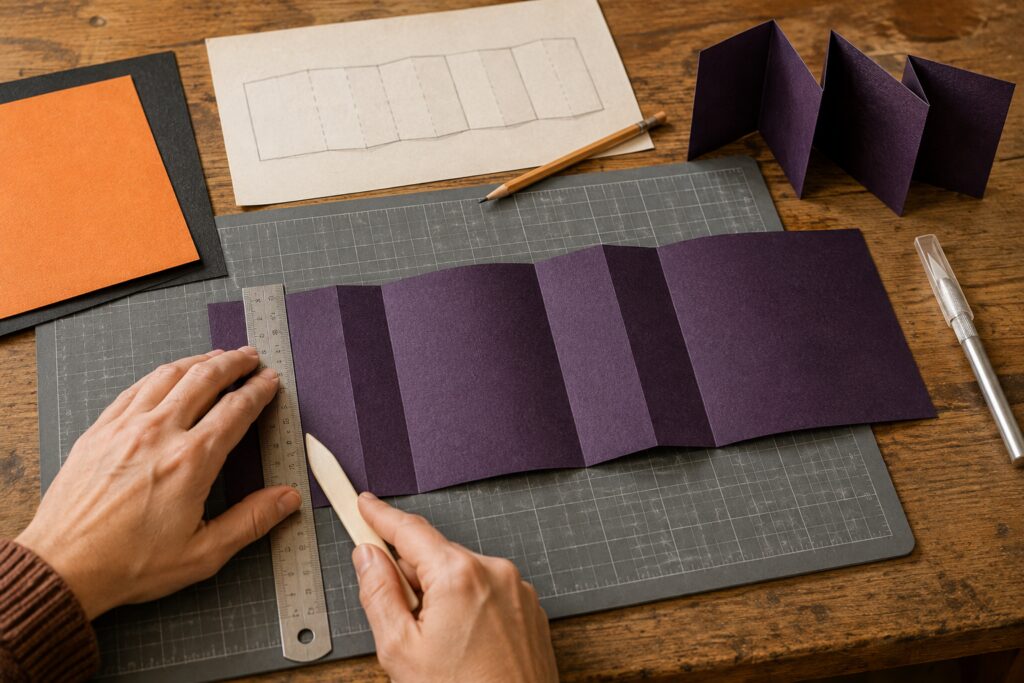
Mark five equal panels across the long cardstock strip. Score every division with a bone folder and ruler or a scoring board. Scoring compresses the paper fibers and gives a cleaner fold than forcing heavy cardstock by hand.
Fold the first line toward you, the second away, and continue alternating valley and mountain folds. Crease each fold firmly with the bone folder. Stack the accordion closed and tap its edges against the table. If one panel projects beyond the others, recheck the score lines before continuing.
2. Make the hard covers
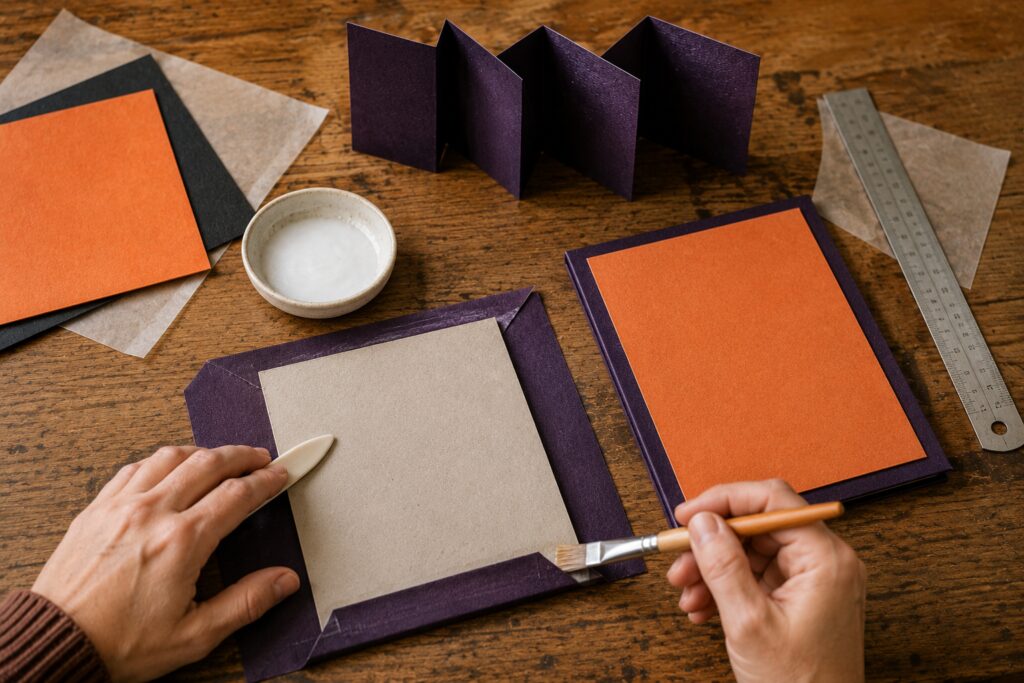
Cut two identical pieces of book board. Each should extend slightly beyond the folded accordion at the top, bottom, and fore edge. Place the boards on the reverse of the book cloth and cut around them, leaving enough material to wrap every edge.
Brush a thin, even coat of adhesive over one board and press it onto the cloth. Trim the cloth corners at a 45-degree angle, leaving a tiny allowance beyond the board point so the corner will not be exposed. Turn in the long edges, then the short edges, smoothing each with the bone folder. Repeat for the second cover.
Cut two lining papers slightly smaller than the boards and adhere them over the turned-in cloth edges. Place wax paper over the covers, sandwich them between clean boards or heavy books, and let them dry flat. Follow the adhesive maker’s drying guidance.
3. Attach the accordion to the covers
Open the accordion and identify the outside face of each end panel. Center one end panel on the inside of the back cover, checking that the accordion clears the cover edges. Mark its position lightly, brush adhesive over the panel, and press it in place.
Close the accordion stack over the attached cover. Apply adhesive to the exposed outside face of the other end panel, align the second cover directly above the first, and lower it into place. This closed-position method keeps both covers square. Insert wax paper where needed and press the book until dry.
Open it gently. The covers should stand like side wings while the center panels form the back of the stage. If the folds resist, work them slowly rather than pulling against the glued joints.
4. Cut the scene from back to front
Trace the inside panel shapes onto scrap paper and use them as layout templates. Begin with the flattest background: a large orange moon adhered directly to the center panel, plus a few tiny stars. Keep shapes away from the accordion creases so nothing blocks the folds.
Next, cut crooked trees and narrow castle silhouettes. Simplify delicate branches and spires so they remain sturdy. Arrange these middle-distance pieces in front of the moon without covering it completely. Finally, cut two pumpkins and a low strip of rocky ground for the foreground.
Before gluing, fold the book closed with the loose pieces inside. Trim anything that catches at a crease or extends beyond the cover edges.
5. Build depth with Z-fold tabs
Cut narrow cardstock strips and score each twice to make small Z shapes. One flat end attaches to the scenery piece and the other attaches to a panel or floor layer. The center section determines how far the piece stands forward.
Adhere the moon flat. Mount the trees and castle with shallow tabs, then use slightly deeper tabs for the pumpkins and ground. Position tabs behind the artwork so they disappear from the front. Work from the back toward the viewer, allowing each layer to dry before adding the next.
6. Assemble the focal creature
Draw the creature as a group of simple overlapping shapes rather than one complicated silhouette. For the owl-moth, cut a tapered body, rows of small feather shapes, two horns or antennae, and layered circles for one large eye. Build the figure flat on the table first.
Use very small amounts of adhesive and allow each layer to set. A metallic pen can add a few star points or feather marks, but keep the detailing restrained. The contrast between paper colors should do most of the visual work.
Attach the creature to a central accordion fold or the foreground base with a folded support. Make sure its weight is centered and its lower edge does not buckle when the stage is open.
7. Check the closing clearance
Use the scrap-cardstock depth gauge made during planning. Hold it across the side of the open stage and confirm that every layer stays within the allowance. Slowly bring the covers together while watching the creature, trees, and pumpkins. The Z-fold tabs should flatten in the same direction rather than collide.
If a piece bends sharply, shorten its tab or move it closer to a fold. If the creature is too thick, remove one decorative layer or replace foam adhesive with flat paper spacers. Do not force the covers shut. A successful paper stage closes with light pressure and opens without needing to reshape the scene.
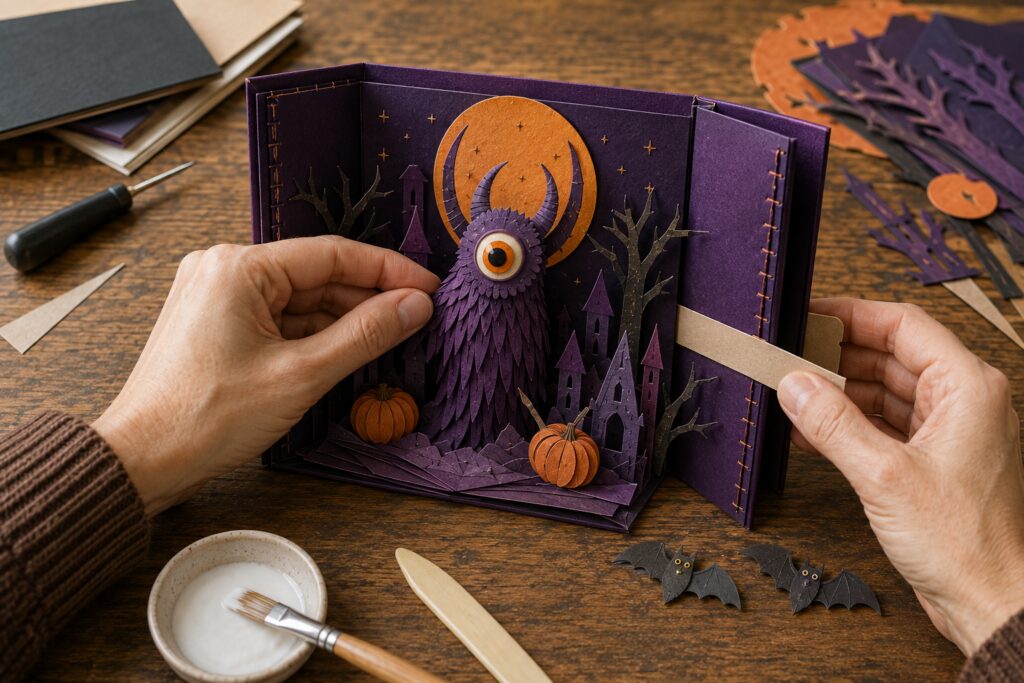
[STEP IMAGE 4: Place after this paragraph. Show the one-eyed purple creature being mounted in the completed stage while a narrow cardstock gauge checks the depth and one cover begins to fold inward.]
8. Add bats and optional stitching
Finish with two or three tiny bats on the side panels, leaving the center creature visually dominant. Test the book again after every addition. Small details near the outer edges can create surprising pressure points when the covers close.
To echo the stitched character of the inspiration image, add a short decorative running stitch to the accordion’s outer end panels before they are glued to the covers. Pre-punch evenly spaced holes with an awl on a protected surface, then sew with waxed thread and a blunt needle. Keep stitching away from the working creases. This detail is decorative, not structural, and can be omitted.
Let all adhesive cure fully. Store the book closed under light weight for the first night, then display it open on a stable shelf, mantel, or party table. Keep paper scenery away from candles, hot bulbs, moisture, pets, and small children.
Tips for getting the finished look
- Choose one star character. The collection in the inspiration feels abundant, but every individual book has a clear focal figure.
- Use color in layers. A dark ground, one saturated accent, and one lighter highlight give the scene depth without requiring painted shading.
- Vary the silhouettes. Pair rounded pumpkins and moons with narrow towers, pointed branches, and wing shapes.
- Leave breathing room. Open areas around the creature help the eye understand the miniature scene.
- Keep handmade edges. Slight variations in feather shapes, leaves, and stars add personality. Clean construction matters more than perfect repetition.
Easy ways to customize it
- Make a black-cat stage with an orange arch and cream foliage.
- Put a pale owl against a purple moon and bare paper branches.
- Create a teal frog pond with layered lily pads and a cool gray moon.
- Use a moth as the focal figure in a berry-pink garden.
- Build a simplified jack-o’-lantern scene for the easiest first version.
- Create all seven themes as a collection, but repeat the same cover size and accordion template so the books display cohesively.
Practical note
The sculptural characters in the inspiration appear much deeper than a normally closing book could accommodate. The achievable version uses shallow cardstock layers, folding tabs, and a planned depth allowance. It will look richly dimensional when open while behaving like a handmade book when closed.