*This post may contain affiliate links for which I earn commissions.*
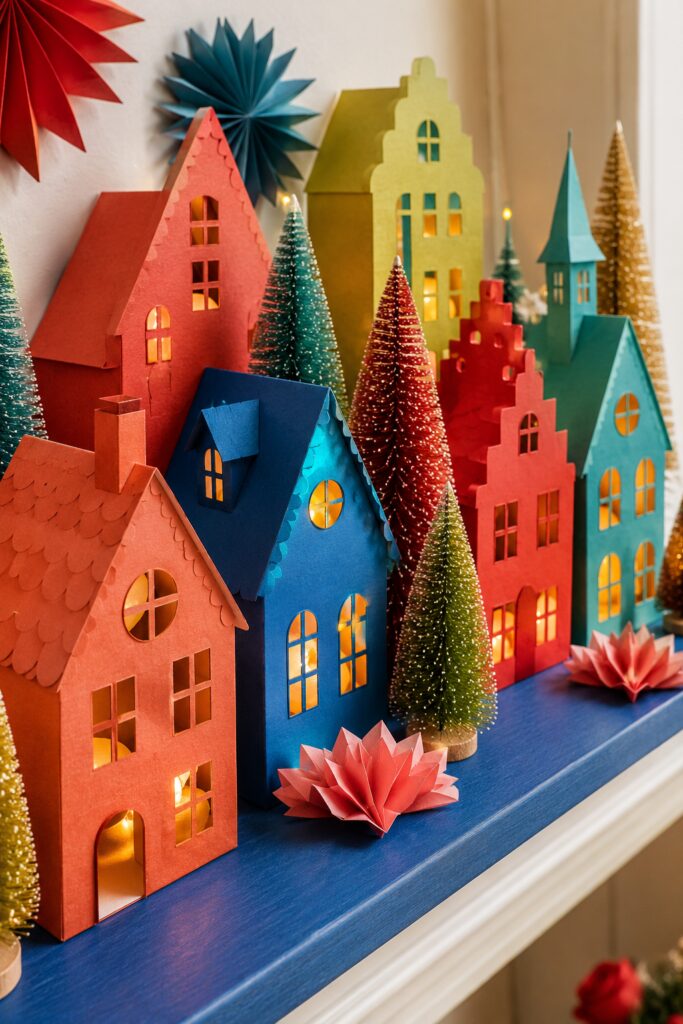
A Christmas village does not have to be white, snowy, or traditional to feel festive. This little streetscape uses coral, cobalt, turquoise, and citron cardstock to turn simple paper houses into a lively display. Stepped gables, steep roofs, glowing windows, miniature trees, and folded stars give it plenty of detail without requiring complicated model-making skills.
The inspiration image suggests a collection of finely constructed paper buildings with concealed lighting. This tutorial adapts that idea into open-backed house shells that are easier to assemble and safer to illuminate. Once you have made one reliable template, you can change the facade and roofline to create an entire coordinated village.
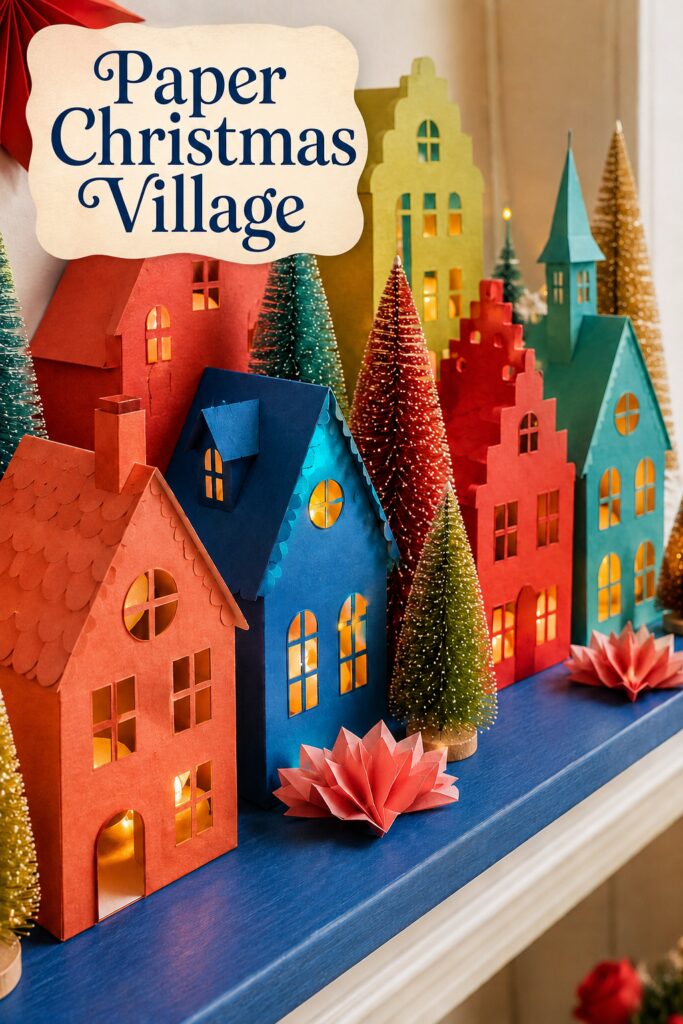
The inspiration image and instructional demonstration images for this project were created with AI. This tutorial translates the visual idea into a practical DIY project; the demonstration images are visual guides rather than photographs of an actually completed village.
What You’re Making
You will create a group of freestanding cardstock houses with cutout windows backed by translucent vellum. Each building has a front, two side walls, an open back, and a separate roof. Warm-white flameless tea lights placed behind the openings illuminate the windows.
A useful village might contain five to seven buildings ranging from approximately 7 to 13 inches tall. The houses do not need to follow those measurements exactly. What matters is the relationship between them: one or two tall buildings, several medium cottages, and at least one narrow structure to vary the skyline.
The image includes elaborate stepped facades and very small crossbars. This version keeps those architectural cues but enlarges delicate cuts and limits each house to a manageable number of windows.
Materials and Supplies
Materials
- Heavyweight cardstock in coral, cobalt, turquoise, citron, red, and optional olive or gold
- Medium-weight translucent vellum in warm white or natural ivory
- Scrap cardstock for reusable templates
- Strong paper craft glue with a fine applicator tip
- Narrow clear double-sided craft tape
- Removable low-tack tape
- Battery-operated warm-white LED tea lights, preferably with timers
- Bottle-brush trees in coordinating shades
- Additional cardstock for folded stars
- Optional fine glitter or white paint for lightly frosted tree tips
Tools
- Self-healing cutting mat
- Precision craft knife with fresh blades
- Metal ruler
- Pencil and white eraser
- Bone folder or blunt scoring stylus
- Small sharp scissors
- Paper clips, binder clips, or small craft clips
- Circle punch, optional
Before You Start
Choose a sturdy cardstock that will hold a fold but can still be cut cleanly by hand. Very thin paper will buckle around the windows, while heavy board can be difficult to score. Test one window, one fold, and one glued tab before cutting a full house.
Plan the village as a color sequence. Avoid placing every coral building together or every blue building together. A rhythm such as coral, cobalt, citron, red, and turquoise will distribute the strong colors across the display.
Make the first house from inexpensive template cardstock. A practical pattern consists of a front facade, a side wall, a second side wall, and a narrow glue tab joined in one long piece. The back remains open. Add bottom tabs only if you want to secure a building to a removable display base.
Use a cutting mat whenever you work with a craft knife. Keep fingers behind the ruler edge, use several light passes instead of forcing the blade through, and replace a dull blade promptly.
Step-by-Step Tutorial
1. Draw a Basic Open-Back House Pattern
Begin with a simple gable-front cottage. Draw the front facade on template cardstock, including the wall rectangle and triangular gable above it. Extend one rectangular side wall from each vertical edge. Add a narrow glue tab to the outside edge of one side wall.
Mark the two vertical folds where the side walls meet the facade. If the house will have a chimney, dormer, or layered roof trim, make those as separate pieces rather than incorporating them into the main net.
Cut out the outer silhouette. Score the two wall folds and the glue tab against a metal ruler. Fold the template temporarily to confirm that both sides stand perpendicular to the facade and that the open back is square.
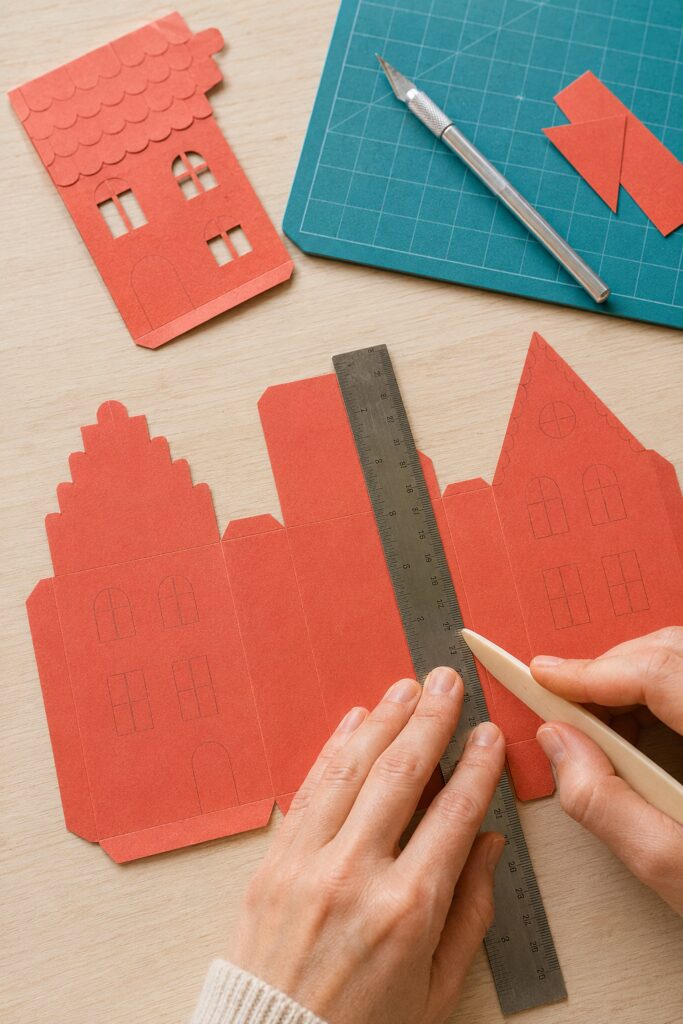
Label the template lightly on the back and keep it for additional cottages. Once the basic structure works, trace it onto the final cardstock.
2. Create Several Roofline Variations
Use the same construction principle to vary the skyline. For a stepped-gable house, replace the triangular top of the facade with a stair-step outline and give the building a simple roof that slopes toward the back. For a tall townhouse, lengthen the wall section and use a shallow pitched roof. For a tower, narrow the facade and add a steep folded cap.
Change one major feature at a time. A tall building with a complex stepped gable needs fewer windows. A simple cottage can carry scalloped roof trim, a round attic window, or a small paper chimney. This restraint keeps the village crisp rather than fussy.
Lay the flat templates side by side before cutting the final colors. Adjust the heights until the row has a clear rise and fall rather than a line of nearly identical peaks.
3. Cut the Windows and Doorways
Trace each template onto the chosen cardstock and mark the windows on the reverse side. Simple rectangles, arches, and circles are the easiest shapes to repeat. Leave at least 1/4 inch of cardstock between neighboring openings and between a window and the outer edge.
Cut the small interior shapes before cutting the outside silhouette. Turn the cardstock instead of twisting the knife around corners. For an arched window, make short controlled cuts along the curve. A circle punch can create a clean round attic opening when the size is suitable.
Window crossbars are optional. If you include them, make them wide enough to survive handling. A strong vertical bar crossed by one horizontal strip is more reliable than an intricate grid.
4. Add the Translucent Window Backing
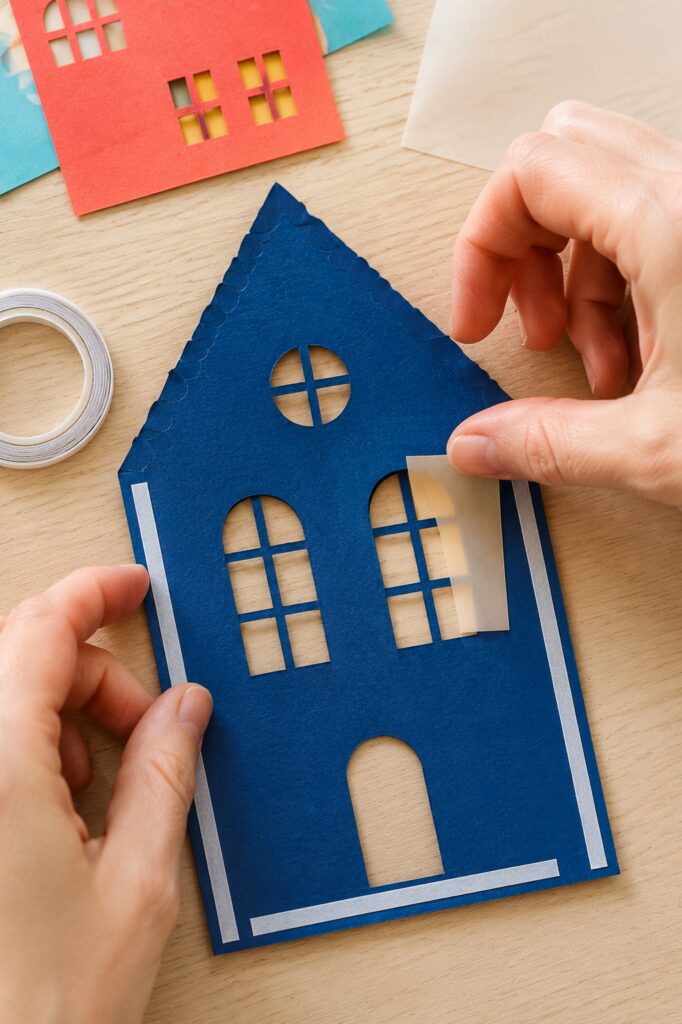
Turn the cut facade interior-side up. Cut one vellum rectangle large enough to cover the entire window group, or use separate pieces for widely spaced openings. Apply narrow double-sided tape around the perimeter of the vellum, keeping it outside the visible window areas.
Press the vellum flat behind the openings. Avoid liquid glue directly around the windows because it can wrinkle the translucent sheet or create shiny patches when illuminated.
Hold the facade in front of a lamp to check the effect. Trim any vellum that extends across a wall fold or glue tab, then repeat the process for windows cut into the side walls.
5. Score and Fold the House Shell
Place the cardstock exterior-side down. Score every wall fold, roof tab, and glue tab with a ruler and bone folder. Press firmly enough to compress the paper fibers without cutting through them.
Pre-fold each scored line before adding adhesive. The two side walls should swing back at right angles to the facade. Fold the narrow glue tab inward so it will remain hidden.
If the cardstock has a textured or coated face, test the fold direction on a scrap. A gentle preliminary score helps prevent the surface from cracking.
6. Assemble the Walls
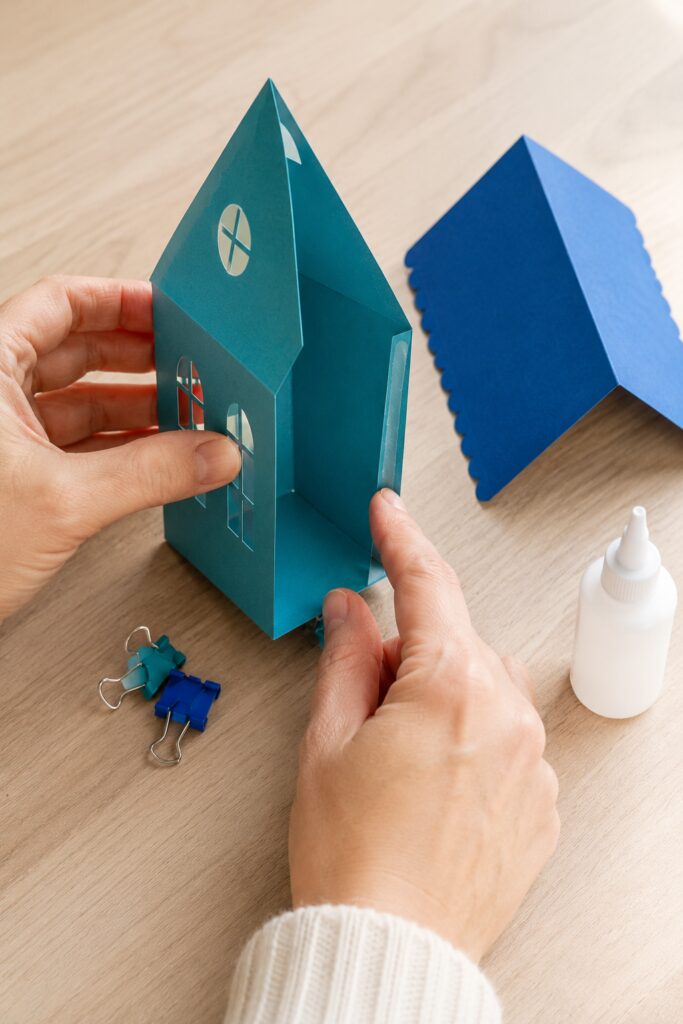
Apply a thin line of paper craft glue to the side tab. Join it only where the design calls for an enclosed corner. For the basic open-back shell, each side wall remains free at the rear, so the building can slip over or stand in front of its light.
Set the facade upright and use a small square object, such as a clean box, to hold each side at a right angle while the glue sets. Clips can hold accessible tabs, but do not squeeze them so tightly that they dent the cardstock.
Check the building from the front before the adhesive becomes firm. The roofline should be level, both sides should reach the table, and the facade should not bow.
7. Fold and Attach the Roof
Measure the distance from the front ridge to the back edge of the side walls, then add a small overhang. Cut one roof rectangle twice that sloping measurement plus the overhangs. Score the center ridge and fold it sharply.
Place the roof over the house without glue and check the fit. When it sits evenly, run a thin line of adhesive along the upper edges of the facade and side walls. Center the roof, press lightly, and let it set.
For the scalloped edge seen in the inspiration image, cut a narrow strip with overlapping rounded scales and attach it beneath the front roof edge. Keep the trim in the same color family as the house so the color-blocked effect remains clean.
Add simple chimneys or dormers after the main roof is secure. A chimney can be folded from a small rectangular tube with four walls and one glue tab. Keep its bottom open and glue two edges to the roof.
8. Build the Stepped-Gable and Tower Houses
A stepped-gable facade can be tall and flat, with side walls that stop beneath a shallow roof behind it. Reinforce the interior of a very narrow top step with a second cardstock layer. The tower house can use a rectangular open-backed shell with a four-sided pointed roof folded from a separate piece.
These specialty buildings need only a few well-placed windows. Two or three rows create the impression of height without weakening the paper. Repeat the same vellum treatment so their windows glow like the cottages.
9. Fold the Paper Stars
Cut several equal squares from coral, red, or cobalt paper. Accordion-fold each square, crease the center, and trim the open ends into points. Fan the folds outward and join the meeting edges with glue or narrow tape.
For a fuller star, make two matching folded fans and attach them back to back. Use one or two stars near the front of the display and reserve larger versions for the wall behind the village.
10. Arrange and Illuminate the Streetscape
Place the tallest buildings toward the back and shift them slightly off center. Bring two medium houses forward and use the narrow tower to bridge a gap. Leave small passages between buildings so the shelf color remains visible.
Set a warm-white battery-operated tea light immediately behind each open-backed house. The light should shine through the vellum without touching the cardstock. Timer lights make it possible to illuminate the village without moving the buildings every evening.
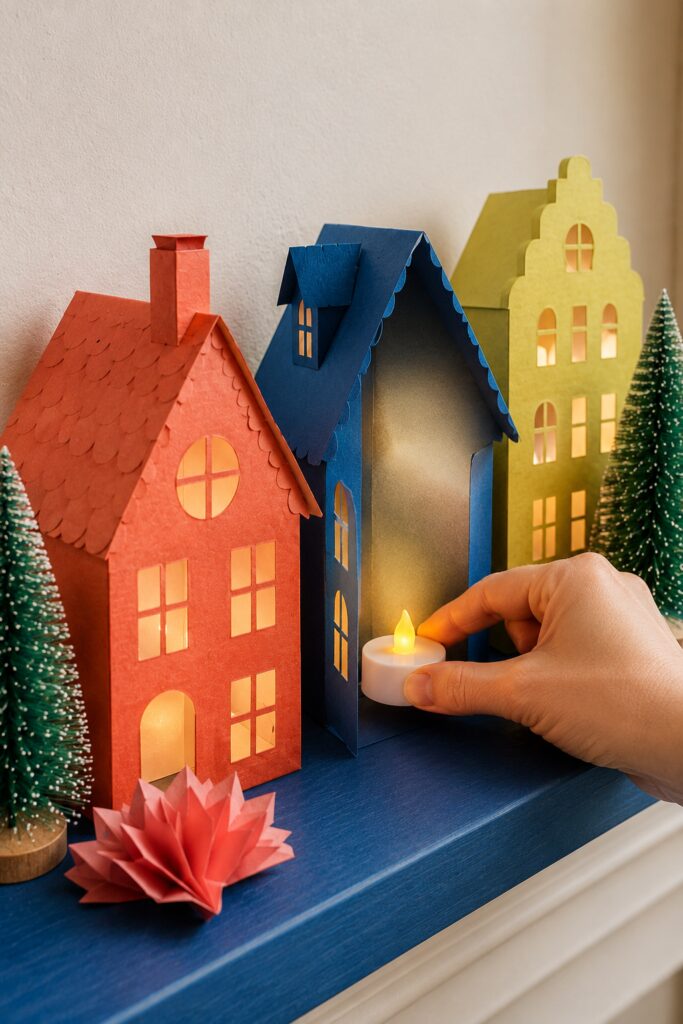
Add bottle-brush trees after the houses are placed. Vary their heights and tuck some between buildings, but do not hide the most distinctive windows or rooflines. Finish with the folded stars and, if desired, a restrained scattering of paper confetti.
Never use real candles, incandescent bulbs, or any light source that becomes hot. Paper, vellum, and adhesive must be kept away from flame and heat.
Tips for Capturing the Finished Look
Let the architecture and palette do most of the work. The inspiration image succeeds because large areas of uninterrupted color sit beside contrasting houses. Avoid outlining every window or adding decorative trim to every edge.
Balance warm and cool colors. Coral and red houses feel richer beside cobalt and turquoise, while citron acts as a visual spark. If one shade dominates, repeat its opposite on the other side of the village through a smaller house, tree, or folded star.
Vary roof shapes as well as building heights. A row of steep gables alone can look repetitive. Combine a broad cottage, a narrow townhouse, a stepped facade, and a pointed tower.
Keep the window light warm rather than stark white. The amber glow softens the saturated paper and helps the entire streetscape feel like Christmas decor rather than a model-building exercise.
Easy Ways to Customize the Village
For a softer palette, substitute blush, dusty blue, sage, and butter yellow while keeping the same building silhouettes. A jewel-toned version could use raspberry, peacock blue, emerald, and deep gold.
You can also simplify the project into three houses for a narrow shelf. Choose one gable cottage, one tall stepped building, and one tower so the smaller group still has an interesting skyline.
For a more detailed version, add removable paper awnings, tiny door wreaths cut from green cardstock, or simple snow caps along two or three roofs. Keep embellishments flat and selective so they do not overwhelm the crisp color blocking.
Displaying and Storing the Finished Village
Arrange the village on a mantel, console, buffet, bookcase, or deep windowsill that stays dry. Keep it away from heating vents, real candles, and damp glass. If children or pets can reach the display, secure the lightweight trees and folded stars with removable museum putty and keep button batteries inaccessible.
At the end of the season, remove the lights and nest smaller open-backed houses inside larger ones only if the roofs are removable. Otherwise, store each building upright in a lidded container with tissue between delicate facades. Keep the reusable templates flat so the village can grow next Christmas.
The houses do not need to reproduce every fanciful detail in the AI inspiration. A strong palette, clean window cuts, a varied skyline, and warm vellum-backed light will create the same imaginative Christmas mood.