*This post may contain affiliate links for which I earn commissions.*
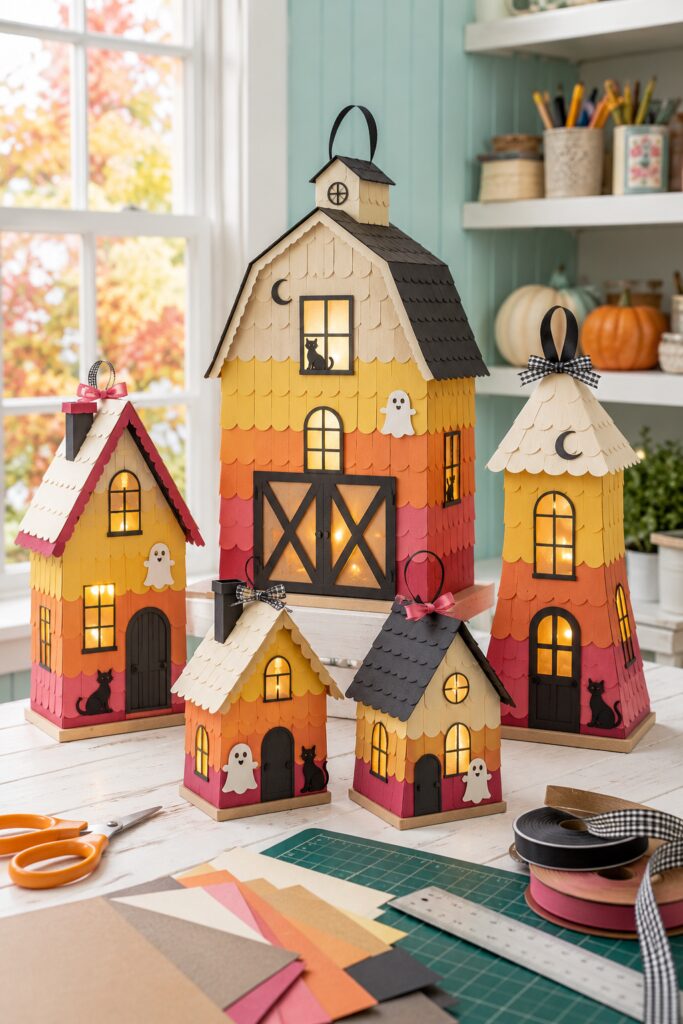
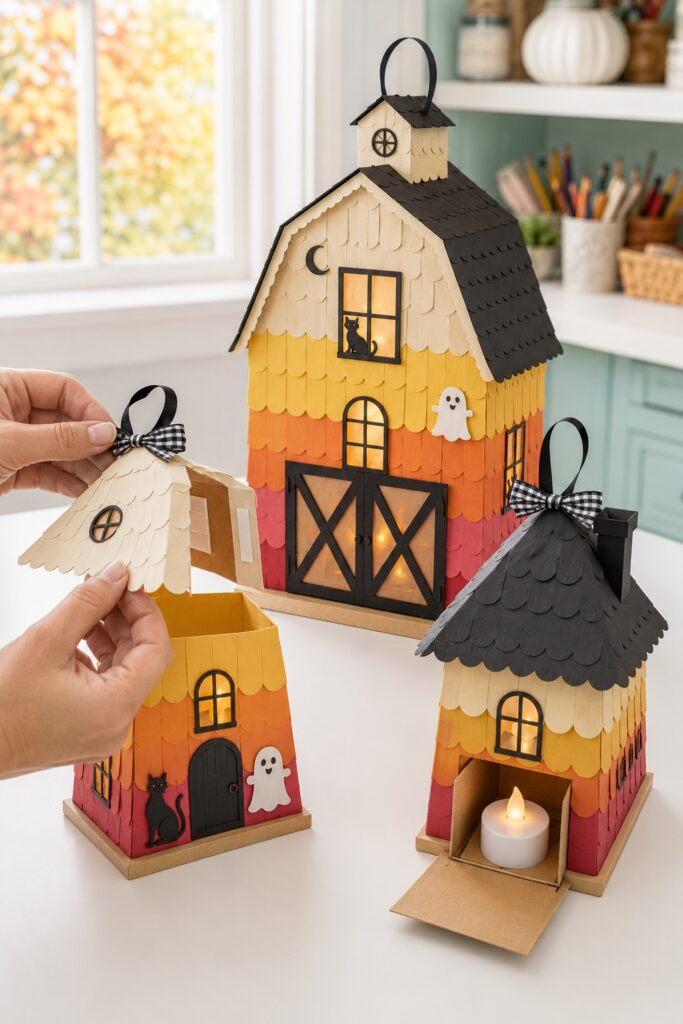
A cluster of glowing paper houses makes Halloween decorating feel playful without relying on dark or eerie finishes. This village takes its cue from candy corn, but the layered scallops, barn-style doors, tiny cats, friendly ghosts, and crescent moons give it a handcrafted storybook character rather than a literal candy theme.
The method below turns that visual idea into a realistic paper project using scored cardstock shells, separate roofs, vellum-backed windows, and battery lights. You can make one cottage first, then reuse the method in different proportions to build a coordinated group.
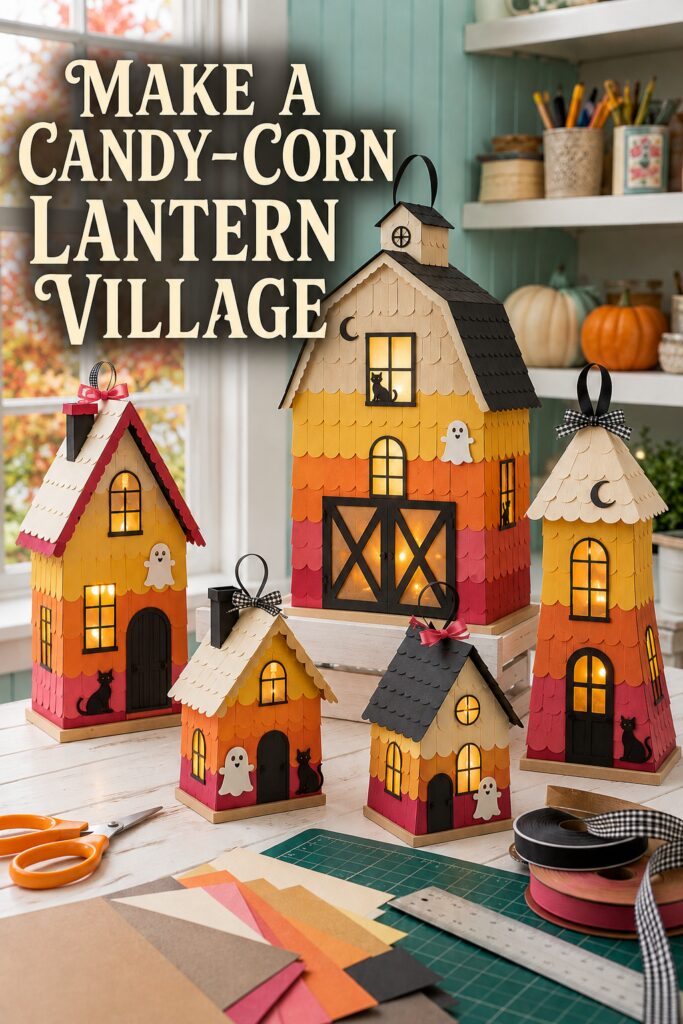
The inspiration image and instructional demonstration images for this project were created with AI. This tutorial translates the visual concept into a practical method you can recreate at home.
What You’re Making
You will make a set of freestanding indoor paper lantern houses. A five-building village looks full, but two cottages and one taller barn already create a satisfying arrangement. Each shell has a removable roof or access flap, translucent windows, overlapping scalloped color bands, and flat black paper details. The decorative tower on the largest lantern is optional because a simple barn roof is sturdier for a first attempt.
Materials and Supplies
Paper and structure
- Medium-weight cardstock for the shells, ideally kraft, cream, or another light neutral
- Cardstock in warm cream, golden yellow, orange, coral-pink, and matte black
- Translucent white vellum for the windows
- Chipboard or heavy cardstock for removable bases
- Scrap paper for templates
- Narrow black ribbon and small gingham or coral ribbon bows, optional
Adhesives and lighting
- Fine-tip paper craft glue that dries clear
- Narrow double-sided paper craft tape
- Small removable adhesive dots, optional
- Warm-white battery-operated LED tea lights, one per house
Tools
- Self-healing cutting mat
- Metal ruler
- Pencil and eraser
- Craft knife with a fresh blade
- Scissors
- Scoring board and stylus, or a bone folder and ruler
- Small paper clips or binder clips
- Scallop border punch, small circle punch, or a hand-cut scallop template
- Electronic cutting machine, optional for windows and silhouettes
Before You Cut
Protect the table with a cutting mat and keep fingers behind the ruler when using a craft knife. Make one plain-paper mock-up before cutting the decorative cardstock. For an easy first cottage, start with a front and back roughly 5 inches wide and 7 to 8 inches tall, plus side walls 3 to 4 inches deep. Add half-inch glue tabs where panels meet. The exact size can change, but the paired walls must match.
Plan every window, door, fold line, and access flap before assembly. Keep openings at least half an inch from folds and corners so the shell does not buckle. Use only cool battery LEDs inside paper lanterns. Never place a flame candle, hot bulb, or corded light that can build heat inside the house.
1. Draft a Reusable House Template
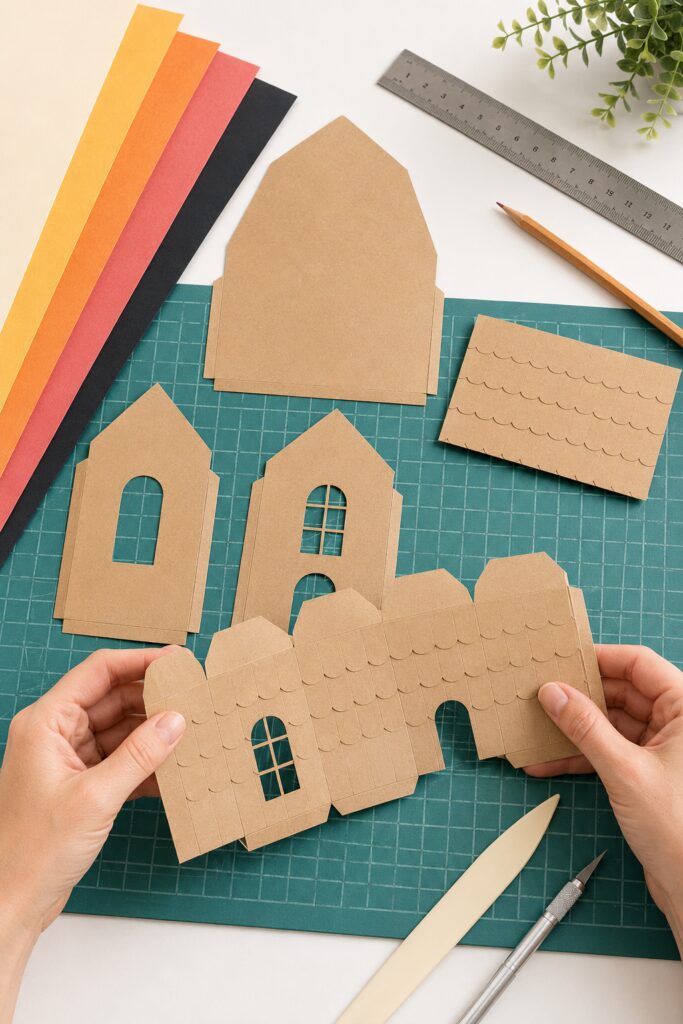
Draw the front as a rectangle topped with a centered gable. Trace it for the back so the roof angles match. Draw two rectangular side walls and add glue tabs along the edges that will sit inside the front and back. For the barn, widen the body and use a taller gable. A cupola can be a small four-sided box with its own folded roof, but it is optional.
Mark a rear access door or bottom flap large enough for a tea light. A flap secured with a small paper tab or removable adhesive is easier to use than a permanently sealed base.
2. Cut Openings and Score the Folds
Transfer the templates to the structural cardstock. Cut the outer shapes first. Then cut arched windows, round windows, doors, and the rear access opening with a sharp craft knife and metal ruler. Several simple windows will look cleaner than many tiny openings.
Score every fold before bending it. Run the scoring tool along the ruler with moderate pressure, then fold the cardstock away from the scored groove and sharpen the crease with a bone folder. Do not cut all the way through a fold line.
3. Back the Windows with Vellum
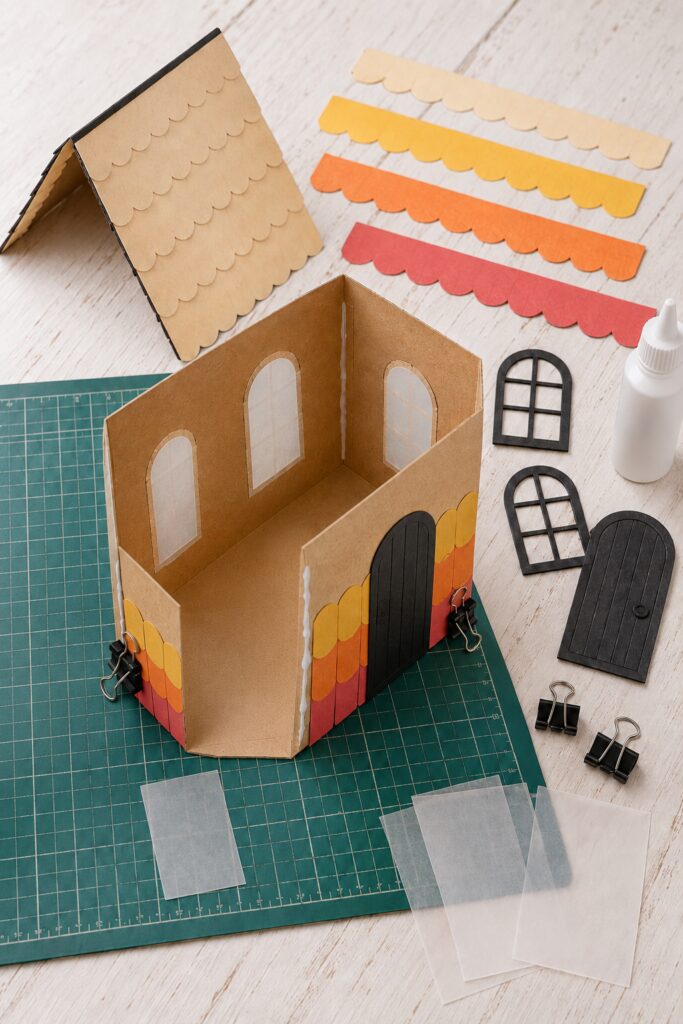
Cut each vellum panel about a quarter inch larger than its opening. Working on the inside face of the wall, apply a very thin line of clear-drying glue around the opening and press the vellum flat. Keep adhesive away from the visible center because it may show when illuminated. Let the panels dry under a light book or acrylic block if they curl.
4. Assemble and Square the Shell
Dry fit the four walls first. Apply narrow double-sided tape or a thin bead of paper glue to one tab at a time, then press the next wall into place. Work around the shell and close the final seam last. Set the house on the table and gently adjust the corners until the walls stand square. Clips can hold the seams while liquid glue dries.
Cut a chipboard base slightly wider than the finished shell. Attach the house to the base on three sides, leaving the planned access flap usable. The base adds weight and prevents the tall barn from leaning.
5. Make the Candy-Corn Scallop Bands
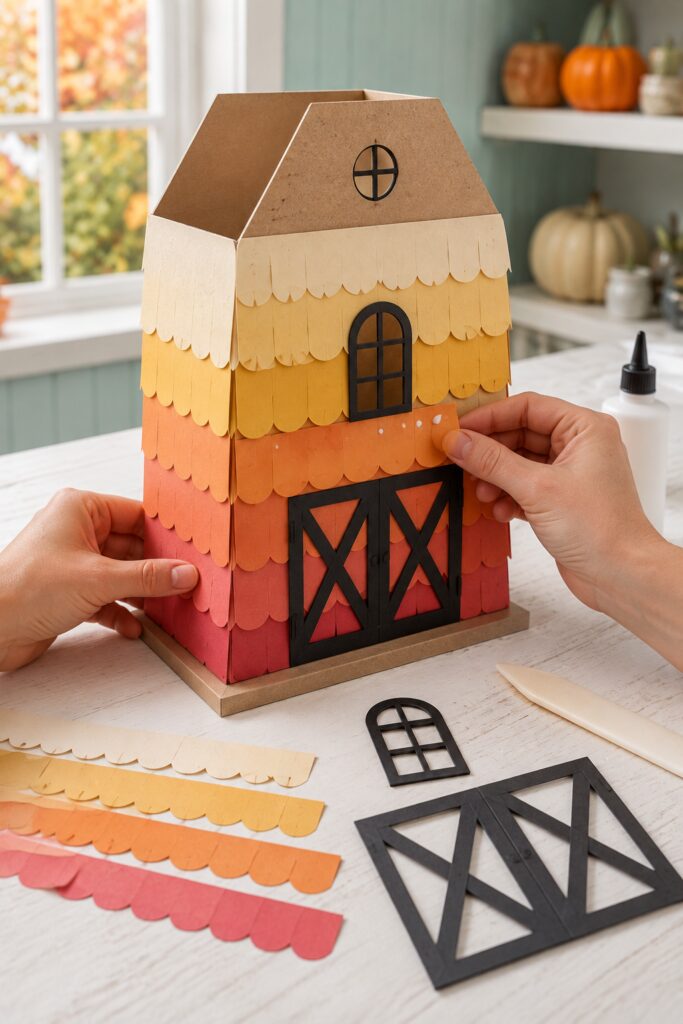
Cut long strips of coral-pink, orange, golden yellow, and warm cream cardstock. Make the scalloped edge with a continuous border punch, overlapping circle punch cuts, or a small hand-cut template. For the handmade patchwork effect, the scallops may vary slightly, but keep each strip close to the same height.
Start at the bottom of a wall with coral-pink. Add orange above it, then yellow, then cream. Let each upper row overlap the top of the row below by about a quarter inch. Stagger the scallops from row to row, wrap the bands around corners neatly, and trim the ends at a rear seam.
6. Add Roofs, Frames, and Barn Details
Score a separate roof rectangle down the center and test it over the gable. Leave a modest overhang at the front, back, and sides. Cover it with black scalloped rows, or use cream on selected cottages to vary the village. Attach the roof with tape on roof tabs if you want it removable, or glue only one slope and use a small hidden tab on the other.
Cut black frames slightly larger than the window openings and glue them to the exterior. Add simple doors, barn-door cross braces, a chimney, or a small cupola. Flat paper details are lighter and more reliable than thick embellishments on the walls.
7. Give Each House Its Own Halloween Details
Cut a few small black cats, white ghosts, and crescent moons from cardstock. Repeat only one or two motifs on each building so the village feels coordinated without looking copied. Position silhouettes beside doors or along lower corners, where they will not compete with the glowing windows. Add ribbon loops to roof peaks for the lantern-like profile, but display the houses standing on their bases rather than hanging them.
8. Install Safe, Removable Lighting
Place one warm-white battery LED tea light inside each finished shell through the rear or bottom access flap. Center the light below the windows and secure it with a removable adhesive dot if it slides. Test the glow in a dim room, then reopen the flap whenever the battery or switch needs attention.
Tips for Capturing the Storybook Look
- Keep the warm color order consistent on every house, even when the number or width of bands changes.
- Let the barn rise about one-and-a-half times the height of the cottages so the group has a clear center.
- Balance black details across the arrangement. A black roof on one cottage can visually echo the large barn roof.
- Use warm-white, not cool-blue, LEDs so the vellum windows resemble a candlelit glow.
- Arrange buildings at slightly different angles and heights. A small riser beneath the barn helps the silhouettes read separately.
Easy Ways to Customize the Village
Replace coral-pink with deep red for a more traditional candy-corn palette, or swap the orange band for muted terracotta to soften it. Turn the barn into a tall townhouse by narrowing the front, or create a row of tiny cottages from one reduced template. For a quilt-inspired variation, piece each scalloped band from short blocks of related shades instead of using one solid strip.
Displaying the Finished Lanterns
Cluster the village on a mantel, console, buffet, craft-room shelf, or covered tabletop where the paper will stay dry. Keep the pieces away from open flames, damp areas, heat vents, and curious pets that may chew ribbon or paper. If children will handle them, omit loose bows and use sturdier bases. These lanterns are indoor decorations and should not be exposed to rain or overnight humidity.
A Village That Rewards Small Variations
The charm comes from the repeating palette and changing house shapes, not from duplicating every feature in the inspiration image. Begin with one cottage, refine the template, and let each later building add a new roofline or tiny character. Once the windows glow together, even a modest group will read as one fanciful Halloween village.