*This post may contain affiliate links for which I earn commissions.*
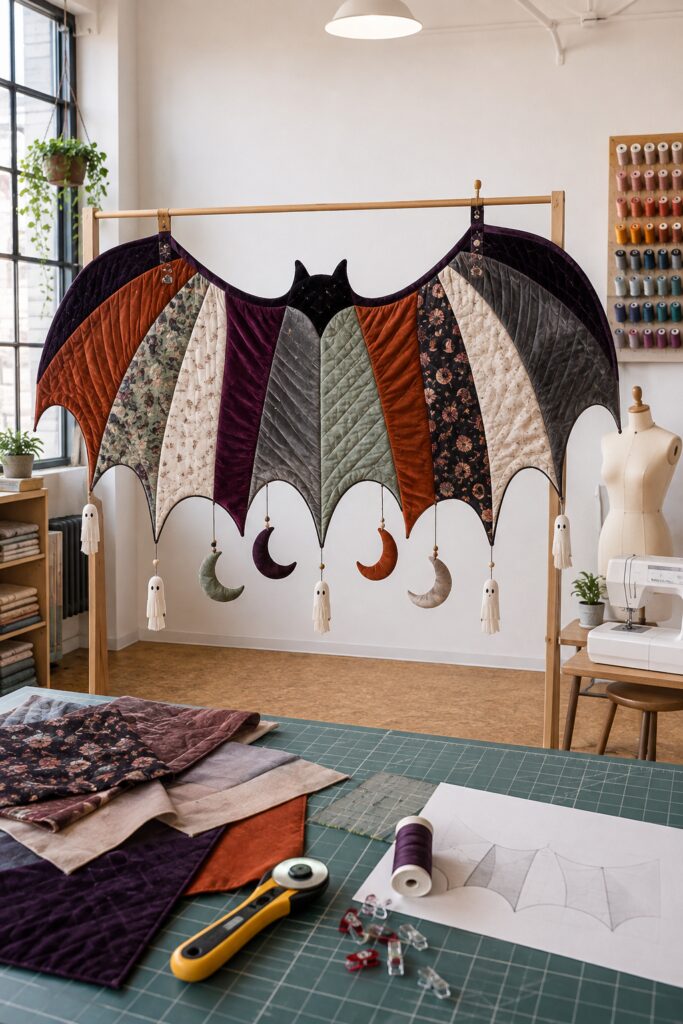
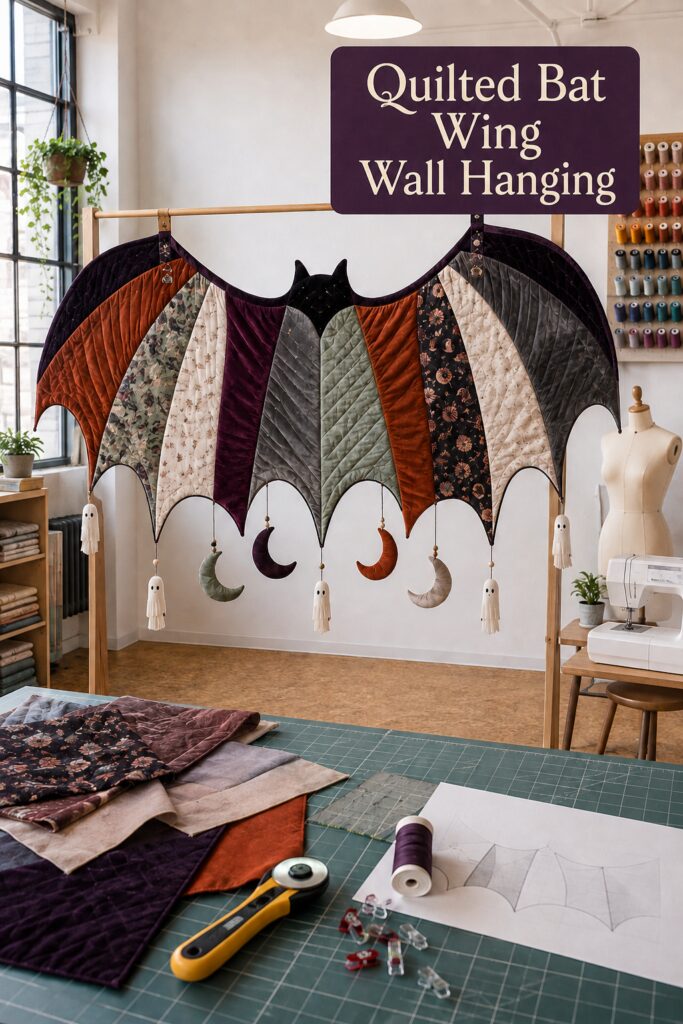
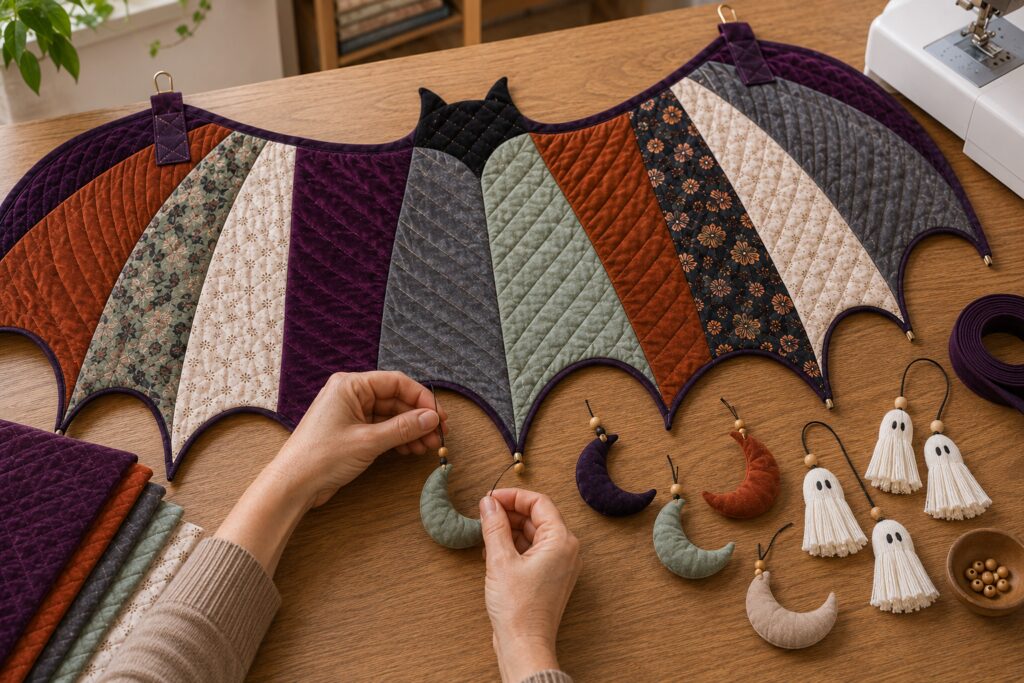
This quilted bat wing turns patchwork into a Halloween statement piece with a softer, handmade character. Deep plum, smoky gray, rust, sage, cream, and botanical prints radiate across the wings, while crescent moons and tiny tassel ghosts add movement along the scalloped lower edge.
The tutorial below adapts that imaginative visual into a practical wall hanging made with pieced fabric, low-loft batting, stabilizer, and curved bias binding. The inspiration and instructional images for this project were created with AI. They illustrate the concept and useful construction stages rather than documenting an object that was physically sewn.
What You’re Making
The finished project is a wide, shaped textile hanging that resembles an outstretched pair of bat wings. A suggested finished size is approximately 42 to 48 inches wide and 22 to 26 inches from the upper curve to the lowest wing point, not including the dangles. A black quilted body anchors the center, mirrored patchwork panels fill the wings, and reinforced fabric tabs suspend the piece from a decorative dowel or wall-mounted rod.
The AI image suggests an unusually large, perfectly supported textile. This version is intentionally smaller and includes lightweight stabilizer, close quilting, and reinforced tabs so it holds its silhouette without requiring a rigid frame across every curve.
Materials and Supplies
Fabrics and Structural Materials
- Coordinating quilting cotton in deep plum, rust, charcoal, muted sage, cream, and one or two small-scale Halloween or botanical prints
- Black quilting cotton for the central bat body
- Backing fabric large enough for the entire silhouette
- Low-loft cotton or cotton-blend batting
- Lightweight or medium-weight fusible stabilizer suitable for fabric wall décor
- Deep plum or black bias binding, or enough matching fabric to make bias strips
- Small fabric scraps for crescent moons
- Cream cotton yarn or embroidery floss for tassel ghosts
- Polyester stuffing for the moons
- Black embroidery floss for ghost eyes
- Narrow dark cord for the dangles
- Small unfinished wooden beads, optional
- Two or three small D-rings or a decorative dowel and wall brackets
Tools
- Sewing machine with a fresh universal or quilting needle
- Coordinating thread
- Rotary cutter, acrylic ruler, and self-healing cutting mat
- Fabric scissors and paper scissors
- Iron and pressing surface
- Fabric clips and pins
- Flexible curve ruler or round household objects for drawing scallops
- Kraft paper, taped printer paper, or pattern paper
- Walking foot, helpful for quilting the layered piece
- Hand-sewing needle
Before You Start
Wash and press cotton fabrics if you expect the finished piece to be washed later. Test any velvet-look or specialty fabric with the iron before using it. For the easiest construction, use quilt-weight cotton throughout and let color and print create the rich appearance.
Measure the intended wall and decide the maximum width before drawing the pattern. Tape paper into one sheet larger than the planned hanging. Leave enough room below the wing for moons and ghosts, and keep the finished dangles away from heaters, vents, candles, and areas where children or pets could pull them.
Step-by-Step Tutorial
1. Draw One Full Bat-Wing Pattern
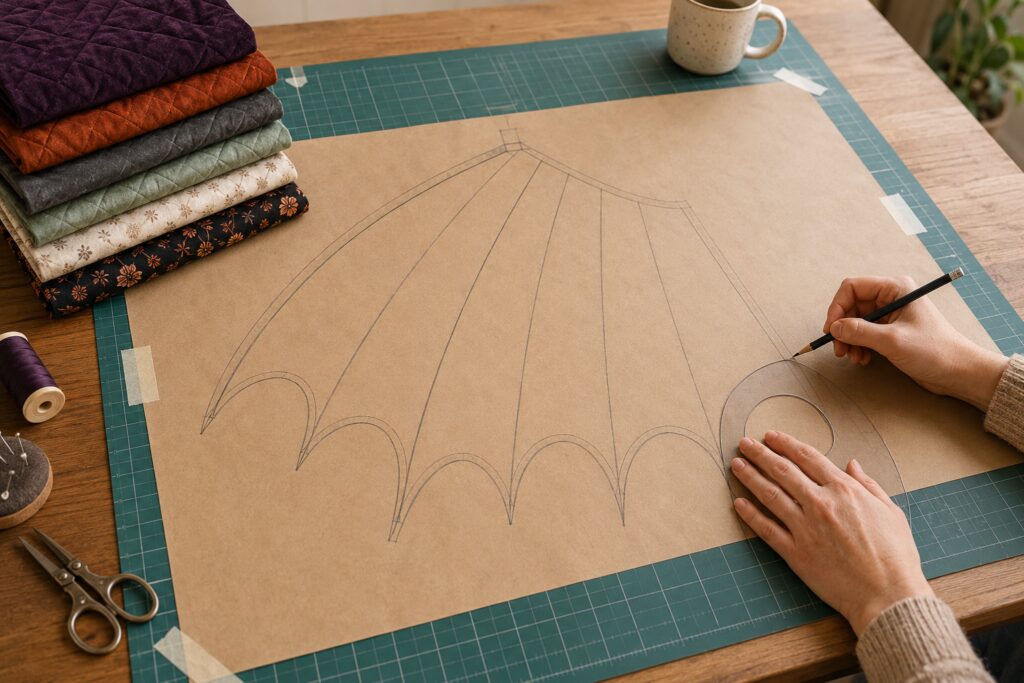
Draw a vertical centerline on the paper. Mark the total width and height, then sketch a shallow dip from each upper wing shoulder toward the center. Add a small black bat body at the center with two pointed ears and a long lower body that overlaps the wing join.
Shape each outer wing as a broad curve. Along the lower edge, draw three rounded inward scallops per side, ending each curve in a narrow downward point. Keep the concave curves generous rather than tight. Broad curves are much easier to bind smoothly.
Divide the wings into radiating wedge-shaped panels that spread outward from the center. Mirror the divisions visually, but allow some fabrics to change positions so the result does not appear too rigid. Trace a second cutting line approximately 1/4 inch outside the finished outline for the seam and trimming allowance.
2. Turn the Drawn Panels Into Templates
Number the paper wedges for your own reference before cutting the pattern apart. Cut each wedge along the drawn division lines. When transferring a panel to fabric, add a 1/4-inch seam allowance to every straight edge that will be joined to another panel. Keep the outer silhouette allowance already included in the master pattern.
Cut the left and right sets separately so prints remain right side up. If you want exact symmetry, flip each template for the opposite side. For a more collected patchwork effect, use the same wedge shapes but rearrange two or three colors across the second wing.
3. Piece the Radiating Wings
Lay all cut pieces on the master paper pattern before sewing. Confirm that every wedge points toward the center and that the high-contrast prints are distributed across both sides.
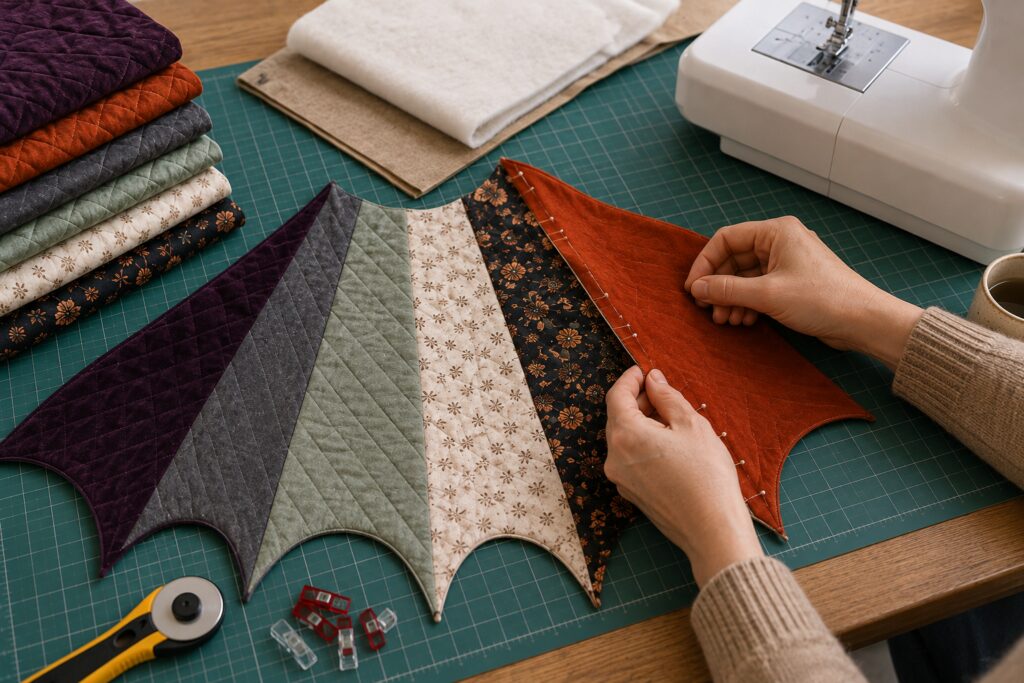
Working from the center outward, place the first two wedges right sides together. Pin or clip one straight seam and sew with a consistent 1/4-inch allowance. Press the seam toward the darker fabric. Continue adding one panel at a time until both wings form one complete patchwork top.
Do not trim the scalloped outline yet. The little bit of extra fabric around the perimeter gives you room to correct minor shifting after quilting.
4. Build and Quilt the Layered Silhouette
Cut the fusible stabilizer slightly smaller than the patchwork top so it stays out of the final binding seam. Fuse it to the wrong side according to its instructions. Place backing fabric right side down, add low-loft batting, and position the stabilized patchwork top right side up.
Baste the layers with pins, temporary basting spray, or long hand stitches. Begin quilting near the center and work outward. Straight diagonal lines that follow the direction of each wedge echo the appearance in the inspiration image and help the broad wings hold their shape. Space the quilting closely enough to control the layers without making the textile stiff.
Quilt the black center-body piece separately with a simple grid or diagonal pattern. Place it over the central wing join and stitch around its edge with a narrow zigzag or appliqué stitch. Its widest section should cover the raw meeting point of the mirrored panels.
5. Trim the Curves Carefully
Return the master pattern to the quilted piece and trace the final silhouette. Cut through all layers with sharp fabric scissors, taking extra care around the inward curves and pointed scallop tips.
If any lower point feels too narrow to bind neatly, round it slightly. The finished piece will still read as a bat wing, and a clean curve is more attractive than a bulky, twisted point.
6. Bind the Outer Edge
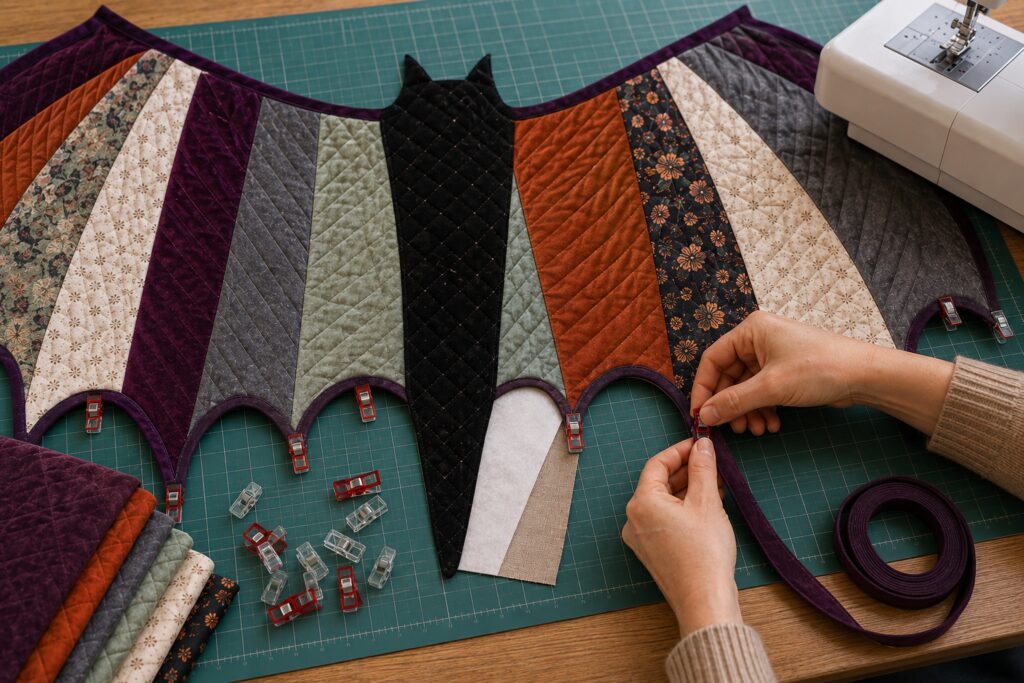
Use true bias binding around the entire silhouette. Fabric cut on the bias stretches enough to follow the deep scallops and upper curves without puckering. Pre-made binding can work, but test it around the tightest curve before attaching the full length.
Clip the binding around one short section at a time. Ease it through each concave scallop without pulling. Sew slowly, shorten the stitch length slightly near the deepest part of a curve, and stop with the needle down whenever you need to reposition the layers. Fold the binding to the back and finish it by machine or hand.
7. Make the Stuffed Crescent Moons
Draw a simple crescent approximately 4 to 5 inches tall. For each moon, cut two fabric pieces right sides together. Sew around the shape with a narrow seam allowance, leaving a small opening along the outer curve. Clip the seam allowance around the inner crescent, turn the moon right side out, and fill it lightly with polyester stuffing.
Close the opening with a ladder stitch. The moons should feel soft and light, not firmly packed. Make three to five in the same colors used in the patchwork panels.
8. Make the Tassel Ghosts
Wrap cream yarn around a small piece of cardboard until the tassel looks full. Tie it securely at the top, slide it off the cardboard, and bind a second piece of yarn below the top to form the head. Trim the skirt evenly.
Use black embroidery floss to make two tiny vertical eye stitches. Avoid beads or glued eyes if the piece will hang where a child or pet could reach it. Make three to five ghosts, varying the skirt length slightly.
9. Attach the Dangles to Reinforced Points
Decide where each moon and ghost will hang before sewing. Alternate the shapes without creating a strict pattern, and leave a few scallop points empty so the lower edge does not become crowded.
Stitch a small fabric reinforcement patch to the back of every selected point. Pass dark cord through that reinforced area, add one or two wooden beads if desired, then knot the moon or ghost securely at the bottom. Keep the dangles short enough that they do not tangle when the hanging moves.
10. Add the Hanging Tabs
Make two wide tabs from folded and interfaced fabric. Position one near each upper wing shoulder, where several patchwork seams and quilting lines can help distribute the load. Stitch a reinforced rectangle with an X through each tab and the quilted hanging.
For a piece wider than approximately 42 inches, add a discreet third loop behind the center body. Slide a smooth decorative dowel through the tabs, or attach D-rings and hang them from correctly rated wall hooks. Check the textile from a distance and adjust the center support until the upper curves hang evenly.
Tips for Achieving the Finished Look
Let deep plum and charcoal frame the composition, then use rust, sage, cream, and patterned fabrics as alternating highlights. Repeating one print on each side helps the broad shape feel balanced even when the layout is not perfectly mirrored.
Quilting direction matters. Lines that angle outward from the center exaggerate the wingspan, while the black body looks more distinct with a different quilting pattern. Keep the batting low loft so the lower points remain crisp.
The moons and ghosts should look secondary to the quilted silhouette. Use lightweight materials and plenty of open space between them so they add movement without hiding the scalloped edge.
Easy Ways to Customize It
For a smaller project, reduce the pattern to about 30 inches wide and use three lower scallops per side. It can hang from two tabs without a center support.
Replace the ghosts with fabric tassels for a less whimsical appearance, or omit every dangling piece and let the quilted wings stand alone. A black-and-cream version will feel more graphic, while muted plum, copper, and moss create a softer vintage Halloween palette.
Scrap quilters can make every wedge from a different fabric, provided the overall values alternate between light and dark. Avoid heavy upholstery fabric because mixed weights can distort the seams and make the hanging sag.
Displaying the Finished Wall Hanging
Hang it indoors on a wall with enough open space for the full wingspan. Use hardware appropriate for the wall material and confirm that the dowel or rod cannot slide out of its brackets. Keep it away from open flames, hot light fixtures, moisture, active vents, and frequently opened doors.
If it develops a fold during storage, press from the back using a temperature suitable for the most delicate fabric. Never place a hot iron directly on synthetic stuffing, yarn embellishments, or unknown specialty fabrics.
Let the Handmade Details Show
The project does not need to reproduce every panel or dangle from the AI inspiration. The bat silhouette, radiating patchwork, dimensional quilting, and suspended accents are what make the design recognizable. Small variations in fabric placement and hand stitching give the finished piece the character of an actual handmade Halloween decoration.