*This post may contain affiliate links for which I earn commissions.*
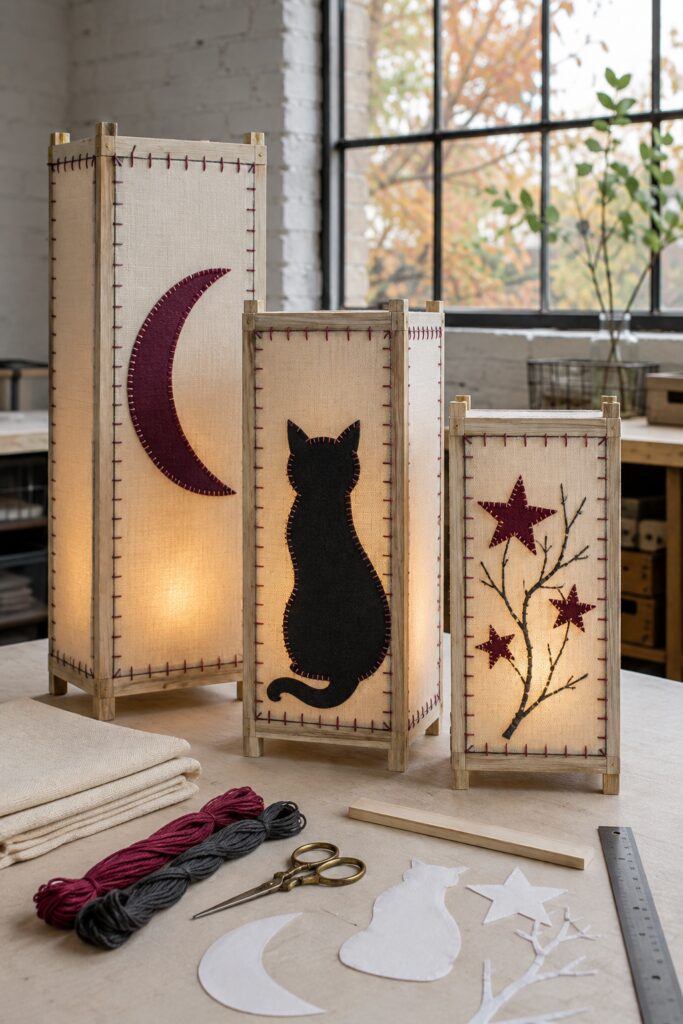
Softly illuminated sailcloth gives these Halloween lanterns a gentler presence than glass or metal. Their pale wood frames and visible stitching feel handmade, while the crescent moon, seated cat, stars, and bare branch remain recognizable from across a room.
The inspiration suggests that the canvas may be held to the wood entirely by decorative stitching. A more dependable construction method is to staple each completed fabric panel to the inside of a rigid frame and conceal the fasteners with thin wooden trim. The berry perimeter stitches remain visible but do not have to carry the tension of the canvas.
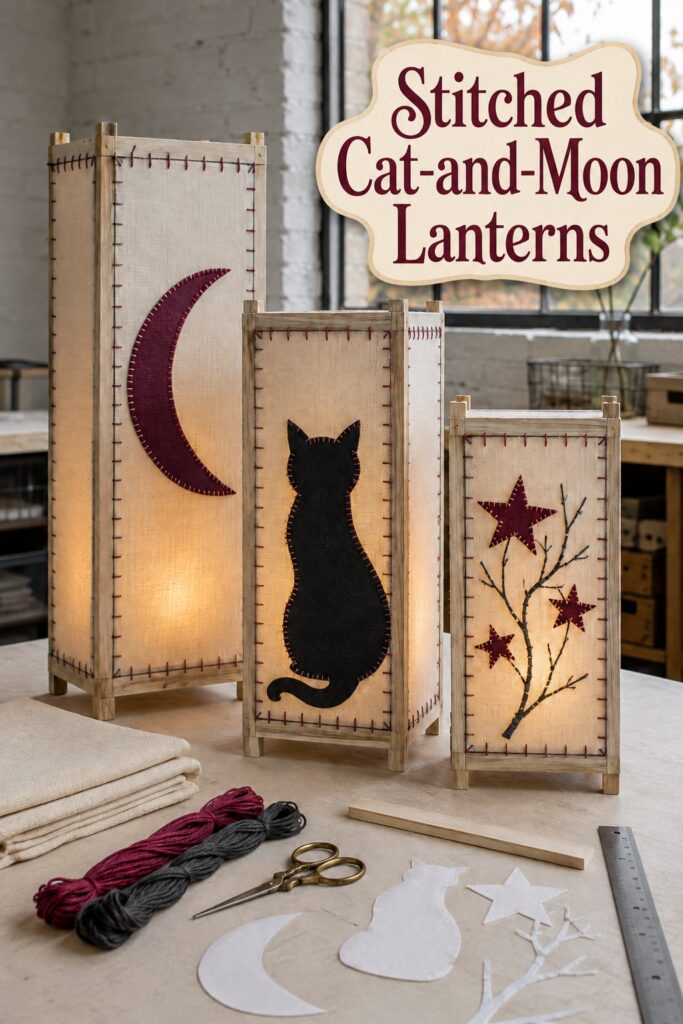
The inspiration and instructional images for this project were created with AI. This tutorial translates their visual ideas into a practical construction method rather than documenting an actual physical build.
What You’re Making
This project creates a coordinated trio of open-framed rectangular lanterns:
- A tall lantern with a dark berry crescent
- A medium lantern with a seated black cat
- A shorter lantern with a black branch and berry stars
Each lantern has four corner posts connected by upper and lower rails. Appliquéd sailcloth panels cover the sides, and a removable bottom tray provides access to battery-operated LED lights.
Suggested finished heights are approximately 20 to 28 inches for the tall lantern, 16 to 22 inches for the medium design, and 12 to 18 inches for the smallest. Adjust these proportions to suit your display and available wood.
Materials and Supplies
Quantities will depend on the dimensions and number of lanterns.
Frame Materials
- Square hardwood or clear pine strips for the corner posts
- Narrow wood strips for the upper and lower rails
- Thin wood trim strips
- Thin plywood for removable bottom trays
- Small wood screws
- Short upholstery staples
- Small brads
- Wood glue
- Fine-grit sandpaper
- Clear matte finish or pale wood stain, optional
Fabric and Appliqué Materials
- Natural cream cotton sailcloth or medium-weight cotton canvas
- Black felt
- Dark berry felt
- Dark berry embroidery floss
- Black embroidery floss
- Cream embroidery floss
- Hand-sewing needles
- Paper or lightweight cardboard for templates
- Fray-control solution, optional
Lighting Materials
- Warm-white battery-operated LED fairy lights
- Translucent vellum or heat-safe plastic diffusion material
- Reusable fastening straps
- Thin wood strips for tray guides
Tools
- Measuring tape
- Pencil
- Carpenter square
- Saw or miter box
- Drill-driver and small drill bit
- Clamps
- Manual staple gun
- Small hammer or brad nailer
- Fabric scissors
- Embroidery hoop
- Iron and ironing surface
Use only cool-running battery-operated LEDs. Do not place wax candles, tealights, incandescent bulbs, or another heat source inside fabric-covered lanterns.
Before You Start
Decide on the width and depth of all three lanterns before cutting the frames. Using the same footprint for every size simplifies the work and makes the trio look coordinated. You can then vary only the post length.
A square footprint between approximately 7 and 10 inches wide is manageable for a tabletop lantern. Make sure the opening is large enough to accommodate the removable lighting tray and your hand.
Cut and dry-fit the wood for one lantern first. Confirm that its frame is square and stable before cutting all the pieces for the remaining two.
Prewash and press ordinary cotton canvas so it does not shrink after the panels are made. Felt generally should not be ironed directly unless its care instructions permit it.
Step-by-Step Tutorial
1. Cut the Frame Components
Each lantern requires four equal corner posts, four upper rails, and four lower rails. The rails form matching square frames at the top and bottom.
Cut the tall lantern’s posts first, then shorten the posts for the medium and small versions. Keep the rail lengths consistent if you want all three lanterns to have the same width and depth.
Lightly sand the pieces before assembly. Pay particular attention to the inside edges because they will be harder to reach after the canvas is installed.
2. Assemble the Wooden Frames
Construct the square bottom frame by joining four rails. Apply wood glue at each joint, clamp the pieces against a carpenter square, and drill pilot holes before inserting screws or brads.
Repeat for the top frame. Position the four posts between the matching corners of the upper and lower frames. Check the structure from several directions before securing it.
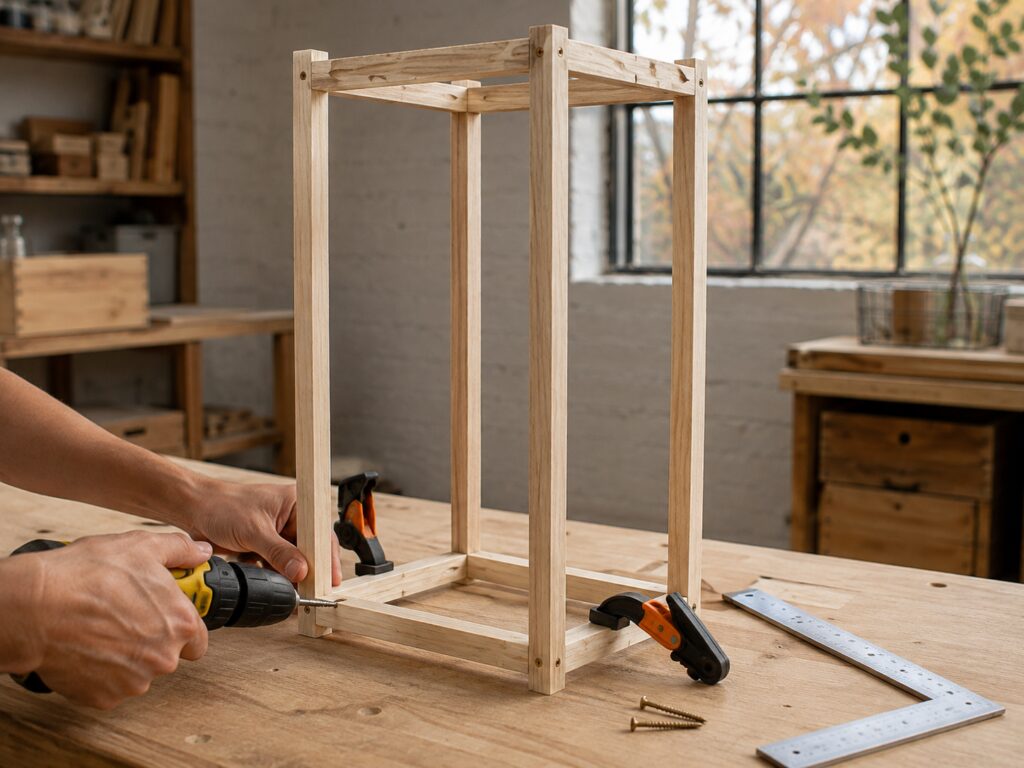
Measure diagonally from corner to corner across the top and bottom. When the two diagonal measurements match, the frame is square.
Set the assembled frame on a flat surface to ensure that it does not rock. Correct any twist before the glue dries.
3. Make the Panel Templates
Measure the rectangular opening between the rails and corner posts. Add approximately 1 inch to every edge so the fabric extends behind the wood and can be stapled securely.
Create a paper panel pattern using those measurements. Mark a second rectangle approximately ½ to ¾ inch inside the visible opening. This inner line indicates where the decorative perimeter stitching should sit.
Cut four canvas panels for each lantern. The front panel will carry the primary appliqué. Side and rear panels can remain plain or receive smaller stars, moons, or simple stitched lines.
4. Create the Felt Motifs
Draw or print bold paper templates for the moon, seated cat, branch, and stars. Keep the silhouettes simple. Narrow cat legs, tiny star points, and delicate branch tips are more difficult to stitch and may not read clearly when backlit.
Trace the moon and stars onto dark berry felt. Trace the cat and branch onto black felt. Cut with sharp fabric scissors, using smooth continuous cuts where possible.
Arrange each motif on its canvas panel and check its placement inside the visible rectangle. Leave enough room around the design for the perimeter stitches.
5. Blanket-Stitch the Appliqués
Place the first canvas panel in an embroidery hoop. Pin or temporarily baste the felt motif in position.
Use blanket stitch around the edge of each appliqué. Cream floss creates a pronounced handmade outline on the moon, while berry floss adds a subtle Halloween accent around the black cat. Black floss allows the branch to remain crisp without becoming overly decorative.
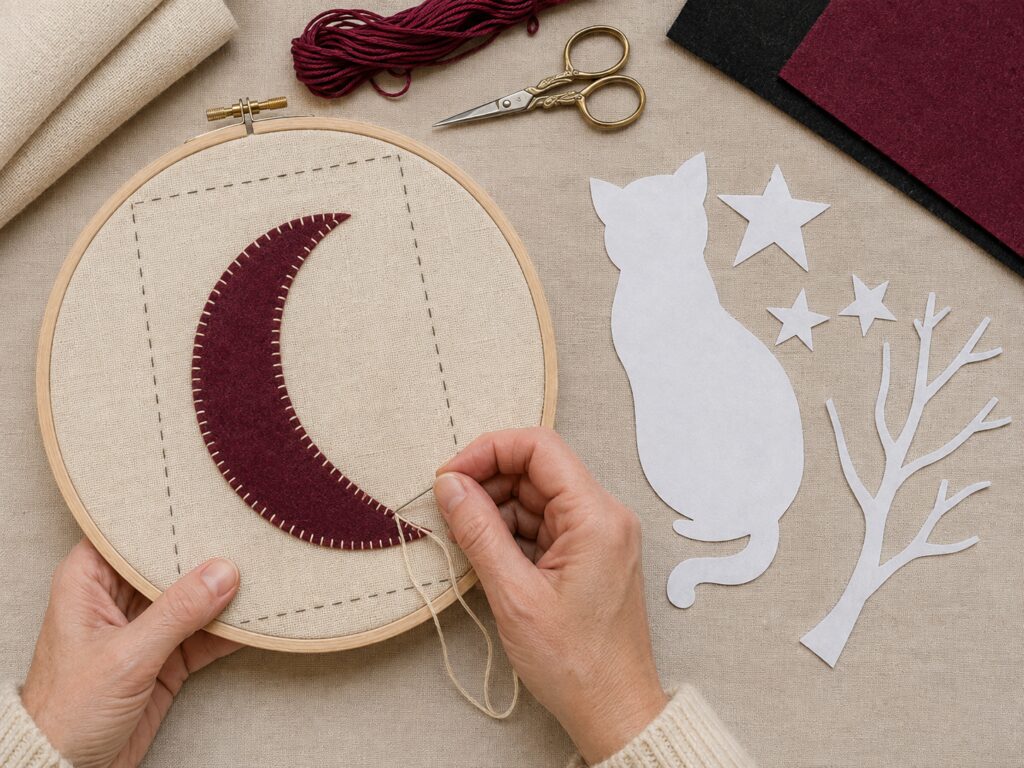
Keep the stitches reasonably consistent, but do not worry about making them mechanically perfect. Slight variations suit the rustic character of the lanterns.
For the branch panel, attach the larger branch shape first. Add the stars after the branch is secure so you can adjust their spacing.
6. Add the Decorative Perimeter Stitches
Use the marked inner rectangle as your guide. Work a widely spaced blanket stitch or straight whip-style stitch around the perimeter with dark berry floss.
These stitches should sit close enough to the wood frame to appear as if they connect the fabric to it. However, leave enough canvas outside the stitched line to staple the panel from behind.
Finish and knot all floss on the back. Trim loose ends, then press the panels from the reverse side under a pressing cloth.
7. Attach the Canvas Panels
Lay the lantern frame on one side. Center the corresponding panel over the opening with the appliqué facing outward.
Fold the fabric allowance around the inner edges of the rails. Insert one staple at the center of the top edge and another at the center of the bottom. Pull the canvas gently toward the sides and add one staple at the center of each vertical edge.
Continue working outward from those center points, alternating between opposite edges. This distributes tension evenly and reduces wrinkles. The canvas should be smooth rather than drum-tight.
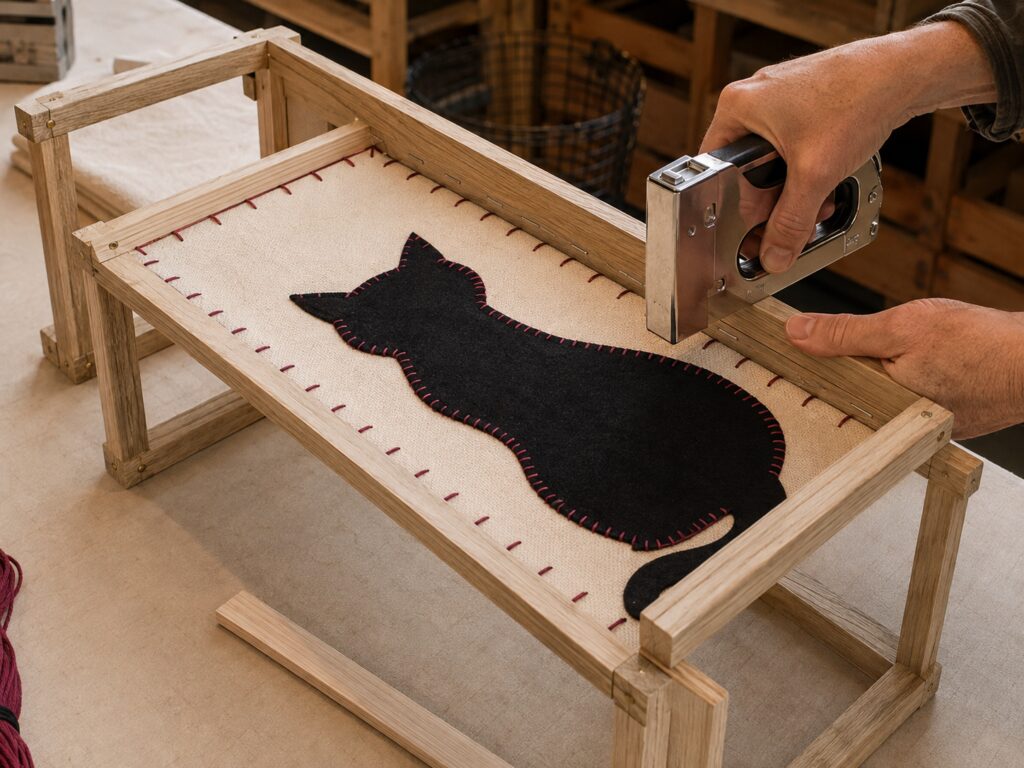
Cut thin trim strips to fit over the stapled edges inside the lantern. Secure them with short brads. The trim protects the fabric edge, conceals the hardware, and gives the interior a cleaner finish.
Repeat for the remaining three sides.
8. Make the Removable Lighting Tray
Cut a thin plywood square slightly smaller than the lantern’s interior footprint. Sand its edges so it slides smoothly.
Attach two narrow guide cleats inside the lower frame, positioned so the tray can slide between them. Leave one side accessible rather than enclosing the tray permanently.
Secure the LED battery pack to the tray with a reusable strap. The switch and battery compartment must remain reachable without removing a fabric panel.
9. Diffuse the LED Light
Fairy lights can create distracting pinpoints behind canvas. A simple translucent cylinder helps spread the light more evenly.
Form a loose cylinder from translucent vellum or flexible heat-safe diffusion material. Join its overlapping edge without creating a top or bottom. Place the fairy-light strand loosely inside the cylinder and set it on the removable tray.
Do not pack the lights tightly or allow the diffusion material to press directly against the fabric.
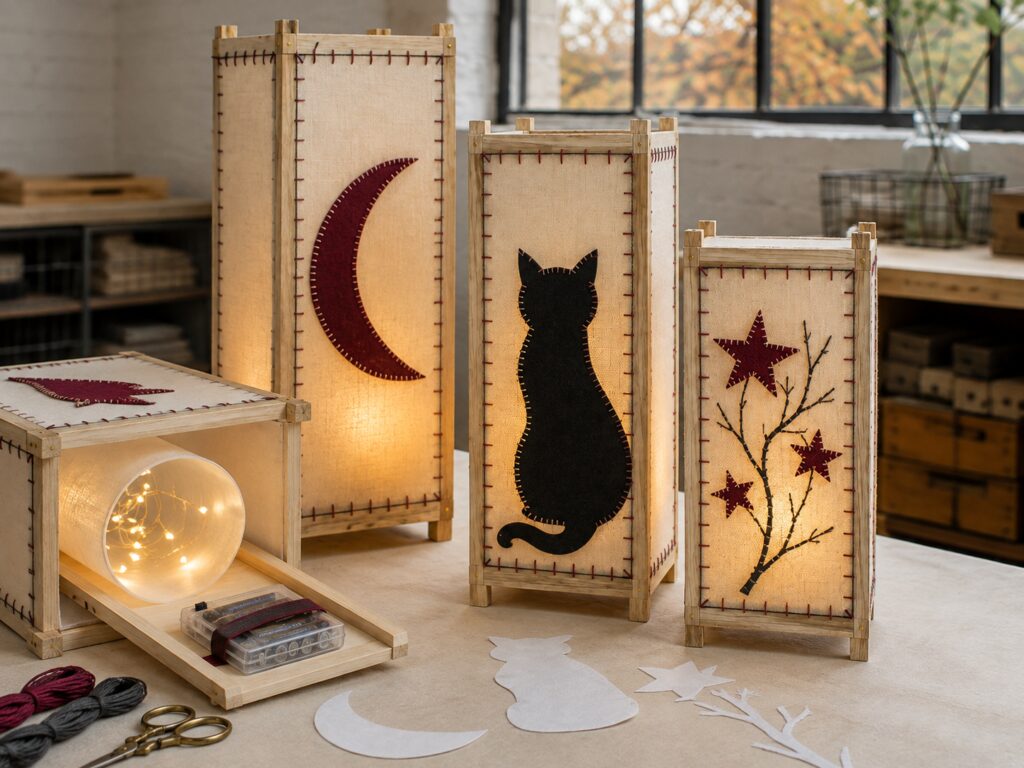
Slide the tray into place and test the lantern in a dim room. Reposition the lights if one side appears much stronger than the others.
10. Finish the Wood
If you want to preserve the pale natural appearance, apply a clear matte protective finish before installing the fabric. Allow it to cure fully.
For a more aged result, use a light wash of cream, gray-brown, or diluted stain and wipe it back immediately. Avoid heavily darkening the frame because the contrast can overwhelm the stitching.
Add small felt pads beneath the posts to protect furniture and prevent the lanterns from sliding.
Tips for Getting the Finished Look
Use one canvas color and one wood finish throughout the trio. The changing heights and motifs provide enough variety.
The moon should fill much of the tall front panel, while the cat should remain centered and grounded near the bottom rail. Keep the branch slightly asymmetrical and scatter the stars around it rather than placing them in a rigid row.
Choose warm-white LEDs. Cool-white lights can make natural canvas look gray and diminish the berry tones.
Maintain a little negative space around every motif. The lanterns are most effective when the silhouettes remain bold and uncomplicated.
Repeat the same berry perimeter stitch on all three lanterns. That small shared detail is what makes the group look like one collection.
Easy Ways to Customize the Lanterns
Replace the moon, cat, and branch with bats, an owl, a pumpkin vine, or simple haunted-house silhouettes. Keep every appliqué broad enough to recognize when the lantern is glowing.
For a more neutral fall collection, use rust, ochre, and olive felt with leaf, acorn, and wheat motifs.
A single shorter lantern can serve as a beginner version. It requires less wood and canvas while teaching the same appliqué, framing, and lighting techniques.
You can also use fusible web to hold the felt in place before stitching, but the visible blanket stitches should remain because they contribute so much character.
Displaying the Finished Lanterns
Arrange the trio on a wide windowsill, console table, mantel hearth, covered porch table, or kitchen counter. Stagger their positions slightly so each motif remains visible.
These lanterns are intended for dry indoor use unless every material and electrical component is specifically rated for sheltered outdoor conditions. Keep them away from sinks, cooking surfaces, fireplaces, and open windows where rain could reach them.
Turn the LEDs off when the lanterns are unattended unless the light manufacturer specifically permits extended operation. Check the battery compartments periodically for corrosion.
Your frames and hand stitches do not need to look identical to the imagined versions in the inspiration image. Consistent materials, strong silhouettes, and softly diffused light will preserve the same handmade Halloween character.