*This post may contain affiliate links for which I earn commissions.*
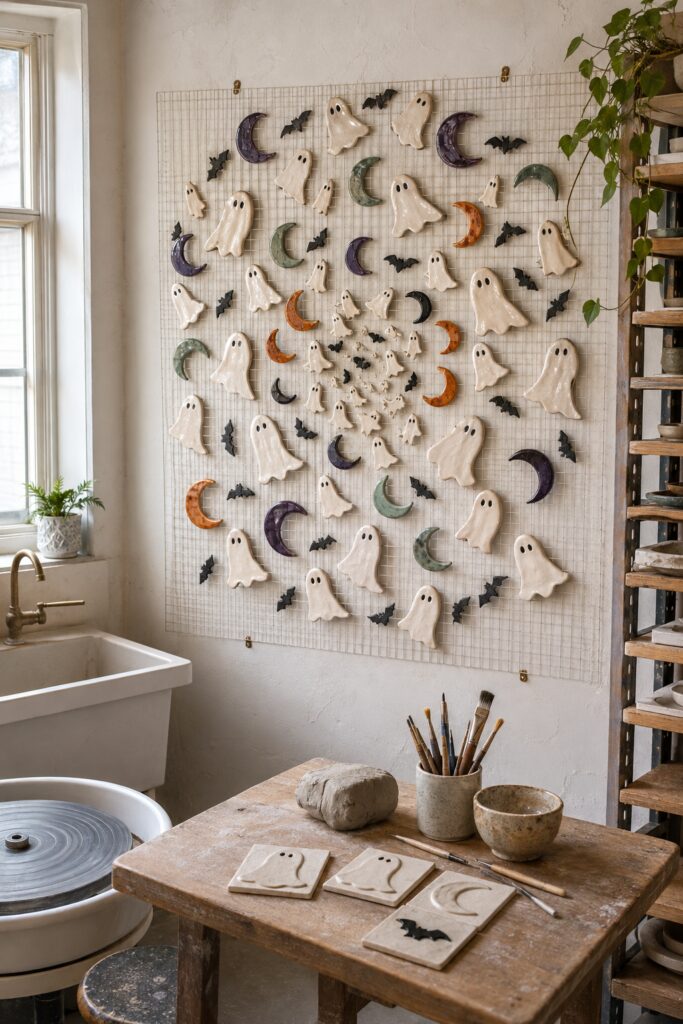
This Halloween wall turns a collection of handmade ghosts into a large piece of seasonal art. Cream-colored figures in many sizes spiral across a pale wire grid, surrounded by glossy crescent moons and small black bats.
The display feels playful and handcrafted rather than mass-produced. Slight differences in the ghosts’ shapes, expressions, and surfaces make the arrangement more interesting, while purple, orange, sage, and black accents keep the neutral figures from disappearing into the wall.
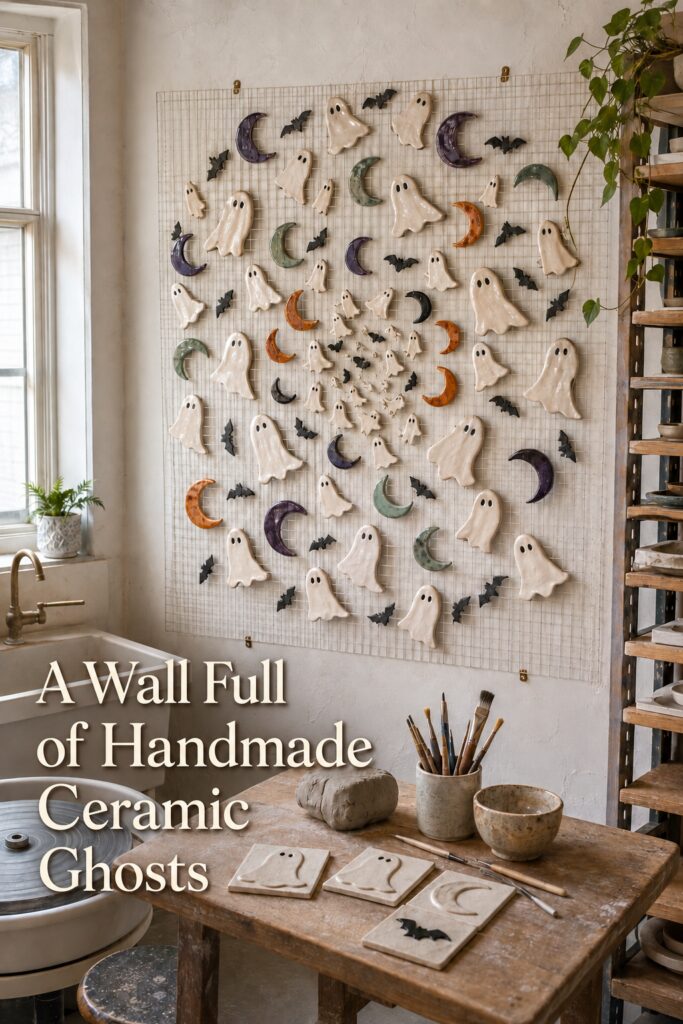
This inspiration image was created with AI. The idea can be recreated with kiln-fired ceramics or an accessible air-dry-clay alternative, depending on the materials and equipment available to you.
Why This Handmade Ghost Wall Works
Repetition gives the display its impact. One ceramic ghost would be a charming shelf accent, but dozens of them become an installation.
The figures are not arranged in predictable rows. Larger ghosts form an open outer layer, while smaller pieces gather near the center. This creates a loose spiral that appears to be swirling across the grid.
Crescent moons break up the many cream shapes. Their jewel-like purple, green, orange, and black surfaces add color while supporting the nighttime theme.
Small black bats fill narrow gaps and create contrast. Because they are considerably smaller than most of the ghosts, they keep the wall from feeling like a collection of identical objects.
The wire grid is also important. It holds everything within a clear rectangular boundary, giving the handmade pieces enough structure to read as one finished work of art.
Choose Between Ceramic and Air-Dry Clay
There are two practical approaches to this project.
The true ceramic version requires pottery clay, appropriate glazes, kiln firing, and access to a pottery studio or community kiln. This method will produce the glossy, durable finish shown in the inspiration image.
Anyone using a shared kiln should confirm the accepted clay body, glaze type, firing temperature, and thickness guidelines before buying materials. Studios commonly have specific rules intended to protect their equipment and prevent firing problems.
The simpler home version can be made with white air-dry clay. These pieces will not become ceramic, but acrylic paint and a compatible clear sealer can create a polished decorative finish.
Air-dry-clay ghosts should be kept indoors and away from water or high humidity. They are best treated as lightweight seasonal ornaments rather than permanent ceramic tile.
Both methods can recreate the overall effect. The handmade variation matters more than producing an exact copy of the AI-generated pieces.
Roll the Clay Into Even Slabs
Begin by rolling the clay into a relatively even slab. Thickness will depend on the material, size of the figures, and any requirements provided by the clay manufacturer or firing studio.
Use thickness guides or two narrow wooden strips beside the clay to help keep the rolling pin level. This reduces weak thin spots and makes the collection look more cohesive.
For ceramic clay, compress and smooth the slab according to accepted pottery practice. Avoid trapping loose scraps, dust, or foreign materials in clay intended for a kiln.
Air-dry clay can be rolled between pieces of parchment or on a clean nonporous work surface. Follow its package instructions for handling and drying.
Make several small test pieces before committing to an entire wall. This will reveal how much the material shrinks, curls, cracks, or changes color.
Shape Ghosts With Individual Personalities
Create a few paper templates for the largest ghosts, then cut smaller figures freehand. The mixture will save time without making the collection look overly uniform.
Give each ghost a rounded head and a softly uneven lower edge. Some can lean to one side, lift an arm, or appear to be floating upward.
Use a rounded clay tool or fingertip to soften the cut edges. Crisp squared edges may make the pieces resemble unfinished tiles rather than little sculptural figures.
The black eyes can be created as painted ovals after drying or firing. For ceramic pieces, they can also be added with an approved underglaze or glaze before the appropriate firing stage.
If you plan to hang the figures from hooks, make mounting holes while the clay is still workable. Place each hole far enough from the edge to reduce the risk of breaking.
Add Moons and Tiny Bats
Crescent moons are simpler to repeat than the ghost shapes. Cut a circle, then remove an overlapping section to form the crescent.
Vary the moon sizes and colors. Deep plum, mossy green, burnt orange, and black complement the warm ivory ghosts while keeping the palette appropriate for Halloween and fall.
Small bat shapes can be formed with miniature cutters or paper templates. Because thin wings may be fragile, keep the narrow sections slightly thicker and more compact than they appear in the inspiration image.
The bats can also be made from lightweight black wood or painted air-dry clay if tiny ceramic pieces feel impractical.
Create extra small pieces. They are useful for filling unexpected gaps once the larger ghosts and moons are arranged on the grid.
Dry or Fire the Pieces Properly
Allow air-dry clay to dry completely according to its instructions. Turn flat pieces when appropriate so both sides receive air, and avoid rushing the process with excessive heat.
Once dry, smooth rough edges carefully if the product allows sanding. Paint the ghosts a warm ivory, add black eyes, and finish the moons and bats in the chosen accent colors.
Use a clear coating specifically compatible with the paint and clay. Test it on a spare piece because some sealers can alter color or create an unwanted shine.
For pottery clay, follow the firing studio’s complete process. Glaze chemistry, clay maturity, drying time, and kiln schedules are technical considerations that should not be improvised.
The slightly glossy, handmade surface in the image does not require perfection. Variations in color and texture will make the wall feel more personal.
Create the Wire Grid Backdrop
A pale wire grid provides a flexible background for arranging the collection. White or cream will visually recede against a light wall, allowing the ceramic figures to remain dominant.
A ready-made photo grid panel can work for a smaller version. For a large installation, several matching panels may need to be connected securely.
The grid and every decorative piece contribute to the total weight. Mount the structure using hardware appropriate for the wall material and the expected load.
Do not assume removable adhesive can support a large display simply because the individual decorations are small. A substantial grid filled with clay pieces may require secure wall anchors or installation into framing.
For a renter-friendly variation, attach the grid to a freestanding display frame or sturdy easel rather than the wall.
Arrange the Collection Before Hanging It
Lay the grid flat and place all of the pieces before attaching anything. Begin with the largest ghosts around the outer portion.
Add medium ghosts and colored moons next, distributing the darker colors so no area feels noticeably heavier.
Concentrate the smallest ghosts near the center to create the swirling effect. Rotate some figures slightly and vary the distance between them.
Use black bats to bridge gaps and lead the eye from one area to another. Avoid filling every empty square. The open grid should remain visible.
Take a photograph of the final arrangement before attaching the pieces. It will serve as a reference if anything shifts during hanging.
Display the Pieces Securely
Small hooks, coated craft wire, or reusable grid clips may work depending on the weight and hanging holes of the finished pieces.
Use clear or light-colored fasteners behind the ivory ghosts and darker fasteners where they will blend with the bats and moons.
Check that each ornament lies securely against the grid and cannot slide off when the panel is lifted. Heavy ceramic pieces may require more than one attachment point.
Hang the finished panel away from doors, busy work areas, and places where it could be bumped. A lower, smaller version may be better for lightweight air-dry-clay pieces than for heavy ceramics.
Adapt the Idea to a Smaller Project
A full wall of handmade ghosts is ambitious. A panel with nine ghosts, three moons, and a few bats can still produce the collected-art effect.
Another option is to make one ghost for each family member and arrange them with personalized expressions. A set of small ceramic ornaments could also hang from a tabletop grid.
The same shapes can become magnets, gift tags, garland pieces, or shelf decorations. Readers do not need to complete dozens of tiles before enjoying the idea.
Shop White Air-Dry Clay
Look for a smooth white clay intended for decorative craft projects and capable of holding flat cut shapes.
Add Clay Rolling and Cutting Tools
Use a nonporous roller, thickness guides, shaping tools, a craft knife, and small cutters to create consistent slabs and clean silhouettes.
Look for Acrylic Paint and Sealer
Choose warm ivory, black, plum, orange, and muted green paint with a clear finish compatible with air-dry clay.
Add a White Wire Display Grid
Select a strong grid panel with openings small enough to provide flexible attachment points.
Gather Small Hooks and Grid Clips
Use fasteners selected for the weight, hole placement, and material of the finished pieces.
Explore Kiln-Fired Ceramic Supplies
If using a pottery studio, purchase only the clay and finishing products approved for its firing process.
Final Styling Tip
Make a few ghosts noticeably larger than the rest, then gather the tiniest figures near the middle. The strong change in scale is what turns separate clay ornaments into a swirling wall installation.