*This post may contain affiliate links for which I earn commissions.*
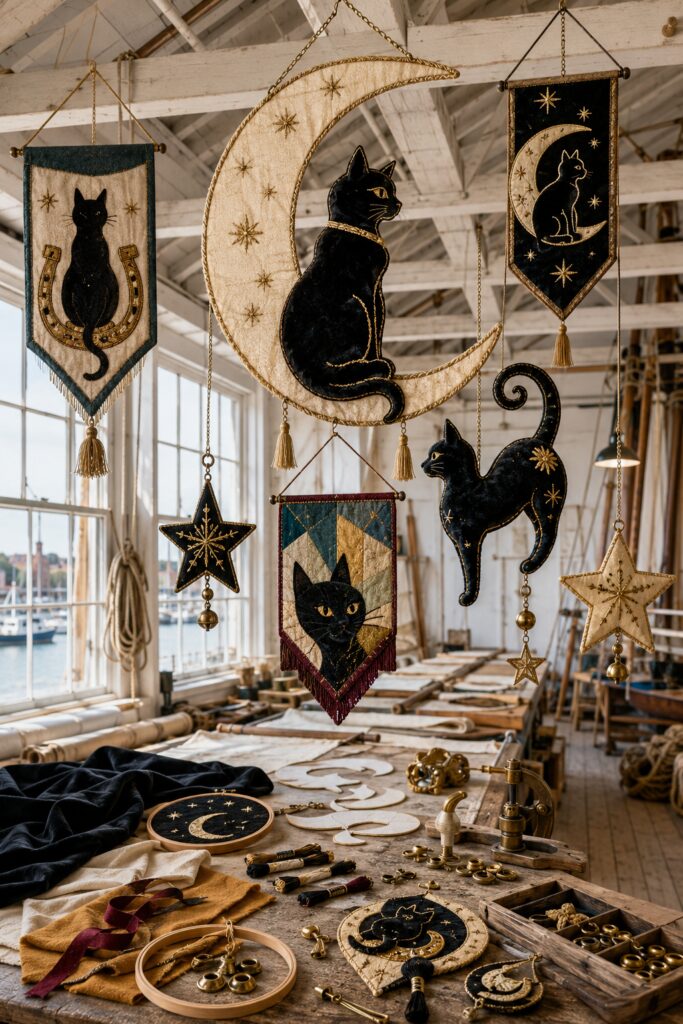
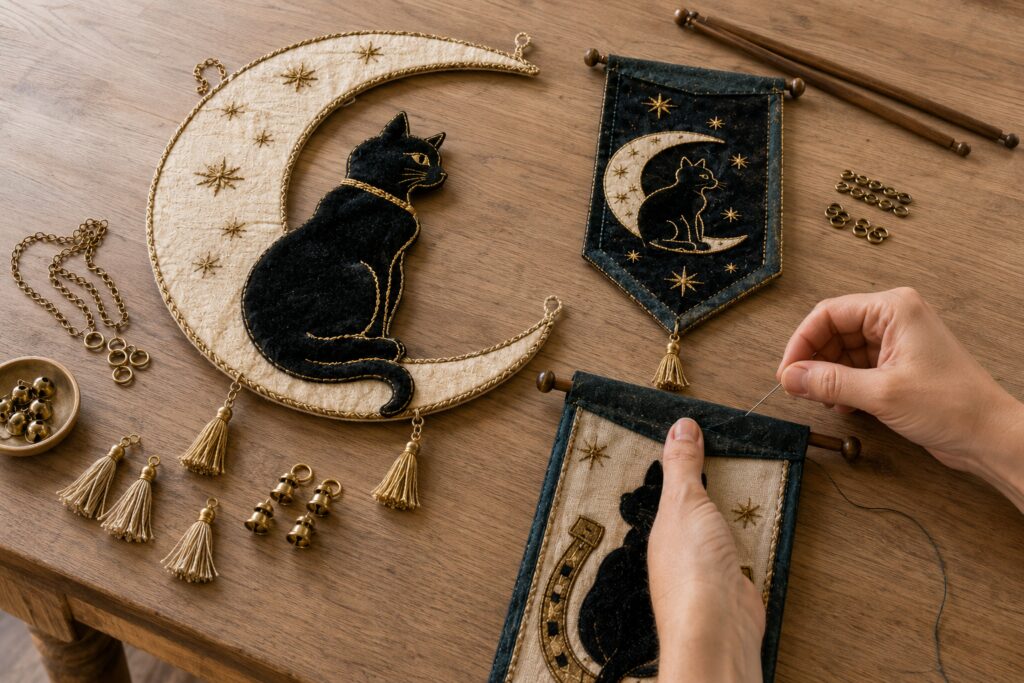
Black velvet cats, cream sailcloth, wool felt and antique-gold stitching give this Halloween banner collection the character of treasured folk art. Small tassels and brass-toned bells add movement without taking attention away from the cats and celestial motifs.
The AI inspiration shows an elaborate assortment of dimensional hanging pieces. This tutorial translates that idea into a manageable three-piece collection: one large crescent-and-cat centerpiece and two narrow pointed pennants. Stiff felt and interfacing support the larger moon so it hangs neatly without requiring a rigid metal frame.
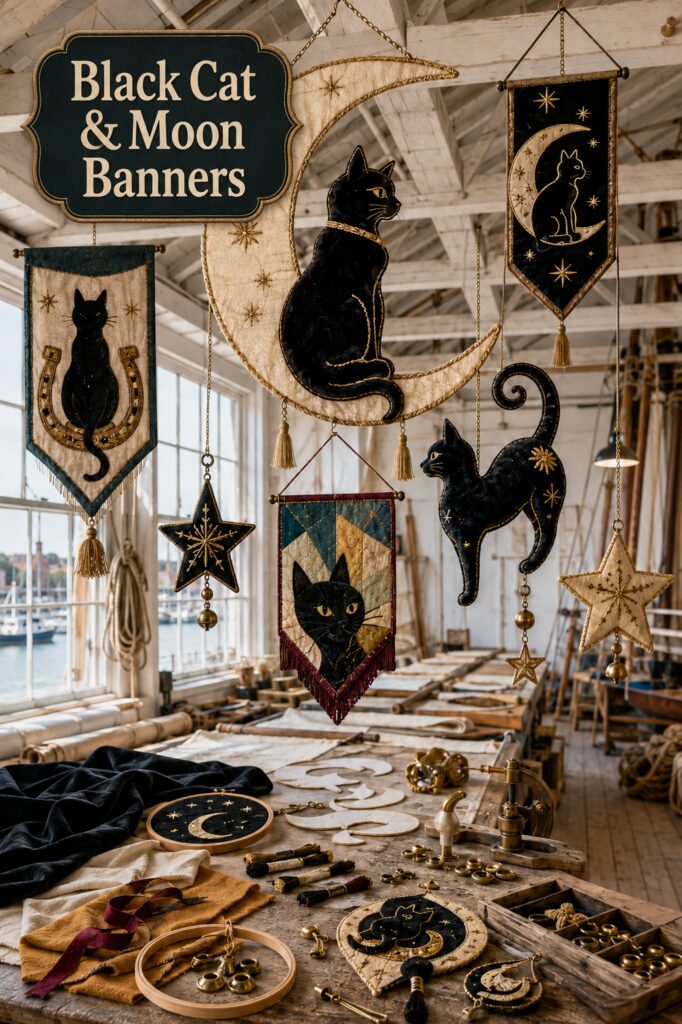
The inspiration and instructional images for this project were created with AI. This tutorial translates the visual concept into a practical textile project you can make at home.
What You’re Making
The collection includes:
- One large cream crescent, approximately 24 to 28 inches tall, with a dimensional black velvet cat
- One deep-teal pennant featuring a seated cat
- One black pennant featuring a cream crescent and smaller cat
- Antique-gold embroidery, stars, tassels and small bells shared across the set
The smaller pennants can be approximately 8 inches wide and 16 to 18 inches long. They hang from slim wooden dowels. The larger crescent hangs from two reinforced loops so its weight remains balanced.
The three pieces coordinate without being exact copies. This makes them easier to arrange as a collected display.
Materials and Supplies
Fabrics
- Medium-weight cream sailcloth or cotton canvas
- Black cotton velvet
- Black wool or wool-blend felt
- Cream wool or wool-blend felt
- Deep-teal wool felt or velvet
- Muted ochre wool felt
- Small amount of burgundy felt or fringe
- Lightweight woven fusible interfacing
- Firm sew-in stabilizer or stiff felt
- Fusible web suitable for fabric appliqué
- Lightweight batting, optional
Embroidery and Sewing Supplies
- Antique-gold or brass-colored metallic embroidery thread
- Black cotton embroidery floss
- Ochre embroidery floss
- Strong all-purpose sewing thread
- Embroidery needles
- Standard hand-sewing needles
- Metallic-thread or topstitching needle if using a machine
- Straight pins or fabric clips
- Tailor’s chalk or removable fabric marker
- Pressing cloth
Hanging and Finishing Supplies
- Two slim wooden dowels for the pennants
- Antique-brass chain or narrow decorative cord
- Small jump rings
- Tiny brass-toned bells
- Three to five small tassels
- Narrow braid or twisted cord for edging
- Small screw eyes for the dowels, optional
- Wall hooks rated for the finished weight
Tools
- Fabric scissors
- Small embroidery scissors
- Paper scissors
- Iron and ironing surface
- Sewing machine, optional
- Embroidery hoop
- Thimble
- Hand-sewing awl, optional
- Small jewelry pliers
Before You Start
Decide where the collection will hang before choosing its final dimensions. The crescent should be large enough to serve as the focal point but light enough to hang securely from two fabric loops.
Prewash the sailcloth and any washable cotton fabrics. Velvet and wool felt may not be washable, so follow the care instructions for those materials rather than washing everything together.
Test the iron temperature on scraps. Velvet can be crushed by direct pressure, and some metallic threads or synthetic felts can be damaged by high heat.
When pressing velvet, place it face down on a thick towel or velvet pressing surface. Always use a pressing cloth between the iron and the project.
Step-by-Step Tutorial
1. Draft the Crescent and Pennant Patterns
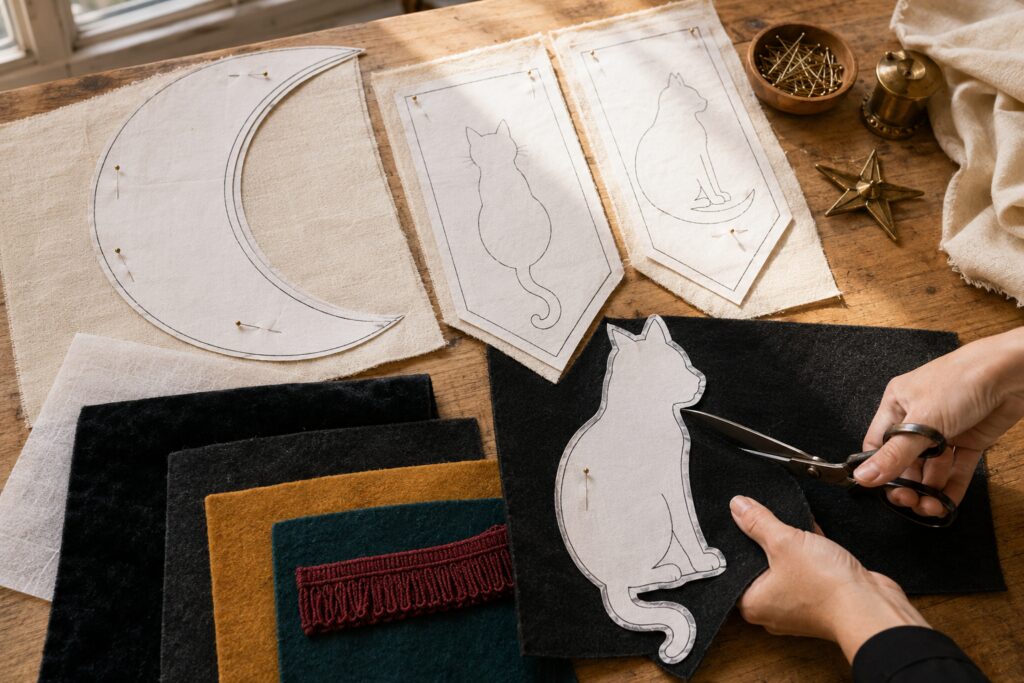
Tape together several sheets of paper for the large crescent pattern. Draw an outer circle approximately 24 to 28 inches in diameter, then shift a smaller circle toward one side to form the inner curve.
Keep both crescent tips broad rather than needle-sharp. Narrow points can curl or collapse when the banner hangs.
Draw a seated cat that fits comfortably inside the lower half of the crescent. Use a simple silhouette with upright ears, a gently curved back and a tail that follows the lower moon.
For each narrow pennant, draw a rectangle approximately 8 inches wide and 16 to 18 inches long. Add a centered point or shallow swallowtail at the bottom. Include extra fabric at the top for a dowel sleeve.
Create a second seated cat for one pennant and a smaller crescent-and-cat arrangement for the other.
2. Cut and Stabilize the Fabric Pieces
Cut two cream sailcloth crescents using the large moon pattern. Cut one matching crescent from firm sew-in stabilizer or stiff felt.
Cut the larger cat once from black velvet and once from black wool felt. The felt layer supports the velvet and gives the appliqué a gently raised edge.
Cut two sailcloth backing pieces for each narrow pennant. Add deep-teal or black decorative fronts according to your planned layout.
Apply lightweight woven interfacing to the wrong side of the sailcloth pieces. Use a pressing cloth and the temperature recommended for the interfacing.
Cut the decorative stars, small crescents and any patchwork sections from wool felt. Keep the smallest points broad enough to stitch securely.
3. Build the Dimensional Cat Appliqués
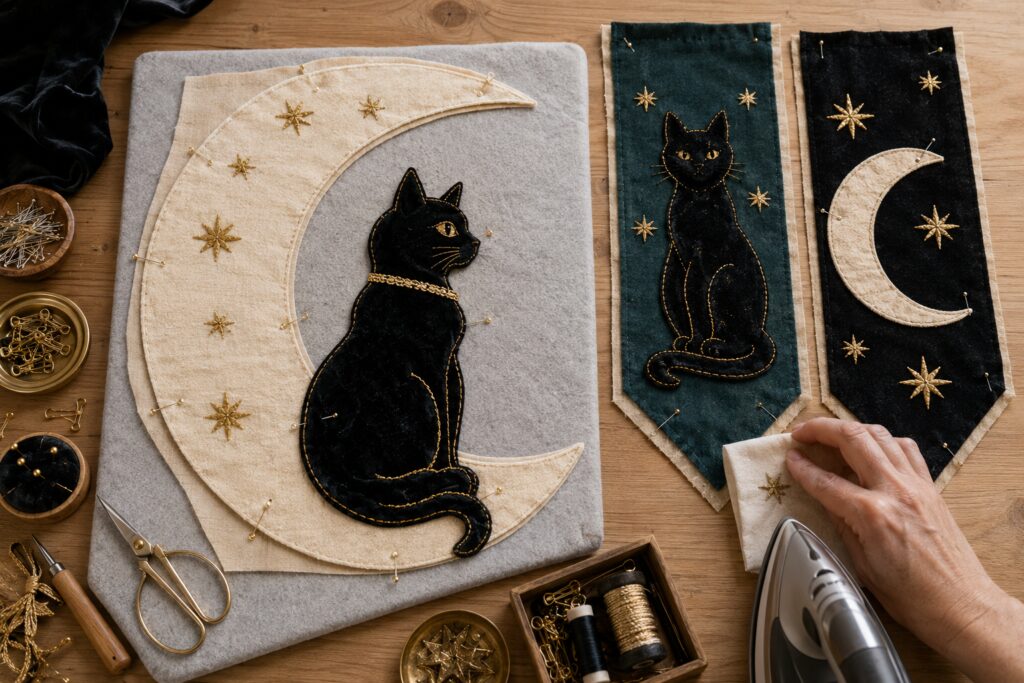
Place the large velvet cat over its matching felt backing. Use small dots of fusible web between the layers or baste them together near the edges.
Trim the felt if it extends beyond the velvet. A narrow black felt edge may remain visible if you want a subtle outlined effect.
Position the layered cat along the lower inner curve of the cream crescent. The cat’s body should overlap enough of the moon to look securely seated rather than balanced on a narrow point.
Repeat the layering process for the smaller pennant cats. Use black felt beneath velvet wherever the appliqué needs more body.
Fuse or baste the cats into position. Do not permanently assemble the front and back banner layers yet because the embroidery is easier to complete while the pieces remain flat.
4. Stitch Around the Appliqués
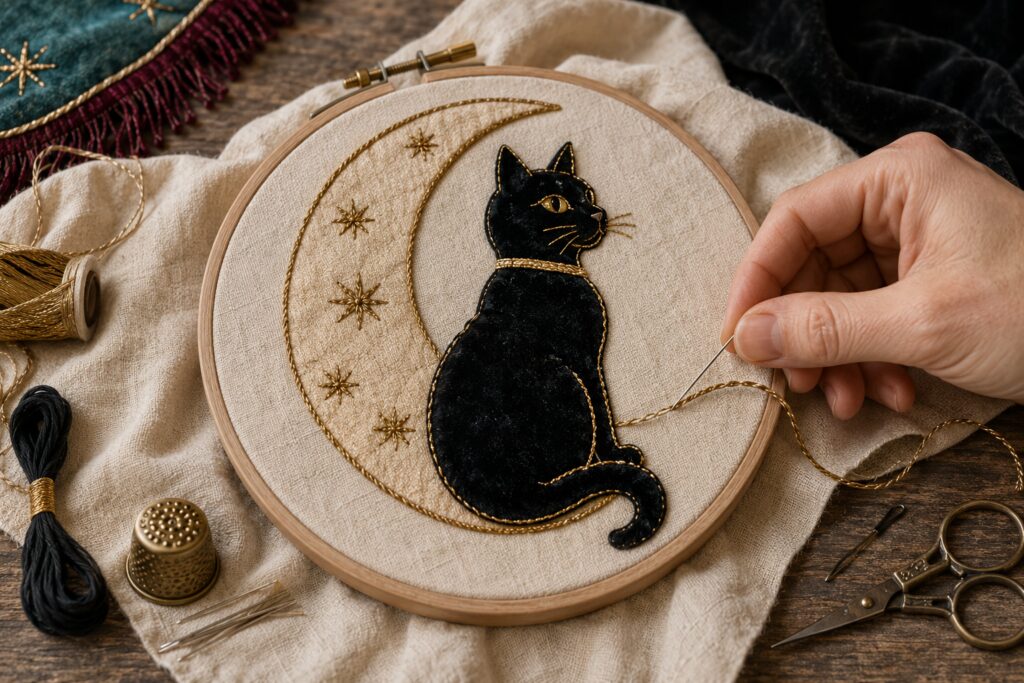
Use a short blanket stitch, whipstitch or narrow machine zigzag to attach each appliqué. Black thread produces a subtle edge, while antique-gold thread creates the outlined appearance seen in the inspiration.
If using metallic machine thread, reduce the sewing speed and test the tension on a layered scrap. Metallic thread can split or kink when pulled too tightly.
Hand stitching provides more control around ears, paws and curled tails. Take shorter stitches around tight curves and slightly longer stitches along the cat’s back and body.
Make certain every narrow point is attached. Add a few small anchoring stitches within larger velvet sections if the fabric lifts or shifts.
5. Add the Cat Faces and Brass Details
Mark the eyes, whiskers, collar and leg lines with tailor’s chalk. Keep the facial details simple so the cats remain readable from across the room.
Fill the eyes with ochre satin stitches. Add a narrow black pupil if desired. Use gold backstitches or couched metallic thread for whiskers, collar lines and body contours.
For couching, lay the metallic thread on the surface and secure it with tiny stitches of coordinating cotton thread. This method creates a smooth gold line without forcing thick metallic thread repeatedly through dense velvet.
Stitch simple eight-point stars onto the cream moon and the pennant backgrounds. Vary their size and spacing, leaving some quiet areas around each cat.
6. Assemble the Large Crescent
Lay the embroidered crescent front face down. Position the firm stabilizer over it, followed by the plain cream backing with its right side facing up.
If you want slightly softer dimension, add a thin layer of batting between the embroidered front and stabilizer. Keep the batting out of the final seam allowance so the edge does not become bulky.
Pin or clip the layers securely. Sew around the crescent, leaving an opening along one of the longer outer curves.
Clip the seam allowance around the inner curve and notch the outer curve without cutting through the stitches. Turn the crescent right side out and shape the broad points carefully.
Press from the back with a pressing cloth. Close the opening with a ladder stitch.
Topstitch approximately 1/4 inch from the edge or hand-sew decorative twisted cord around the perimeter. The edging helps visually define the moon and keeps the layered construction from shifting.
7. Assemble the Two Pennants
Place each embroidered pennant front against its sailcloth backing with the right sides together. Sew along the sides and pointed lower edge, leaving the top open.
Clip the corners and turn each banner right side out. Use a blunt turning tool to shape the lower point.
Press the pennants from the back. Fold the upper edge toward the rear to form a sleeve large enough for the selected dowel. Turn the raw edge under before stitching the sleeve in place.
Slide the dowel through the finished sleeve. The dowel should extend slightly beyond both sides of the banner.
8. Prepare Balanced Hanging Points
The large crescent should hang from two reinforced loops rather than one central point. Position one loop near each upper curve and test the balance before sewing them permanently.
Make the loops from strong twill tape, folded chain tabs or several layers of sturdy fabric. Stitch them through the sailcloth and internal stabilizer with a box-and-cross pattern.
Connect the two loops with equal lengths of chain or decorative cord. Bring those lengths together at a central hanging ring.
For the pennants, attach chain or cord to the ends of each dowel. Screw eyes can be added to wooden dowels if the wood is thick enough. Drill tiny pilot holes first to reduce splitting.
9. Add Tassels and Small Bells
Attach one tassel to the lower point of each pennant. Add two or three evenly spaced tassels along the lower curve of the large crescent.
Small bells can be suspended beneath the tassels or attached with jump rings at selected lower points. Use them sparingly so the banners do not become visually heavy.
Open and close jump rings with two pairs of pliers, twisting the ends sideways rather than pulling them apart. This helps the ring return to its original shape.
Keep every embellishment well secured. If a bell or tassel can be pulled loose easily, reinforce the attachment before displaying the banner.
10. Check the Finished Collection
Hang the three pieces temporarily against a wall. Place the crescent in the center and one pennant on each side.
Adjust the chain or cord lengths so the three lower edges do not form one rigid line. A staggered arrangement feels more collected and allows each cat silhouette to remain distinct.
Stand across the room and look for areas where the metallic stitching disappears. A few additional stars or short gold accents may be added, but avoid filling every open space.
Trim loose threads and inspect the back of each piece. Cover any exposed knots with a small patch of coordinating felt if necessary.
Tips for Capturing the Finished Look
Use velvet selectively. Its soft sheen makes the cats dimensional, while the flatter sailcloth and felt keep the overall collection from appearing overly formal.
Choose antique gold rather than highly reflective yellow metallics. Softer brass tones complement cream, black, deep teal and burgundy.
Repeat three or four details across the collection, such as eight-point stars, black cats, cream moons and burgundy fringe. Repetition helps varied banner shapes look intentional.
Keep the largest cat simple. The velvet texture and gold outline provide enough detail without adding complicated patchwork inside the silhouette.
Allow the three pieces to vary. One may feature a full cat, another a smaller cat with a moon, and the third a different pose or a horseshoe motif.
Easy Ways to Customize the Banners
Replace deep teal with muted berry, charcoal or plum for a different secondary color.
Make only the central crescent if a three-piece collection feels too involved. It can stand alone above a Halloween mantel or console.
For a no-velvet version, use black wool felt for every cat. Felt is easier to cut, does not fray and can be stitched without fusible backing.
Substitute fabric cord for chain if you prefer a completely textile-based project. A twisted cream-and-gold cord will retain the vintage celestial character.
Tiny moons, stars or horseshoes can replace the bells when the banners will be displayed near pets.
Displaying the Finished Collection Safely
Display the banners indoors or on a dry, protected porch. Velvet, metallic thread, sailcloth and untreated brass embellishments are not intended for prolonged exposure to moisture.
Use hooks and anchors appropriate for the finished weight and the wall or ceiling material. Do not hang the pieces over a bed, crib, doorway, stairway or frequently used walkway.
Bells, tassels and jump rings can become choking hazards. Keep the collection out of reach of children and pets, especially cats that may be attracted to swinging cords and bells.
The banners do not need to reproduce every elaborate detail in the AI inspiration. Strong silhouettes, layered fabric and a few carefully placed brass-colored stitches will carry the same handmade celestial mood.