*This post may contain affiliate links for which I earn commissions.*
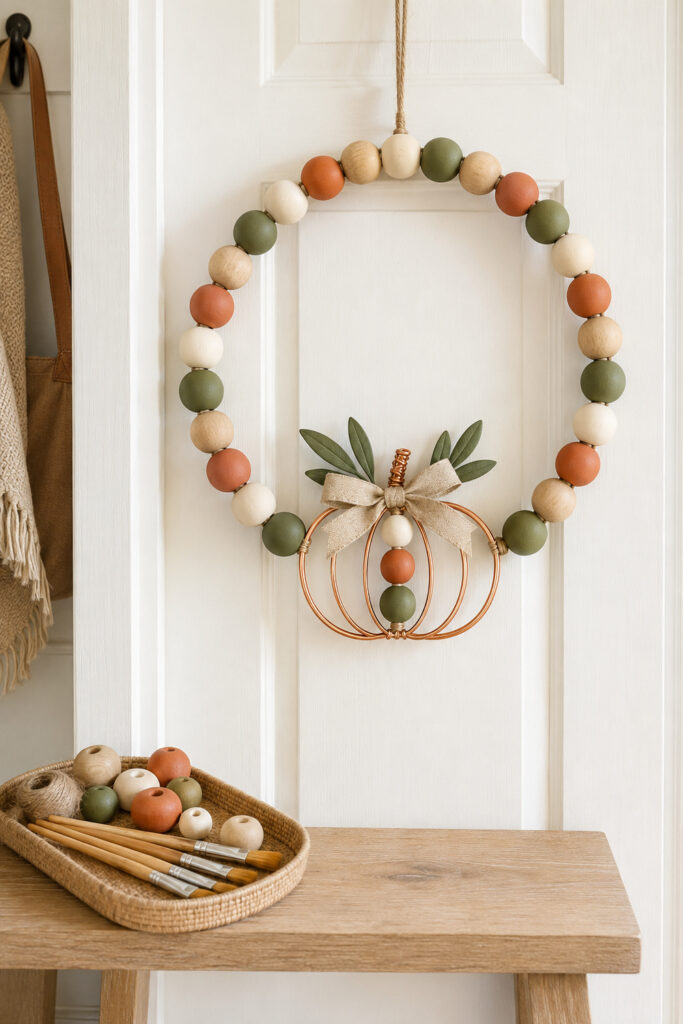
Oversized wooden beads give this fall wreath a clean, open shape, while terracotta, muted olive, cream, and natural wood introduce a softer version of traditional harvest colors. The copper-wire pumpkin, raw-linen bow, and preserved leaves add just enough detail without hiding the simple beadwork.
The inspiration image suggests that the beads are suspended on an almost invisible circular support. For a practical version, this tutorial uses heavy aluminum craft wire shaped into a ring. The beads are threaded directly onto it, and the overlapped closure is concealed behind the pumpkin accent.
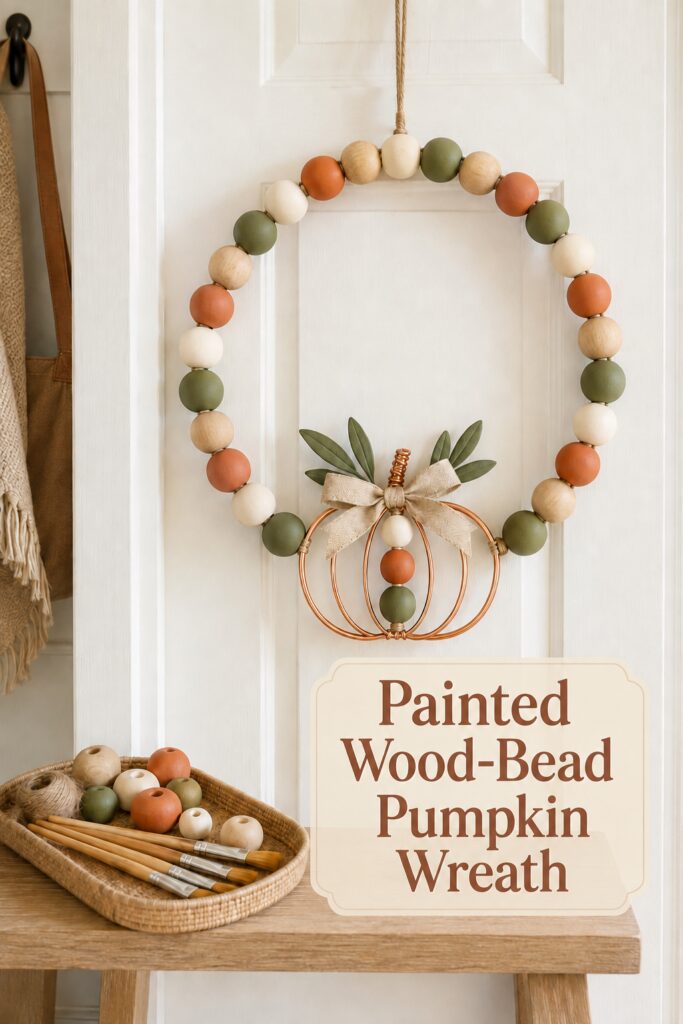
The inspiration and instructional images for this project were created with AI. They illustrate the design concept and a practical construction approach rather than documenting a physical wreath as it was made.
What You’re Making
The finished project is an open wood-bead wreath approximately 14 to 17 inches across, depending on the bead size and quantity.
Its main features include:
- Oversized round wooden beads in four finishes
- A rigid wire support hidden inside the beads
- A flat copper-wire pumpkin attached at the bottom
- Three smaller coordinating beads suspended inside the pumpkin
- Preserved or realistic faux leaves
- A softly structured raw-linen bow
- A natural twine hanging loop
The wire pumpkin is constructed as a flat silhouette rather than a freestanding three-dimensional form. This allows it to sit neatly against a door or wall.
Find the supplies for this project—including wood beads, copper wire, linen ribbon, paint, and finishing accents—in one convenient Amazon idea list.
See the Wreath-Making Supplies →As an Amazon Associate, I earn from qualifying purchases.
Materials and Supplies
For the Beaded Wreath
- Approximately 26 to 32 unfinished round wooden beads, about 1 1/2 inches in diameter (beads should have holes wide enough for the structural wire)
- Heavy aluminum armature wire, approximately 9 gauge or 3 millimeters thick
- Matte acrylic paint in terracotta, muted olive, and warm cream
- Small flat paintbrushes
- Bamboo skewers or dowels that fit the bead hole size
- Foam block or sturdy cardboard box for drying beads
- Fine copper binding wire (could use brown instead)
- Natural jute twine
For the Pumpkin Accent
- Copper-colored aluminum craft wire, approximately 12 gauge or 2 millimeters thick
- Fine copper binding wire
- Three smaller wooden beads in cream, terracotta, and olive
- Preserved leaves or realistic faux leaves
- Raw-linen or linen-look ribbon
- Optional matte clear craft sealer
Tools
- Heavy-duty wire cutters rated for the wire thickness
- Flat-nose pliers
- Round-nose pliers
- Ruler or measuring tape
- Pencil
- Paper for making oval templates
- Protective work surface
- Work gloves and eye protection
Before You Begin
Confirm that the large bead holes will slide easily over the 3-millimeter structural wire. Do not assume that every oversized wooden bead has a proportionally large opening.
Arrange the unpainted beads in a circle to estimate the finished size. A group of approximately 28 beads measuring 40 millimeters each will generally create a wreath in the 14 to 16-inch range, depending on their exact spacing.
Decide where the wreath will hang before choosing the final diameter. A smaller ring suits an interior wall or narrow door, while a larger one has more presence on a standard front door.
Wear eye protection when cutting wire. Cut ends can spring unexpectedly and remain sharp, so cover or bend them inward during assembly.
Step 1: Plan the Bead Pattern
Separate the large beads into four groups. Leave approximately one-quarter natural, then divide the remaining beads among terracotta, olive, and cream.
Arrange them in a repeating sequence on the table. A pattern such as terracotta, natural, cream, olive creates an even rhythm, but an occasional variation will keep it from looking overly mechanical.
Take a quick photograph of the arrangement or write the pattern down before painting.
Step 2: Prepare the Wooden Beads
Check every bead for splinters, rough spots, or partially blocked holes. Smooth rough areas with fine sandpaper and remove the dust.
Slide each bead onto a bamboo skewer. The skewer provides a handle while painting and keeps paint from accumulating inside the hole.
If a skewer is too narrow to hold a bead securely, wrap a small amount of removable tape around it. The bead should remain stable but still slide off after drying.
Step 3: Paint the Beads
Apply a thin coat of matte acrylic paint to the terracotta, olive, and cream groups. Turn the skewer as you work so the finish remains even.
Avoid loading the brush heavily. Thick paint can collect around the holes or leave noticeable ridges.
Insert the painted skewers upright into a foam block and let the first coat dry. Apply a second thin coat if the wood grain shows more than desired.

Leave the natural beads bare or protect them with a light matte sealer. If sealer is used, apply it in a well-ventilated area and follow the product’s drying directions.
Allow all painted and sealed pieces to cure thoroughly before threading them. Paint that feels dry on the surface can still stick when the beads press against one another.
Step 4: Form the Structural Ring
Cut a length of heavy aluminum wire long enough to create the planned circle, plus approximately 4 inches for the overlapping closure.
Shape it gradually around a large round object, such as a bucket or wide bowl. Do not worry about creating a perfect circle immediately. The beads will help smooth the outline as they are added.
Leave the two ends open. Use flat-nose pliers to remove any sharp hooks or burrs that could catch inside the bead holes.
Step 5: Thread the Beads
Begin sliding the beads onto one open end of the ring, following the planned color sequence.
As the ring fills, distribute the beads around the curve instead of allowing all their weight to collect on one side. Stop when enough exposed wire remains at both ends to create a secure overlap.
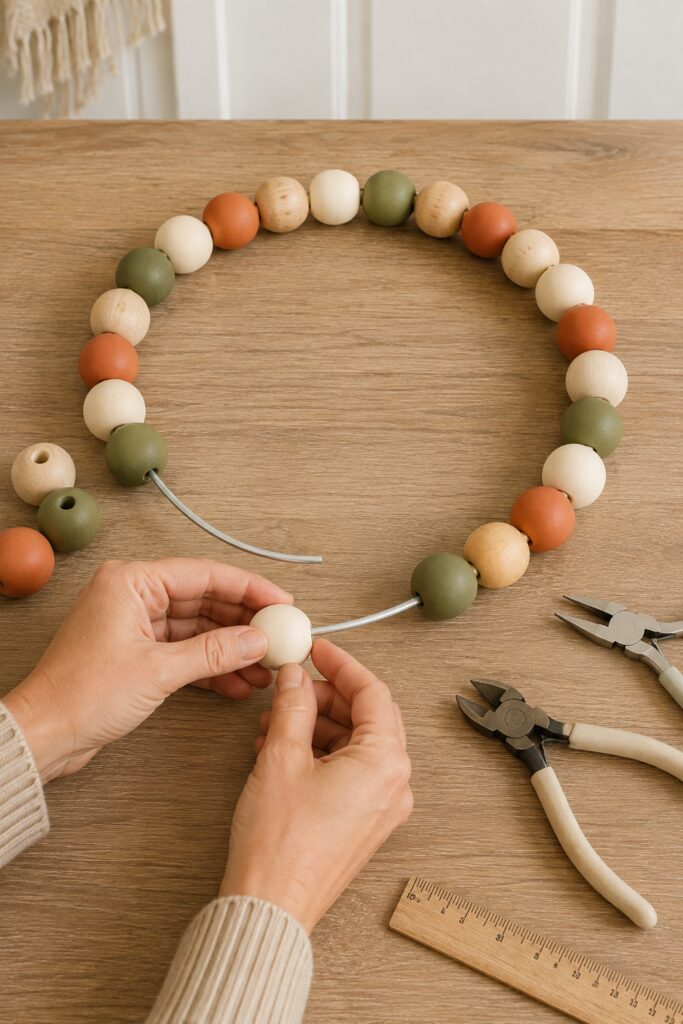
Set the wreath on the table and inspect the pattern. Move any duplicate colors that accidentally landed beside each other, unless the irregularity looks intentional.
Step 6: Close and Reinforce the Ring
Bring the two structural wire ends together at the bottom of the wreath. Overlap them by approximately 2 inches.
Wrap the overlap firmly with fine binding wire. Begin in the middle, work toward one end, return across the joint, and finish at the other end. Use pliers to tighten the wraps and bend the cut binding-wire end inward.
Test the connection by lifting the wreath only a few inches above the worktable. If the joint shifts, add more wraps.
The closure does not need to be decorative because the copper pumpkin, leaves, and bow will conceal it.
Step 7: Make the Flat Copper Pumpkin Ribs
Draw four vertical oval templates on paper. Make the largest approximately 5 to 7 inches wide and size the remaining ovals gradually smaller.
Bend the 12-gauge copper-colored wire around each template. Bring the ends together at the top or bottom and twist or wrap them into a closed oval.
Arrange the four wire ovals flat on the work surface. Nest them concentrically so they share the same top and bottom points. All ribs should remain in one plane.
Bind the ribs together at their upper and lower junctions with fine copper wire.
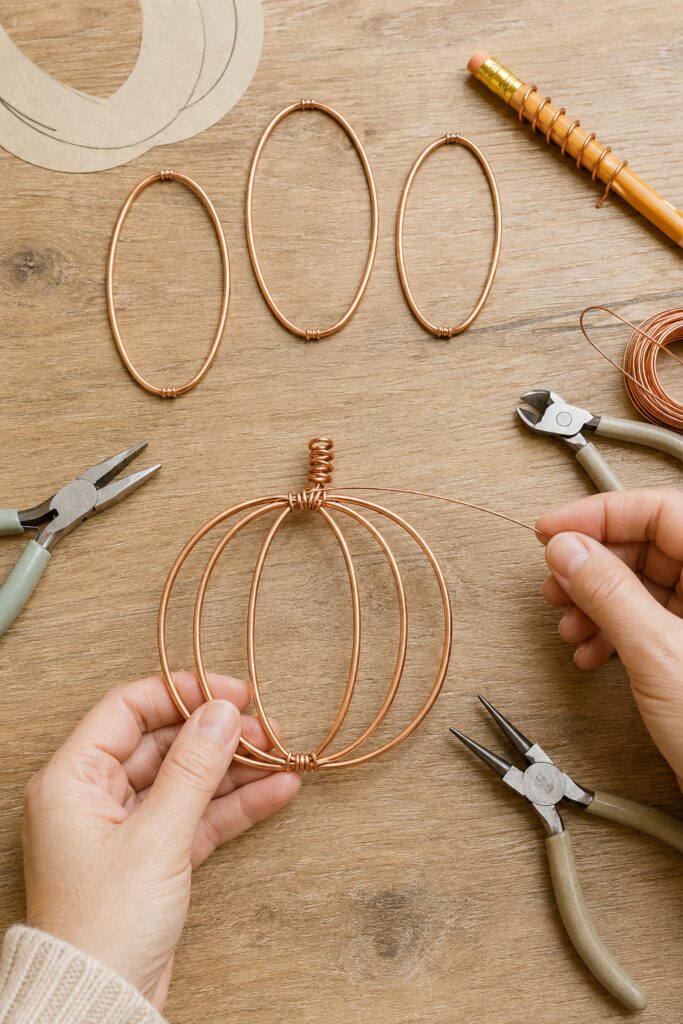
Trim the fine binding wire and press its end flat with pliers. The finished pumpkin should feel stable but remain lightweight.
Step 8: Add the Coiled Pumpkin Stem
Cut a short piece of the copper-colored wire. Wrap most of it around a pencil or narrow dowel to create an open coil.
Leave a small straight section at the bottom. Position this section behind the pumpkin’s upper junction and bind it securely with fine copper wire.
Adjust the coil so it stands vertically without projecting too far away from the wreath.
Step 9: Create the Center Bead Detail
Cut a straight length of fine copper wire slightly longer than the height of the pumpkin.
Make a small loop at one end with round-nose pliers. Thread on one small cream bead, one terracotta bead, and one olive bead.
Position this vertical bead strand inside the pumpkin’s smallest oval. Attach its upper and lower loops to the pumpkin junctions.
Leave a little room between the beads so they hang naturally, but not enough for the strand to appear loose.
Step 10: Attach the Pumpkin to the Wreath
Center the flat pumpkin over the ring closure at the bottom of the wreath. Its upper sides should touch the wreath near the two lower olive or natural beads.
Use fine copper binding wire to attach the pumpkin at two balanced points. Wrap around the structural ring between beads rather than around painted bead surfaces.
Add a third concealed connection near the center if the accent tilts forward.
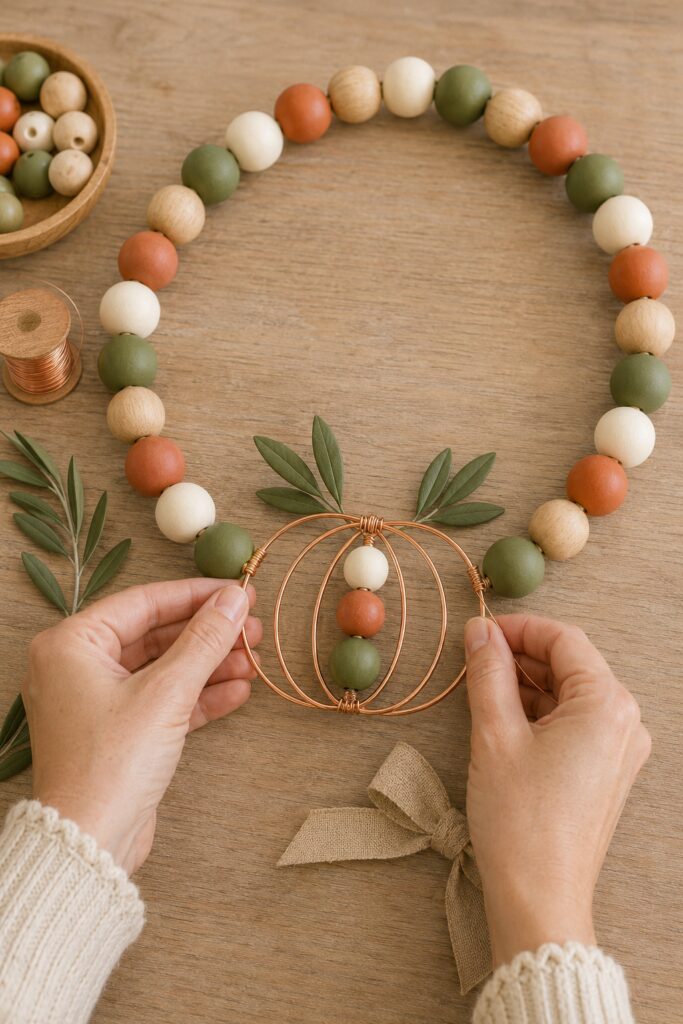
Lift the wreath and check that the pumpkin hangs squarely. Make adjustments before adding the leaves and bow, which will make the connections more difficult to reach.
Step 11: Arrange the Leaves
Place several preserved or faux leaves behind the top of the pumpkin. Fan them outward on both sides without extending them far into the open center of the wreath.
Bind the stems to the structural ring or pumpkin junction with fine wire. Do not rely on glue alone for this connection, especially if the wreath will hang on a moving door.
Trim long stems after the leaves are secured. Bend cut ends toward the back so they cannot scratch the door.
Step 12: Add the Linen Bow
Tie a small bow from raw-linen ribbon. Keep the loops compact enough that the copper pumpkin remains visible.
Secure the center of the bow with fine wire, then attach it over the upper pumpkin junction and leaf stems. Fluff the loops and trim the tails on a diagonal.
If the ribbon frays excessively, apply a very small amount of clear fabric adhesive along the cut edges.
Step 13: Make the Hanging Loop
Cut a generous length of natural jute twine and fold it in half. Pass the folded end around the top of the wreath between two beads, then pull the loose ends through the loop.
Tie the loose ends together at the desired hanging length. Position the knot where it can rest behind the wreath or over the door hook.
Lift the completed piece by its hanging loop and check its balance. The pumpkin should remain centered at the bottom rather than pulling the wreath to one side.
Tips for Capturing the Finished Look
Keep the paint finishes matte. Glossy beads would compete with the copper wire and make the wreath feel less natural.
Use a muted olive rather than a vivid green. It creates a softer transition between the terracotta and bare wood.
Allow some wood grain to remain visible on the natural beads. Their variation gives the repeated circle more texture.
Keep the wire pumpkin open and airy. Too many ribs or overly thick wire can make the lower accent feel heavy.
Use only a small cluster of leaves. Their purpose is to soften the pumpkin’s top and frame the linen bow, not cover the beaded ring.
Easy Ways to Customize It
Replace the olive paint with dusty blue for a cooler autumn palette, or use ochre in place of cream for a warmer harvest look.
For a Thanksgiving version, add a narrow velvet ribbon beneath the linen bow. Rust, plum, or golden brown would work well with the existing colors.
The copper pumpkin can also be made smaller and attached slightly off center for a more asymmetrical design. If preferred, omit the center bead strand and hang a small wooden tag inside the pumpkin.
For a simpler project, use all-natural beads and reserve the terracotta and olive colors for the ribbon and leaves.
Displaying the Finished Wreath
Hang the wreath from a sturdy hook rated for more than its finished weight. Oversized wooden beads are considerably heavier than grapevine or foam wreath materials.
This project works especially well on an interior door, entry wall, pantry door, or covered porch protected from rain and strong sun.
Preserved leaves, raw linen, unfinished wood, and ordinary craft paint are not intended for prolonged exposure to wet weather. Even when the painted beads are sealed, move the wreath indoors during storms or periods of high humidity.
Check that no sharp wire ends touch the door. Small felt pads can be added behind the lower pumpkin connections if needed.
The finished wreath does not need perfectly identical beads or mathematically precise wire ribs. Its appeal comes from the repeated wooden shapes, softened fall colors, and the contrast between matte paint, natural linen, and copper.