*This post may contain affiliate links for which I earn commissions.*
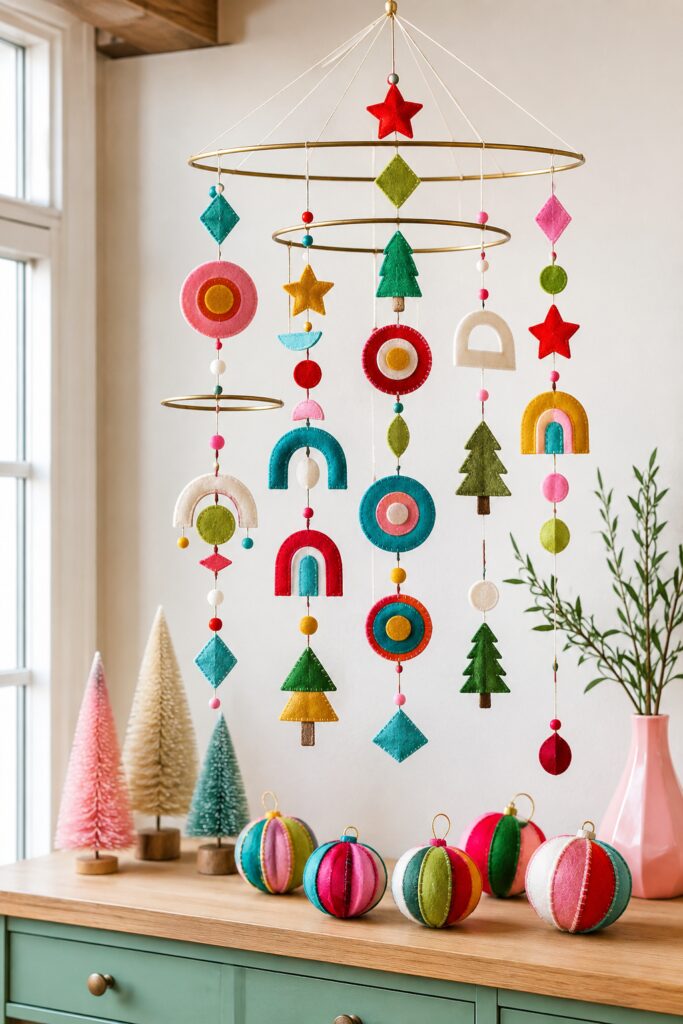
A hanging mobile gives handmade Christmas decorations a sense of movement that a wreath or garland cannot quite match. On this design, layered felt circles, arches, diamonds, stars, and tiny evergreen trees turn slowly beneath two slender hoops. Contrasting stitches outline every shape, while little beads create breathing room between the ornaments.
The inspiration image suggests an elaborate arrangement with several overlapping rings. This tutorial simplifies the structure to two reliable tiers that can be balanced before installation. The ornaments remain the main attraction, with enough variation to look playful but enough repetition to feel intentional.
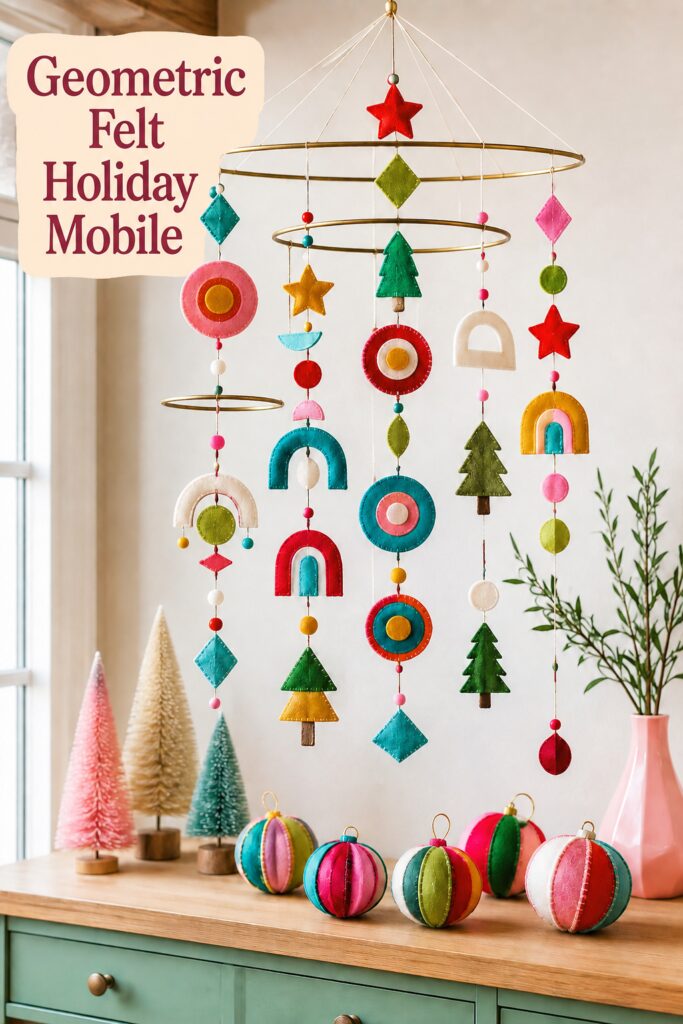
The inspiration image and instructional demonstration images for this project were created with AI. This tutorial translates the visual idea into a practical DIY method; the demonstration images are visual guides rather than photographs of an actually completed mobile.
What You’re Making
You will make a lightweight two-tier mobile with a large brass-tone hoop, a smaller hoop centered beneath it, and approximately six to eight vertical ornament strands. Each felt shape is made from a matching front and back, finished with visible hand stitching, and filled with only a whisper of stuffing when extra dimension is wanted.
An outer hoop around 16 to 18 inches and an inner hoop around 8 to 10 inches create useful proportions. The completed mobile may hang 30 to 40 inches from its top ring to its lowest ornament, although you can shorten it for a smaller room.
The distinctive details are the saturated palette, repeated geometric forms, simple Christmas trees and stars, visible stitches, and open space between strands. The smallest beads should be lightweight wood or felt rather than glass.
Materials and Supplies
Materials
- Wool-blend or good-quality craft felt in coral, red, turquoise, pink, citron, mustard, green, and ivory
- Embroidery floss in matching and contrasting colors
- One large brass-tone metal craft hoop
- One smaller coordinating metal hoop
- Strong cotton cord, waxed cord, or braided nylon jewelry cord in ivory
- Lightweight unfinished or painted wooden beads
- Small felt balls, optional
- Polyester fiberfill, optional
- Cardstock or template plastic
- One sturdy metal hanging ring
- Small split rings or closed jump rings, optional
- Ceiling hook and mounting hardware appropriate for the ceiling material
Tools
- Sharp fabric scissors
- Fine-tip fabric marker or chalk pencil
- Embroidery needles
- Long doll or upholstery needle for threading completed strands
- Straight pins or small sewing clips
- Ruler and flexible measuring tape
- Compass or circle templates
- Needle threader, optional
- Thimble, optional
- Pliers, if using metal rings
Before You Begin
Choose felt with enough body to hold a clean edge. Wool-blend felt is especially pleasant to stitch and tends to look smoother than very thin synthetic sheets. If the felt stretches or becomes translucent when held up, double it with a second layer rather than relying on heavy stuffing.
Make paper templates for five basic forms: circle, diamond, arch, five-point star, and evergreen tree. Suggested finished sizes range from approximately 2 inches for small diamonds to 4 or 5 inches for the largest layered circles and arches. Keep every opening in an arch wide enough that the felt will not tear during sewing.
Before cutting all the ornaments, hang the bare hoops temporarily from a sturdy test stand. Check the available height and decide where the lower hoop should sit. Do not install the ceiling hardware until the finished mobile has been weighed and balanced.
Step-by-Step Tutorial
1. Plan the Palette and Strand Rhythm
Sketch six to eight vertical lines to represent the strands. Assign three to five ornaments or beads to each line. Alternate large and small forms so no strand becomes visually dense from top to bottom.
Distribute the colors across the full mobile. If one strand begins with turquoise, repeat turquoise lower on the opposite side rather than using it repeatedly on the same line. Use ivory as a pause between stronger shades.
Place the largest layered circles and arches on different strands. Save stars for several heights, and repeat the tree shape two or three times so the design still reads as Christmas decor.
2. Cut Matching Felt Pieces
Trace each template onto the reverse side of the felt. Every stitched ornament needs two matching outer pieces. Layered designs also need smaller circles, arch bands, tree trunks, or inset shapes.
Cut the pieces with long, controlled scissor strokes. For the inside of an arch, fold the felt gently and make a small starter snip before cutting around the opening. Pair each front with its matching back as soon as it is cut.
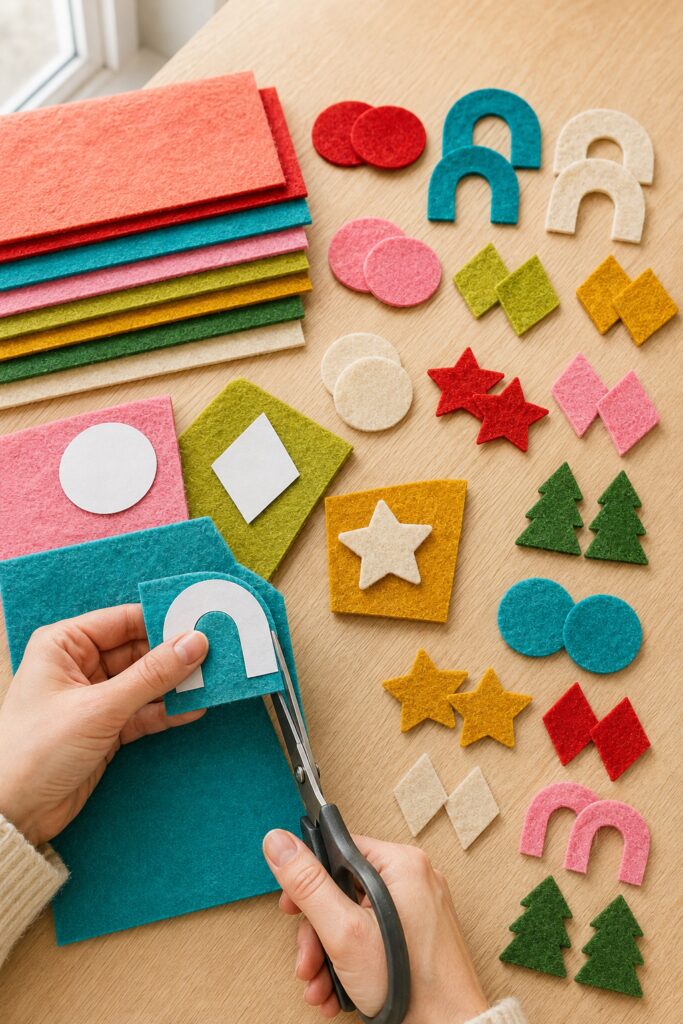
Arrange all pieces on the table in their planned strands. This reveals color repetitions or size imbalances before sewing begins.
3. Add Layered Details to the Fronts
Attach smaller appliqué pieces to the ornament fronts before joining the front and back. A running stitch works well for stacked circles and arch bands. Keep the stitch length consistent, but do not aim for machine-perfect precision.
For trees, stitch a small brown felt trunk behind the green front layer. For stars and diamonds, a simple outline may be enough. Avoid beads on the face of an ornament because they can pull it forward and make the strand twist unevenly.
4. Stitch Each Ornament
Place one front and one back together with their edges aligned. Use two strands of embroidery floss for small pieces or three strands when you want the stitches to read clearly from a distance.
Blanket-stitch around the edge, leaving a small opening. Insert only a thin layer of fiberfill, concentrating it in the center and keeping it away from points and narrow corners. Complete the seam and hide the final knot between the layers.
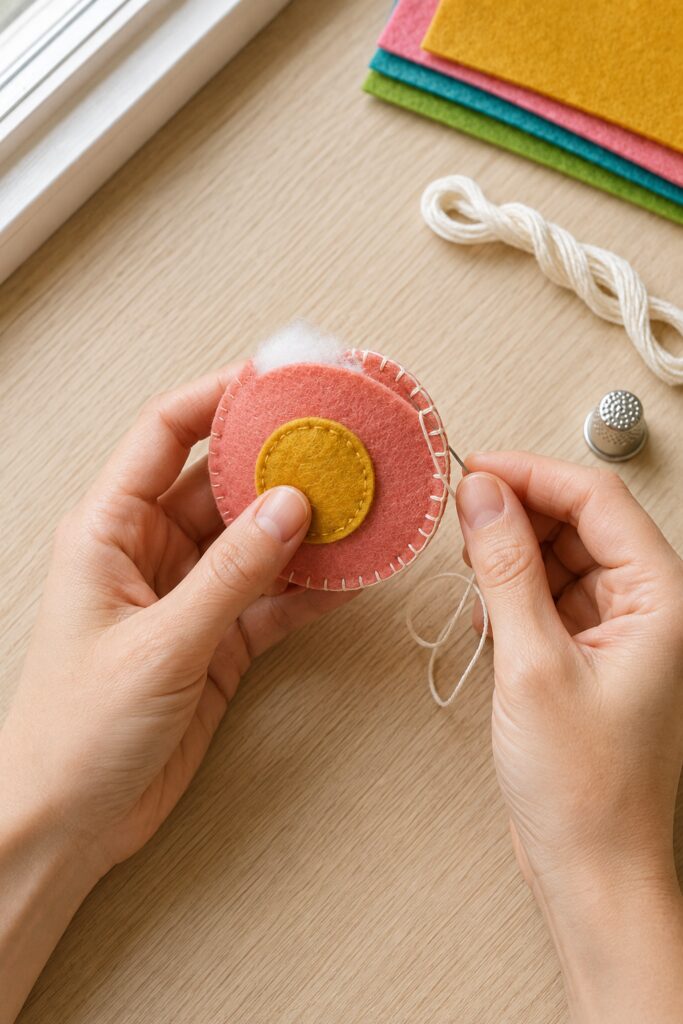
Leave diamonds, narrow arches, and small tree pieces unstuffed if padding makes their edges bulky. A mixture of flat and lightly raised ornaments adds texture without increasing weight unnecessarily.
5. Prepare the Hanging Strands
Cut each cord several inches longer than the planned strand. Tie a small loop at the top so the strand can be attached temporarily and moved during balancing.
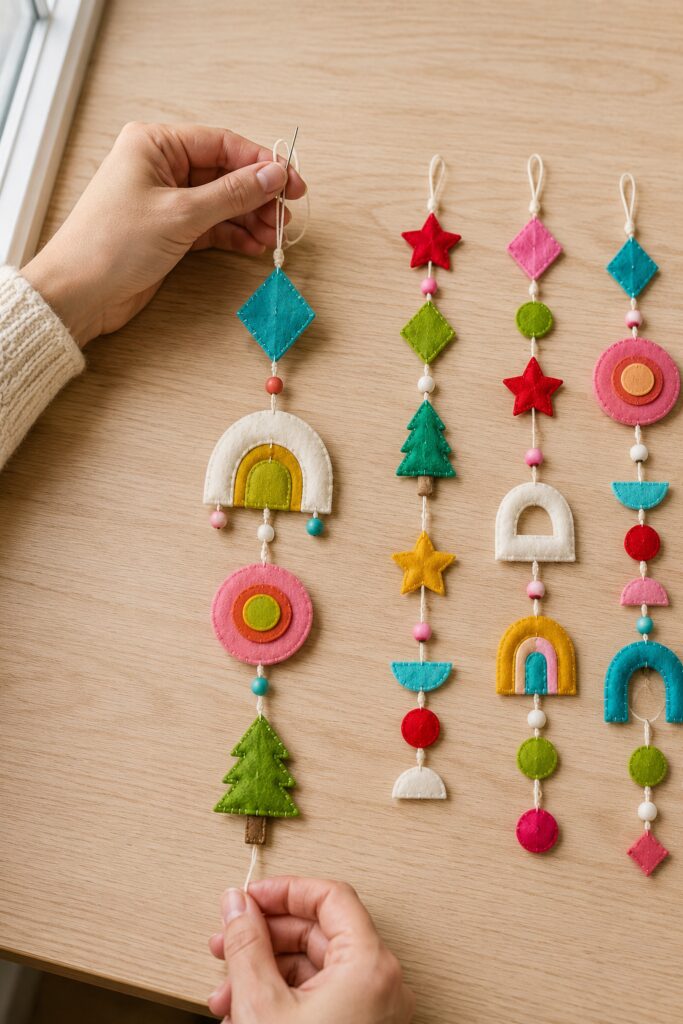
Lay the components beneath the cord in their planned order. Leave 1 to 3 inches between major ornaments, using beads or felt balls as separators. Vary the spacing slightly from strand to strand so the shapes do not align in rigid horizontal rows.
6. Connect the Shapes and Beads
Thread the cord through a long needle. Pass it through the center top of the first felt shape, straight through the inner layers, and out at the center bottom. Tie a discreet knot immediately below the ornament so it cannot slide.
Add a bead, knot beneath it, and continue to the next shape. If a large arch has dangling beads at both ends, stitch those short side cords directly into the lower edge before adding the arch to the main strand.
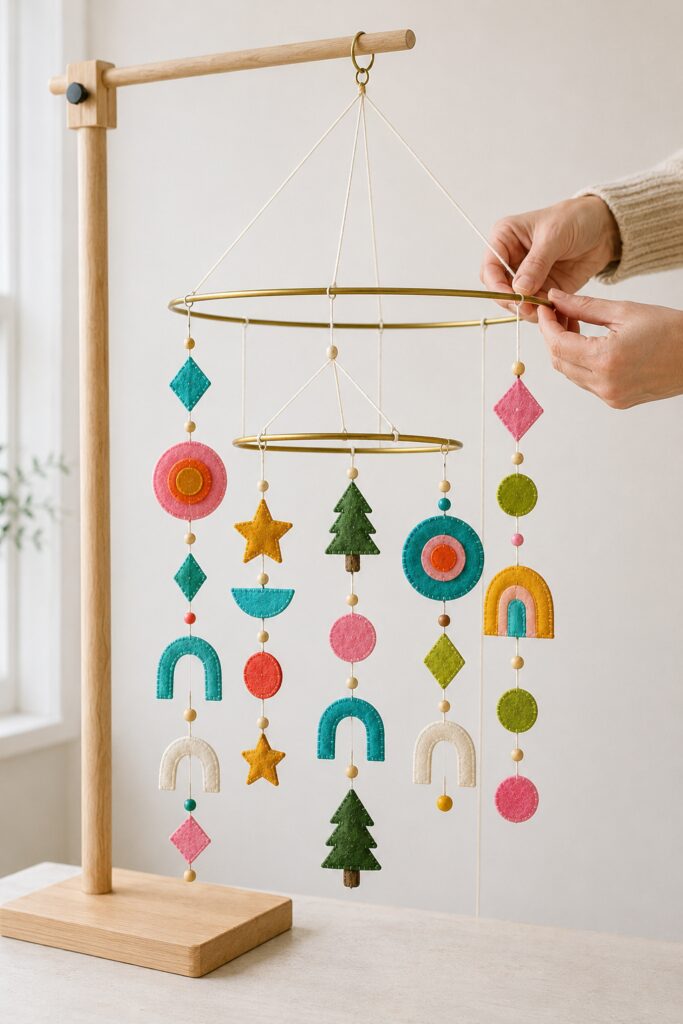
Finish each strand with a secure knot beneath its lowest component. Trim the tail only after the full mobile has been tested.
7. Suspend the Large Hoop
Cut three equal support cords. Tie them to the large hoop at evenly spaced points, creating a triangle. Bring the upper ends together at the metal hanging ring. Measure the cords again after tying because knots can shorten them unevenly.
Lift the ring and check the hoop with a small level or by comparing it to a straight background line. Adjust one support cord at a time until the hoop hangs flat.
8. Add the Smaller Hoop
Suspend the small hoop from three equally spaced points on the large hoop or from a centered junction immediately below it. Keep all three lower support cords equal so the small ring remains centered and level.
The smaller hoop should sit far enough below the upper ring that ornaments can rotate without hitting it. About 8 to 12 inches is a useful starting distance, depending on the hoop sizes.
9. Attach and Balance the Ornament Strands
Loop the planned strands over the hoops without tightening them permanently. Space the heaviest ornaments around opposing sides. Add the strands to the large ring first, then distribute shorter strands around the inner ring.
Step back and observe which side dips. Slide a heavy strand closer to a support point, shift a neighboring strand toward the opposite side, or swap two strands of different weights. Make small changes and let the mobile settle after each one.
When both hoops remain level, secure each loop with a small knot or a tiny wrap of matching cord. Confirm that adjoining shapes do not collide during gentle movement.
10. Install the Mobile Safely
Weigh the finished mobile and choose ceiling hardware rated well above that weight. Fasten the hook into a ceiling joist when possible. If that location is not available, use an anchor specifically designed for the ceiling material and follow its installation directions.
Hang the mobile away from ceiling fans, heat sources, door swings, and busy walkways. It should not be within reach of infants, small children, or pets. This is decorative seasonal decor, not a crib mobile or toy.
Details That Create the Finished Look
Use an uneven number of components on most strands. Three or five shapes generally feel more relaxed than repeated pairs. Keep the lower edge staggered so the ornaments finish at several heights.
Contrast matters as much as color. An ivory blanket stitch outlines coral or turquoise clearly, while green floss can quietly finish a tree. Repeat each major color at least three times across the mobile to keep any one ornament from looking accidental.
Leave visible air between the shapes. The mobile should move independently rather than read as a dense curtain. Lightweight beads add rhythm without competing with the larger stitched pieces.
Easy Ways to Customize It
For a softer Christmas palette, use blush, dusty blue, sage, butter yellow, and ivory. A more traditional version could combine deep red, evergreen, cream, and muted gold while keeping the same geometric templates.
For a smaller mobile, use one 12-inch hoop and five strands. You can also remove the trees and stars after Christmas and replace them with abstract circles and arches for a year-round display.
Displaying and Storing the Mobile
The mobile works above a holiday console, in a quiet reading corner, or near a window where indirect air movement can turn it gently. Keep it far enough from the wall that the ornaments do not rub.
For storage, remove the strands from the hoops and lay them flat between sheets of tissue. Stack the hoops separately. Avoid folding the stitched shapes, and keep the cords straight so they do not develop tangles.
The mobile does not need every ring and ornament shown in the AI inspiration image. A sound two-tier structure, a balanced palette, varied geometric shapes, and visible hand stitching will carry the same lively handmade character.