*This post may contain affiliate links for which I earn commissions.*
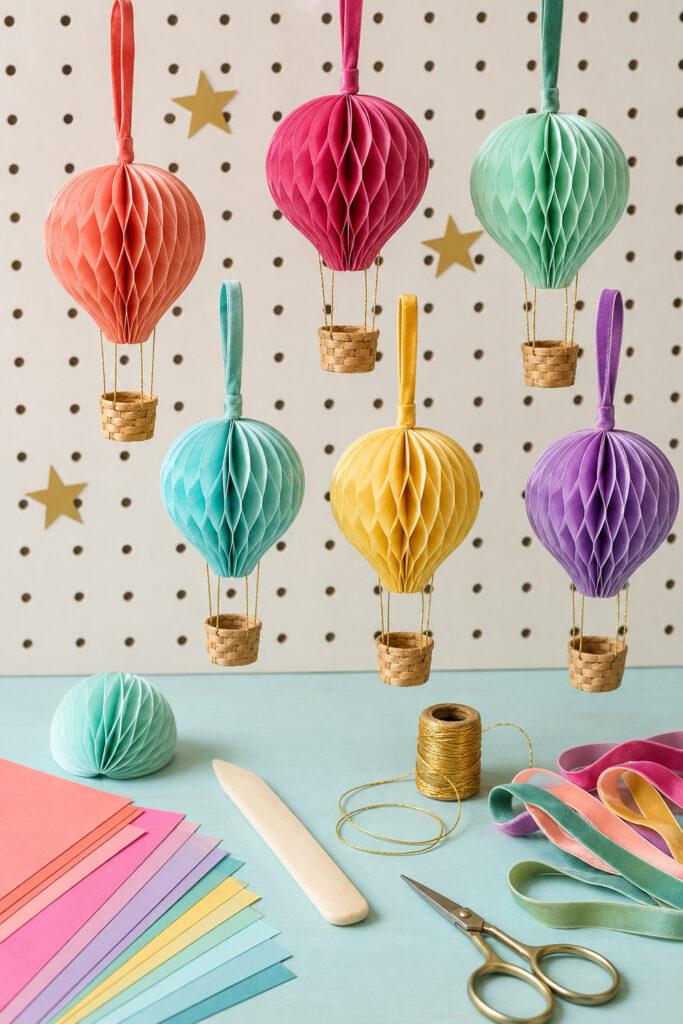
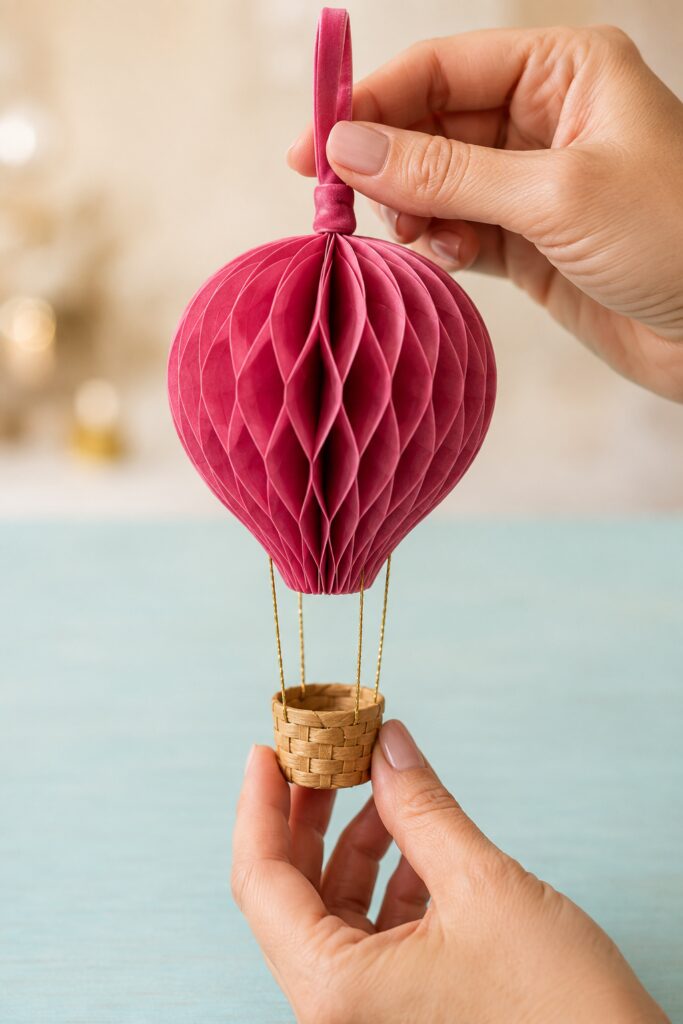
With their honeycomb-paper balloons, miniature woven baskets, gold suspension cords, and soft velvet loops, these ornaments have the playful character of tiny aircraft dressed for Christmas. Coral, raspberry, mint, aqua, yellow, and lavender give the collection a lively look without relying on traditional holiday colors.
The inspiration image contains some extremely delicate construction details that would be difficult to reproduce literally. This tutorial adapts the idea by cutting the balloon bodies from ready-glued honeycomb paper pads and adding hidden cardstock supports. Those reinforcements carry the ornament’s weight so the tissue cells are not pulled apart.
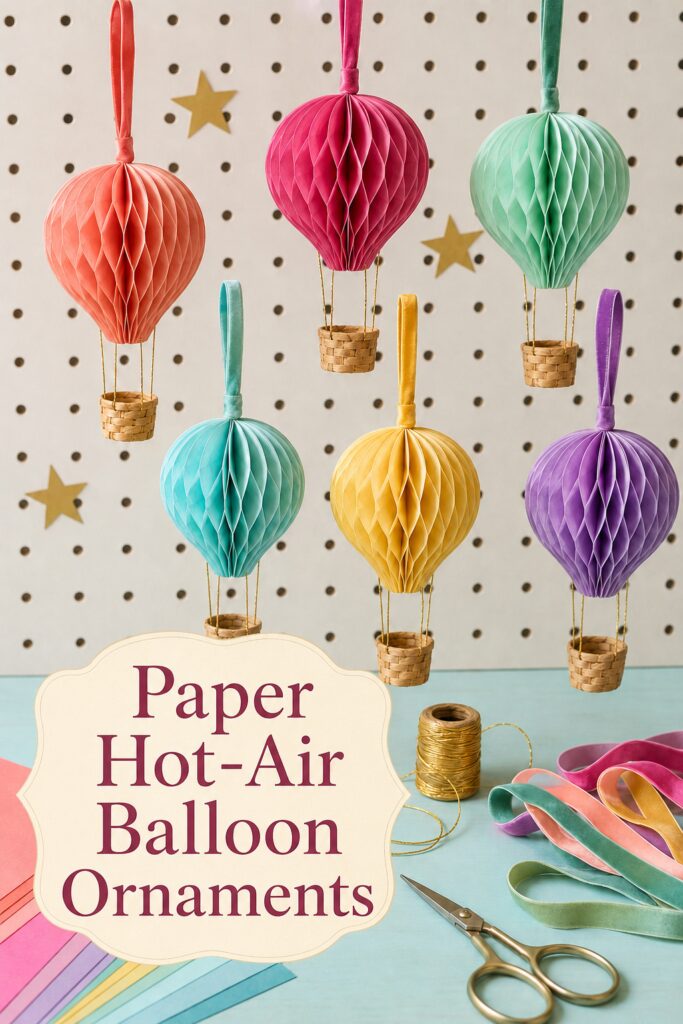
The inspiration and instructional images for this project were created with AI. They illustrate the concept and a practical construction approach rather than documenting a physical project as it was made.
What You’re Making
Each ornament consists of a shaped honeycomb-paper balloon measuring approximately 4 to 5 inches tall, a tiny woven-paper basket, four fine gold suspension cords, and a narrow velvet hanging loop.
The finished ornament is lightweight enough for a Christmas tree but detailed enough to hang from a window, shelf bracket, garland, or tabletop ornament stand. Make one statement ornament or assemble a full collection in complementary colors.
Materials and Supplies
For the Balloon
- Colored honeycomb tissue paper craft pads
- Medium-weight cardstock in coordinating colors
- Lightweight paper for the balloon template
- Narrow velvet ribbon, approximately 1/4 to 3/8 inch wide
- Fine gold metallic cord, approximately 1 millimeter thick
- Clear-drying tacky craft glue
For the Basket
- Kraft cardstock or medium-weight brown paper
- Narrow brown paper strips or quilling strips
- Small scrap of cardstock for the basket form
- Optional light brown ink or chalk for shading
Tools
- Pencil
- Ruler
- Small precision scissors
- Paper trimmer
- Bone folder
- Small binder clips or sewing clips
- Small hole punch, approximately 1/16 inch
- Glue applicator with a fine tip
- Tweezers
- Optional circle punch for the basket base
Before You Begin
Choose a honeycomb craft pad that can open into a complete 360-degree form. Keep it closed while cutting the balloon silhouette.
Make a plain-paper practice template before cutting the specialty material. A simple shape works best: a rounded top, full sides, and a gradually tapered lower section ending in a short, narrow neck.
For a balloon approximately 4 inches tall, a basket around 1 inch wide will remain visible without appearing too heavy. These are suggested proportions rather than required dimensions.
Make one complete ornament before cutting an entire collection. Honeycomb pads vary in cell size, layer count, and glue-line direction, so the first piece will reveal whether the template needs adjustment.
Step 1: Draw the Balloon Template
Fold a piece of lightweight paper in half vertically. Draw half of the balloon shape against the fold, starting with a rounded upper curve and widening through the middle.
Taper the lower third gradually. Finish with a narrow neck approximately wide enough to conceal a small cardstock collar. Cut through both layers and unfold the template.
The result should be symmetrical. If one side looks too full or the bottom feels too pointed, refold the template and trim it before proceeding.
Step 2: Cut the Honeycomb Balloon Body
Keep the honeycomb paper pad tightly closed. Place the balloon template over the pad with its centerline running parallel to the pad’s fold or opening seam.
Clip or lightly pin the template in place. Avoid placing pins through areas where they could tear open honeycomb cells.
Cut slowly around the template with sharp precision scissors. Make long, controlled cuts through the curved sides instead of many tiny snips. Leave the narrow lower neck intact.
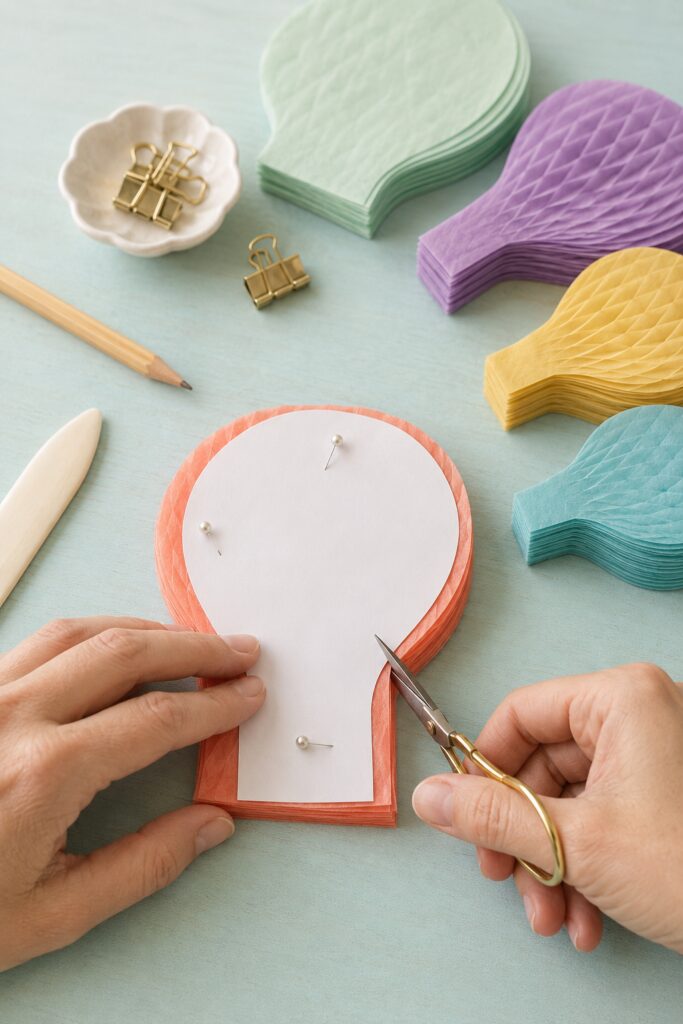
If the pad is too thick to cut comfortably, divide it into two equal sections. Cut both with the same template, then join the sections during assembly. Do not force scissors through a stack that is too dense to control safely.
Step 3: Cut the Hidden Reinforcement Panels
Trace the balloon template onto coordinating cardstock twice. Trim each cardstock shape slightly smaller than the honeycomb silhouette so its edges will not show after the balloon opens.
The cardstock pieces will sit on the two closing faces of the honeycomb pad. They create a firm seam, strengthen the top hanging point, and provide an anchor for the lower collar.
Test the panels against the closed honeycomb shape. Trim away any cardstock visible beyond the tissue.
Step 4: Add the Velvet Hanging Loop
Cut a piece of narrow velvet ribbon approximately 6 to 8 inches long. Fold it in half to make a loop.
Glue the two ribbon ends near the top of one cardstock reinforcement panel. Allow at least 1 inch of ribbon to extend down the panel so the weight is distributed across a larger area.
Glue a small cardstock patch over the ribbon ends. Let this connection dry before opening the honeycomb paper.
For a tailored finish, wrap a very short piece of velvet ribbon around the base of the loop after the ornament is assembled. Secure the overlap at the back with a small amount of glue.
Step 5: Prepare the Gold Suspension Cords
Cut four equal pieces of gold metallic cord. Each should be long enough to travel from the lower neck of the balloon to the basket rim, with extra length for knots and adjustment.
Place the four cords at evenly spaced positions around a narrow cardstock collar. The collar can be made by wrapping a thin strip of coordinating cardstock into a small ring that fits around the balloon’s lower neck.
Glue one end of each cord inside the collar. Add a second thin paper strip over the cord ends to sandwich them securely. Allow the collar to dry under light pressure.
This method prevents the cords from pulling directly on the tissue.
Step 6: Open and Close the Balloon
Glue one cardstock reinforcement panel to each closing face of the honeycomb pad. Use a thin, even coat of adhesive and keep it away from the exposed honeycomb cells.
Once the panels are secure, gently fan the paper open. Bring the two cardstock faces together to create a full balloon.
Check that the honeycomb cells open evenly from top to bottom. If one section remains compressed, ease it apart with a fingertip rather than pulling on the outer edge.
Glue the two reinforcement panels together and hold them with small clips until dry. Protect the paper from clip marks with scraps of cardstock.
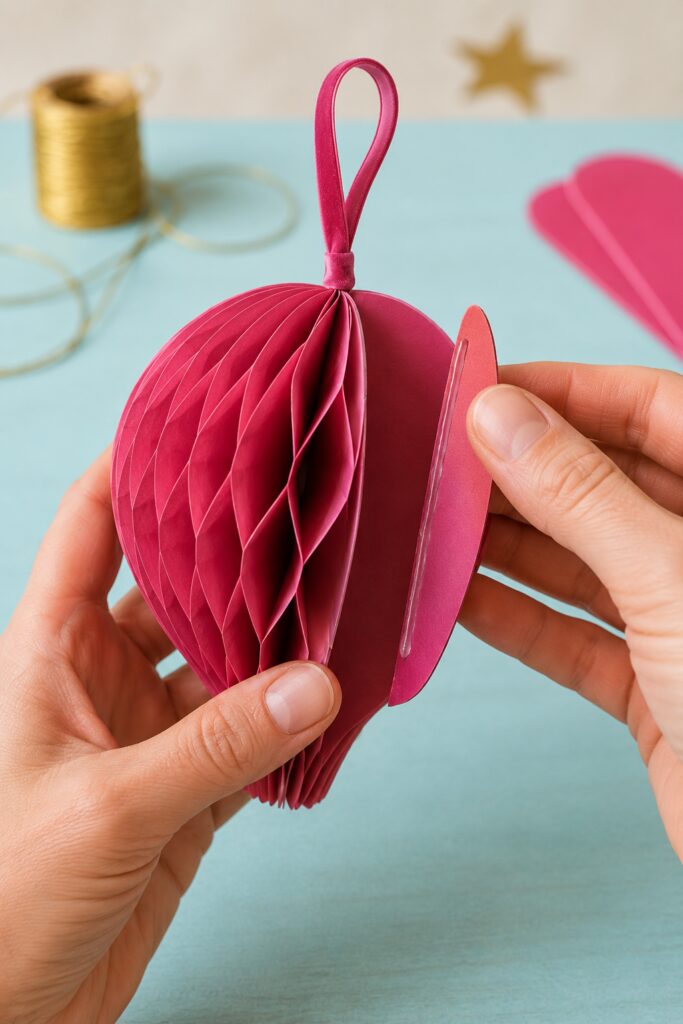
Slide the prepared lower collar around the balloon’s narrow neck. Position its seam at the back and glue the collar to the hidden cardstock support rather than to loose tissue cells.
Step 7: Build the Basket Form
Cut a narrow strip of cardstock and form it into a small cylinder approximately 1 inch wide. Overlap and glue the ends.
Cut a cardstock circle to fit the bottom of the cylinder. Glue it in place and allow the form to dry.
This cylinder becomes both the basket’s structure and the support around which the paper weave is formed. It can remain inside the finished basket, which is more stable than trying to remove it.
Step 8: Add the Vertical Basket Spokes
Cut an even number of narrow kraft-paper strips. Eight spokes create a convincing woven appearance without making the miniature basket unnecessarily complicated.
Glue the lower end of each spoke beneath or just inside the basket base. Space the spokes evenly around the cylinder and bend them upward along its sides.
Keep the strips narrow enough to curve around the tiny form without buckling. A bone folder can help soften heavier kraft paper before it is shaped.
Step 9: Weave the Paper Basket
Begin near the bottom with a long, narrow kraft-paper strip. Weave it over one spoke and under the next, working around the cylinder.
When you reach the starting point, continue upward with the opposite over-and-under sequence. This creates the staggered woven pattern visible in the inspiration image.
Apply tiny dots of glue at several hidden intersections. You do not need to glue every crossing.
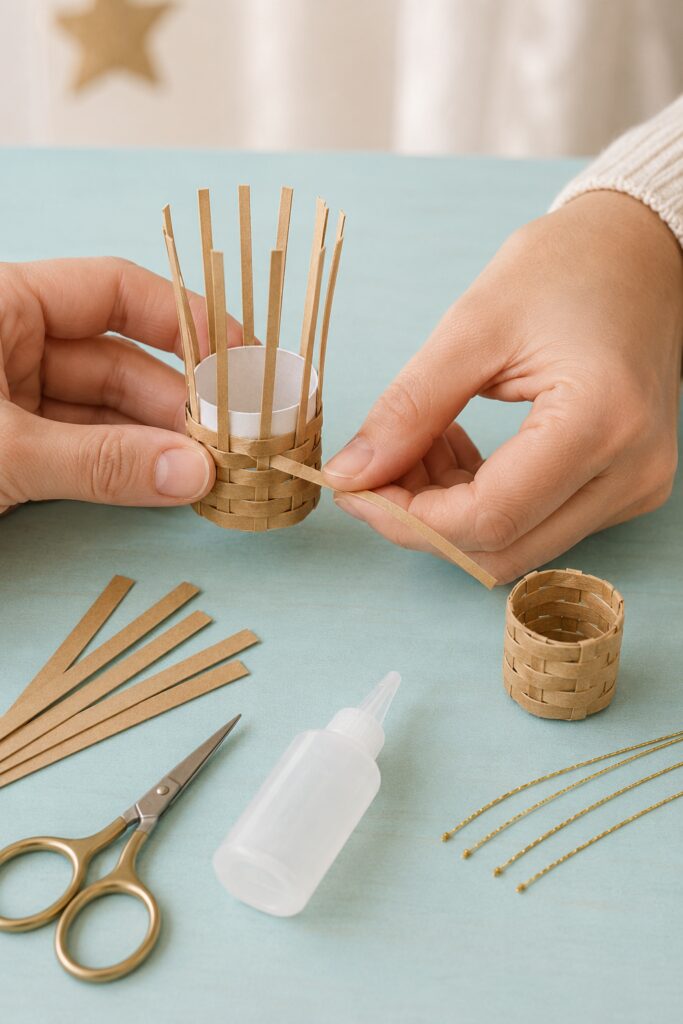
When the weave reaches the desired height, trim the vertical spokes evenly. Fold their ends over the upper edge and glue them inside the basket. Cover the folded ends with one final paper strip wrapped around the rim.
If weaving such narrow strips feels too fiddly, wrap the cylinder with horizontal kraft strips and draw short alternating vertical lines with a fine brown pencil. It will not have the same texture, but it provides a practical simplified option.
Step 10: Punch the Basket Cord Holes
Mark four equally spaced points around the basket’s upper rim. Punch a small hole at each mark.
The holes should sit just below the reinforced top band. Placing them too close to the edge may cause the paper to tear.
Thread one gold cord through each hole. Tie a small knot inside the basket, but do not trim the extra cord yet.
Step 11: Center the Basket
Hold the ornament by its velvet loop and let the basket hang freely. Adjust each cord until the basket sits directly below the balloon and its top rim appears level.
Working with opposite pairs helps. Adjust the front and back cords first, then the left and right pair.
Once the basket is centered, tighten the interior knots. Add a tiny dot of clear-drying glue to each knot, then trim the excess cord after the glue has set.
Avoid gluing the cords where they pass through the basket rim. A small amount of movement helps the ornament settle naturally when it is hanging.
Step 12: Finish the Ornament
Inspect the balloon seam and gently open any compressed honeycomb cells. Remove stray glue with clean tweezers before it fully hardens.
Wrap a small matching velvet band around the base of the hanging loop if desired. This conceals the ribbon ends and gives the top of the ornament a polished finish.
Hang the ornament temporarily and view it from several directions. The basket should remain level, the cords should appear evenly spaced, and the cardstock reinforcement should remain hidden.
Tips for Capturing the Fanciful Look
Use one strong color for each balloon rather than mixing papers within a single ornament. The collection becomes interesting through the contrast between coral, raspberry, mint, aqua, yellow, and lavender.
Keep the gold cord fine. Thick cord can visually overpower the basket and distort the delicate scale of the ornament.
Match the velvet loop to the balloon whenever possible. The similar color lets the honeycomb texture remain the main feature.
Choose kraft paper with a subtle variation in tone for the basket. A light brushing of brown chalk along the woven edges can make plain paper resemble miniature natural fibers.
Make every balloon from the same template, but allow tiny differences in basket weaving and cord length. These variations give the set its handmade character.
Easy Ways to Customize the Ornaments
For a more traditional tree, make balloons in burgundy, evergreen, cream, and muted gold. Ivory balloons with pale blue velvet would suit a winter-themed display.
Tiny metallic stars can be glued to the basket fronts, although embellishments should remain lightweight. A small bead inside each basket can suggest a wrapped gift or passenger without hiding the paper weave.
For place settings, reduce the template and attach a small name tag to the basket. Larger versions can hang in a child’s room after Christmas if the velvet loop and suspension cords are securely reinforced.
Displaying and Storing the Finished Collection
Hang the ornaments on sturdy outer branches where their baskets can dangle freely. Avoid crowding them against lights, tinsel, or neighboring ornaments that could crush the honeycomb cells.
They are intended for dry indoor display. Keep them away from open flames, hot bulbs, moisture, and strong kitchen steam.
The small baskets and cords can be tempting to children and pets, so place the ornaments beyond their reach.
For storage, gently separate the two reinforced closing panels if you have made them reopenable, collapse the honeycomb body, and place each ornament in a shallow box. If the seam was permanently glued, surround each balloon with loose tissue and avoid stacking anything on top.
A complete collection does not require perfectly identical weaving or balloon shapes. Consistent proportions, carefully reinforced hanging points, and a coordinated palette will preserve the fanciful character of the original idea.