*This post may contain affiliate links for which I earn commissions.*
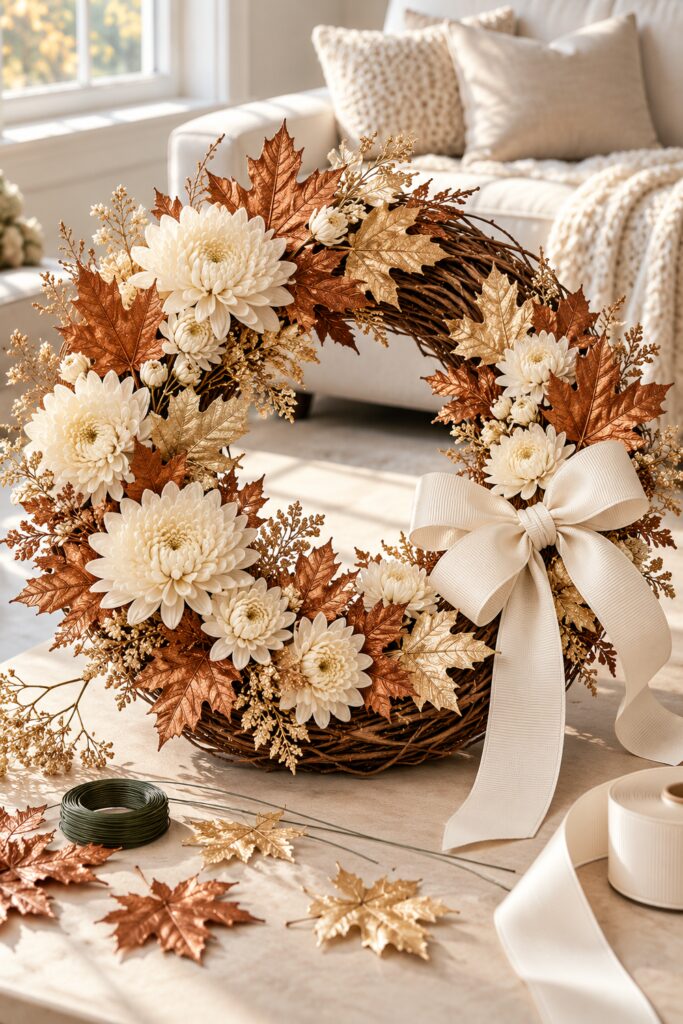
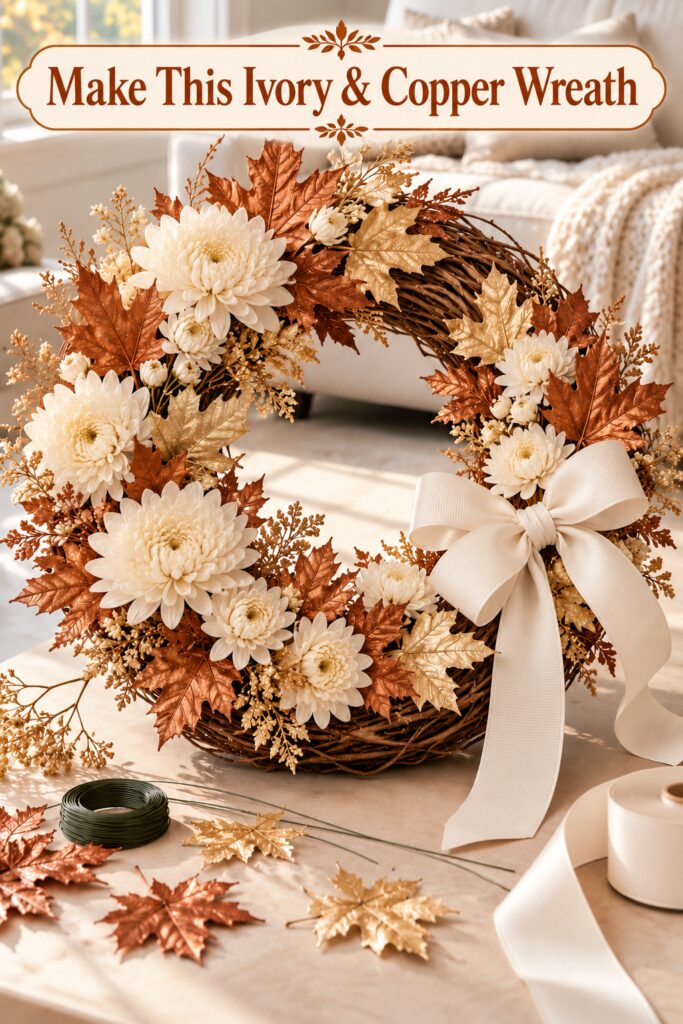
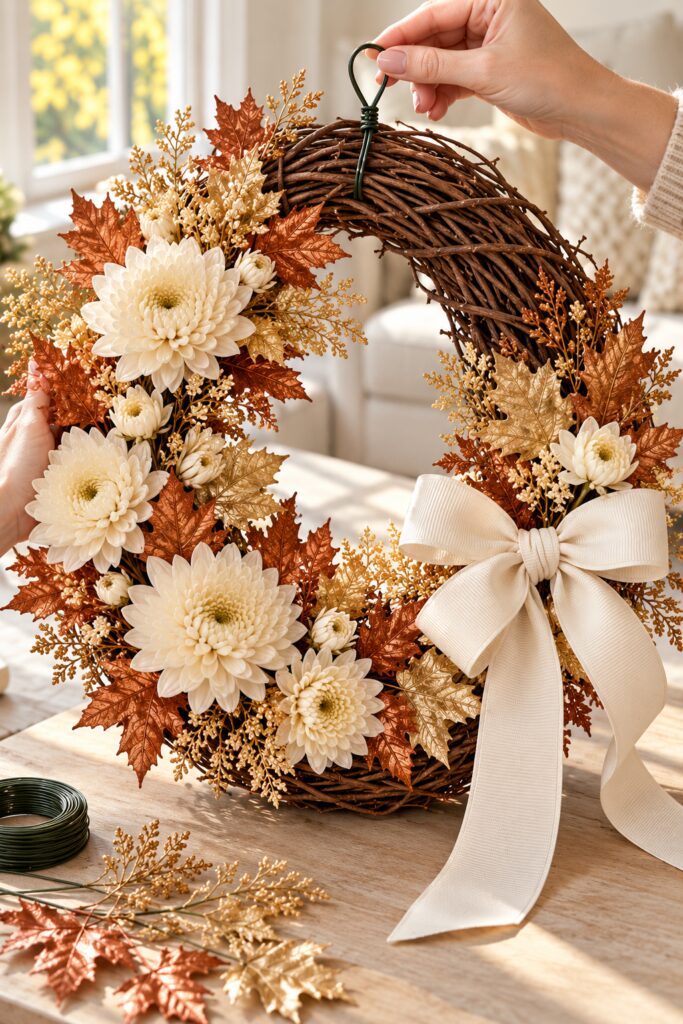
Ivory chrysanthemums and copper maple leaves give this grapevine wreath a soft but distinctly autumnal look. A broad cream bow finishes the lower right side, while exposed vine around the upper edge keeps the flower clusters from feeling too heavy.
This tutorial turns that visual idea into a practical wreath made with faux flowers, wired leaf stems, and a ready made grapevine base. The main attachments use floral wire, so you can adjust the arrangement as you work and refresh individual pieces in another season.
The inspiration and instructional images were created with AI. The demonstration images illustrate the proposed method and do not document an actual project being built. This tutorial translates the visual idea into a practical wreath you can make at home.
What You Are Making
The finished project is a decorative ring with fuller ivory flower clusters along the left and lower sections, metallic leaves around the remaining curve, and a cream bow near the lower right. Keep an open center and some visible grapevine, particularly toward the top.
An approximately 18 inch grapevine base is a useful suggested starting size. Your finished width will be larger once the foliage extends beyond the ring. Use these proportions as a guide rather than treating the inspiration as a measured pattern.
Materials and Supplies
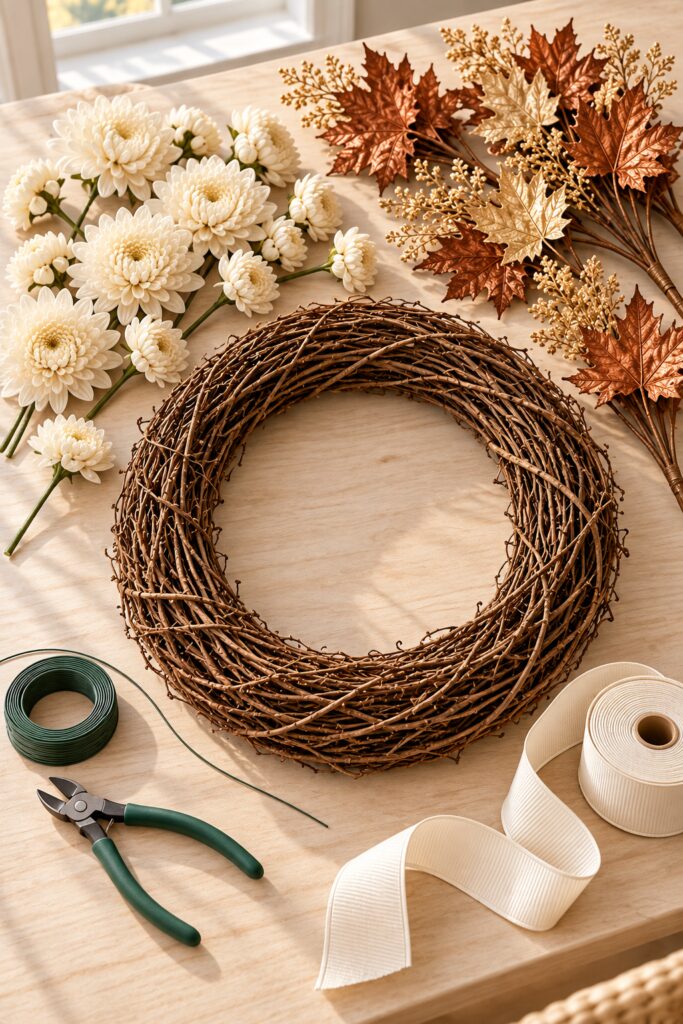
Materials
- One approximately 18 inch grapevine wreath base
- About 8 to 12 faux ivory chrysanthemum heads on stems in a mix of sizes – some large mums, some medium size mums, and maybe some mini mums, depending on the size of the others in your mix (if you can find a set that contains all of them, that’s easier on you but I’ve found that I have to buy 2-3 sets if I buy online – an alternative would be to go to a Michaels or a Hobby Lobby and pick out individual stems)
- Several wired copper maple leaf sprays (I’ve linked to cheaper, dark orange sprays because that will work just fine but if you want them to have a truly copper sheen you could spray them with a copper-toned spray paint first)
- A couple of muted gold leaf foliage sprays (if you decided to spray paint copper leaves, you could do the same for gold leaves rather than buy a separate batch)
- About 2 to 3 yards of cream wired ribbon approximately 2 to 3 inches wide
- Green or brown floral paddle wire approximately 22 to 24 gauge
- A separate length of sturdy hanging wire or a suitable wreath hanger
Flower and leaf quantities depend on their size and the fullness you prefer. Buy by the number of usable heads and branches rather than assuming every floral bunch contains the same amount. Keep extra leaves aside until the arrangement is nearly finished.
Going to make this wreath?
I’ve put together a convenient Amazon supply list featuring hand-picked products that match the supply list in this post to save you time.
See My Hand-Picked Supply ListAs an Amazon Associate I earn from qualifying purchases but this doesn’t increase your price at all!
Tools
- Wire cutters suitable for floral stems
- Scissors reserved for ribbon
- Small pliers for twisting and tucking wire ends
- A protective work mat or cloth
Optional floral tape can wrap exposed cut stems if needed. You can get a floral kit that includes the tape, the paddle wire, and the wire cutters and it might save you some money. This method does not require hot glue although you could use that if you prefer. Ready made metallic foliage keeps the construction straightforward and avoids adding drying stages that the project does not need.
Before You Start
Lay the base flat and rotate it until you find its most attractive face. Grapevine rings are naturally irregular, so choose an orientation with a sound section at the top for hanging. Check for loose branches and remove only pieces that are clearly detached.
Lay the flowers and leaves around the ring without attaching them. Leave a small section near the lower right for the bow and preserve the central opening. Take a photo to use as your placement guide.
Protect the table from scratchy vine and wire ends. Cut floral stems with wire cutters rather than household scissors, keeping the cut ends pointed away from your hands. Gather the offcuts immediately.
Step 1: Prepare the Flowers and Leaf Sprays
Separate the floral bunches into manageable stems. For most flowers, leave approximately 3 to 4 inches of stem below the head as a suggested working length. That gives you enough material to tuck into the vine and wire securely without leaving long stems across the opening.
Divide larger leaf sprays at their natural branch points. Keep a few longer branches for the upper curve and use shorter pieces around the flower clusters. Do not remove every leaf from its stem; a wired branch is easier to anchor than a loose decorative leaf.
Spread the cut components beside the base. Group the larger flowers, smaller flowers, copper foliage, and gold accents separately. Keep large blooms aside for the main clusters.
Step 2: Wire the First Layer of Metallic Leaves
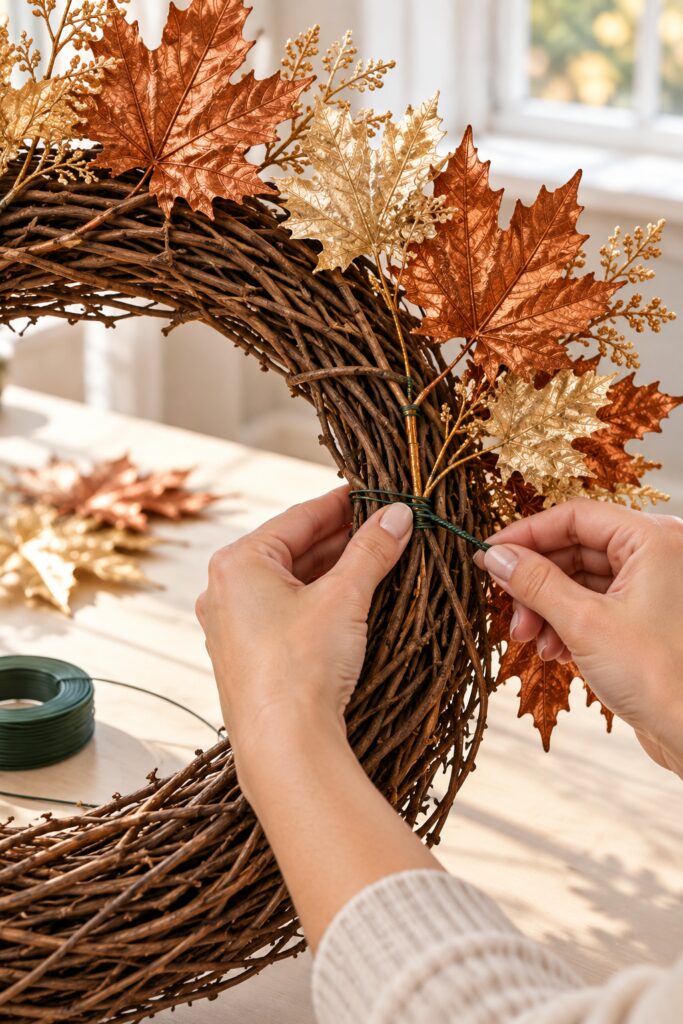
Start along the upper left curve and point the first leaf spray clockwise around the ring. Push its stem into a gap between vines so it lies along the base rather than across the center. Keep the leaves facing forward and slightly outward.
Cut a manageable length of floral wire. Pass it around the stem and a sturdy part of the vine ring, then bring both ends to the back. Twist them snugly with pliers and tuck the ends into the base. Use a second tie if the stem still rotates.
Overlap the next spray enough to cover the first attachment point. Continue around the upper and right sections, varying the leaf direction slightly. Let some copper leaves reach beyond the ring, but keep the open center clear and the outline balanced.
Use fewer gold leaves than copper ones. Tuck them between the warmer sprays so they catch the light as small accents. Leave the lower left area lighter at this stage because the fuller flower clusters will occupy that section.
Step 3: Add the Ivory Chrysanthemum Clusters
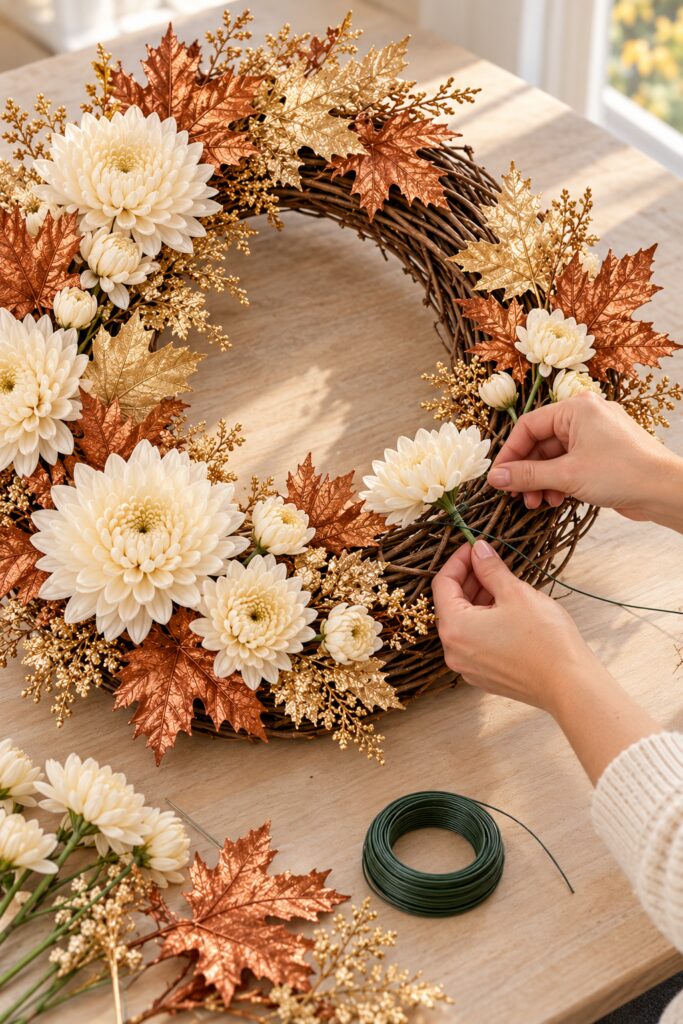
Place a larger flower toward the lower left, angling its face slightly outward. Tuck the stem into the vine and secure it with wire around a sturdy part of the ring. Keep the attachment below the flower head so the bloom sits neatly against the leaves.
Add another large bloom higher along the left curve, then fill between them with smaller flowers. Build the grouping gradually instead of arranging every head at an equal distance. The inspiration’s appeal comes from generous clusters with metallic leaves visible around their edges.
Place a few smaller blooms near the upper right and lower curve to connect the main flower mass to the bow area. Keep the ring’s center visible. If a flower points into the opening, rotate its stem outward before tightening the wire.
Gently lift each flower to check that the stem is anchored to the base rather than merely wedged beneath neighboring foliage. Add another tie where needed. Hide attachment points with nearby leaves, but do not depend on those leaves to hold the flowers in place.
Step 4: Shape and Attach the Cream Bow
Leave a tail, then form two generous loops in the ribbon and pinch the middle. Add another pair of loops if you want more fullness, keeping their sizes slightly varied. Hold the center together with a separate piece of floral wire.
Place the bow near the lower right side of the wreath. Wrap its fastening wire around a strong section of the vine and twist the ends at the back. Shape the wired loops forward so they have depth and do not flatten against the leaves.
Trim the tails to suit the wreath, with one slightly longer if you like the relaxed effect in the image. Cut a clean angled or notched end. Keep the tails outside the central opening and avoid allowing them to cover the main flower cluster.
Step 5: Add a Hanger and Check Every Attachment
Create a hanging loop at the top around a sturdy section of grapevine using suitable hanging wire, or use a wreath hanger rated for the finished weight. Keep the loop separate from the floral stem ties. The decorative pieces should not carry the load of the whole wreath.
Lift the wreath carefully and inspect it upright. Adjust any flowers that settle forward, tighten rotating stems, and tuck sharp wire ends into the back. Check the balance of the bow against the fuller flowers on the left.
Add only a few remaining leaves where the wire or cut stems remain visible. A little exposed vine is part of the design, so you do not need to cover every gap. Check the balance from a distance.
Tips for the Ivory and Copper Finish
Keep ivory as the main flower color and copper as the dominant leaf tone. Smaller gold accents can brighten the spaces between them. Too many competing metallic finishes will make the wreath harder to read from a doorway.
Vary the flower height slightly so the heads create a layered surface. Keep the largest blooms clear of the bow loops. The vine, leaves, flowers, and ribbon should each have a recognizable place in the arrangement.
Easy Ways to Customize It
Use a smaller base for a narrow door and reduce flower size as well as quantity. A larger flower head on a small ring can quickly close the center. Preserve the same fuller left side and lower right bow so the overall idea remains recognizable.
For a less reflective version, combine copper toned faux leaves with only a few metallic gold sprays. Keep the cream ribbon broad and simple. The contrast between soft petals and pointed leaves will still provide the project’s distinctive texture.
Displaying and Storing the Wreath
Hang the wreath indoors or on a protected door only if every component is suitable for that location. Ordinary faux flowers and ribbon should not be assumed weatherproof. Check the door swing and any storm door clearance before leaving it in place.
Store the wreath in a roomy container that will not crush the bow or flowers. Place it face up and support the ring rather than pressing weight onto the decorations. Wired attachments make it possible to replace a worn ribbon or leaf spray later.
Final Encouragement
Concentrate on the ivory flower clusters, copper leaf outline, and single cream bow. Those three features carry the look, and a little variation in the grapevine or bloom placement will give your wreath its own character.