*This post may contain affiliate links for which I earn commissions.*
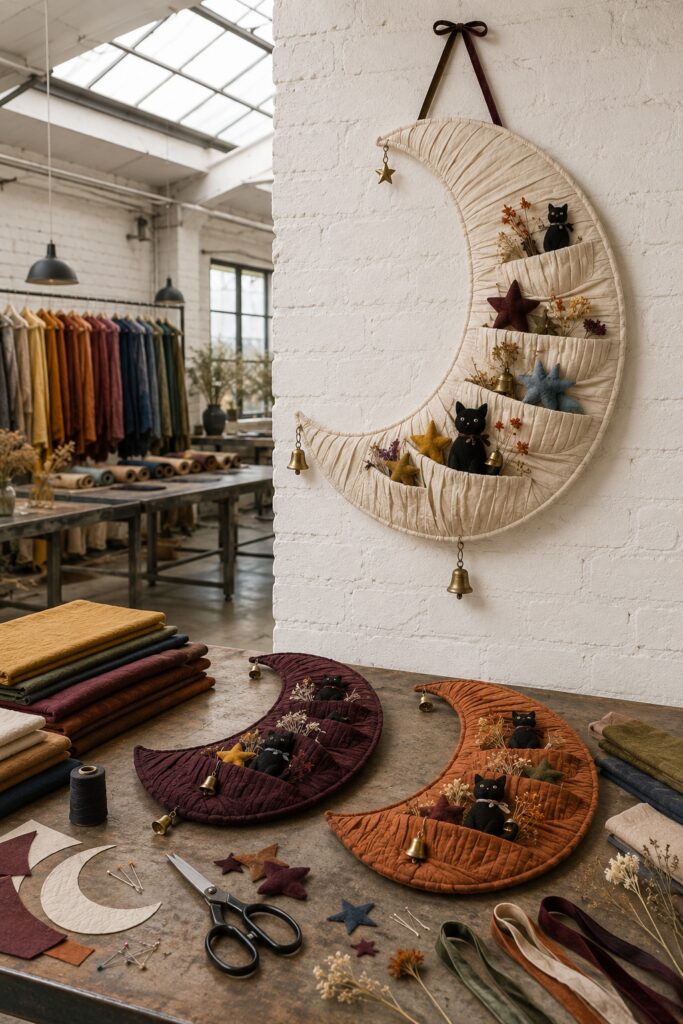
A fabric crescent becomes part textile art and part seasonal organizer in this unusual wall project. Its cream-on-cream quilting lets the moon make a statement, while softly pleated pockets create places for tiny felt stars, black cat ornaments, dried flowers, and other light fall treasures.
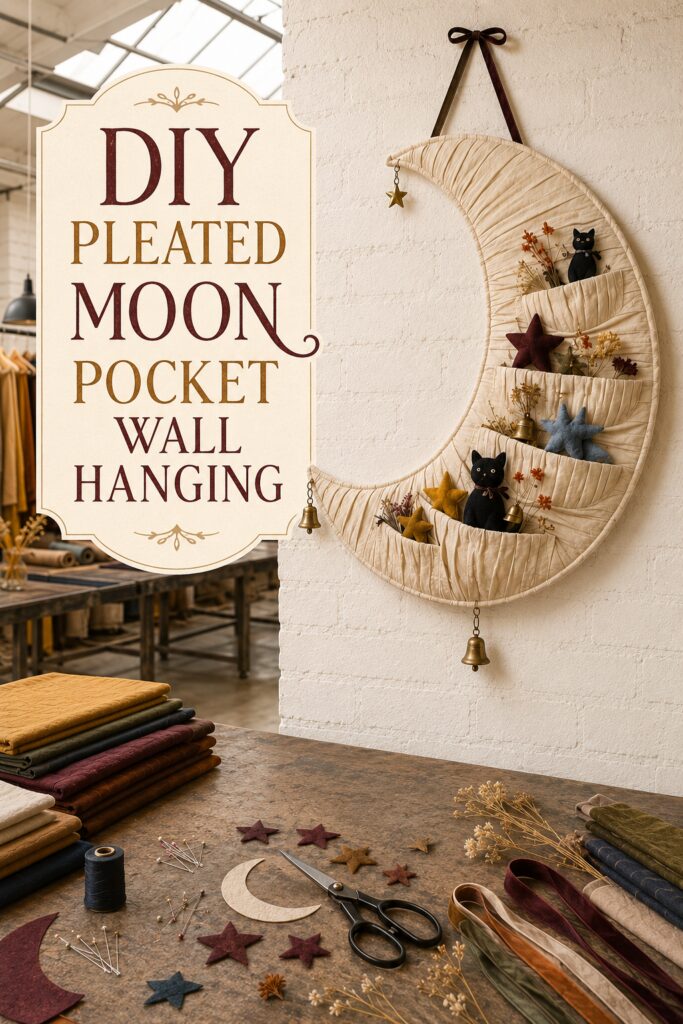
The inspiration image for this project and the instructional images were created with AI. This tutorial translates that visual idea into a practical DIY project you can recreate at home.
What You’re Making
This is a large, flat-backed crescent wall hanging with a lightly padded quilted face and four working pocket rows. An approximate height of 28 to 32 inches gives it presence above a console, craft table, or reading nook, although the pattern can be reduced. A rigid foam-board core replaces the image’s seemingly stuffed structure so the moon keeps its shape after the pockets are filled.
Materials and Supplies
Materials
- One sheet of 3/16-inch lightweight rigid foam board large enough for the crescent
- Kraft paper or joined sheets of paper for the full-size template
- Cream medium-weight cotton, linen-look cotton, or cotton canvas, with yardage based on the chosen size
- Thin low-loft quilt batting
- Coordinating all-purpose sewing thread
- Narrow cotton tape or extra fabric for two reinforced hanging tabs
- Approximately 30 to 36 inches of 3/8- to 5/8-inch velvet ribbon for the hanger
- Small amount of felt or fabric for stars and cat ornaments
- Three small lightweight metal bells
- Strong hand-sewing thread for tabs and bells
- Small amounts of dried flowers or faux botanical sprigs
Tools
- Sewing machine with a standard presser foot
- Fabric scissors
- Craft knife with a fresh blade
- Self-healing cutting mat
- Metal ruler
- Fabric marker or tailor’s chalk
- Straight pins or sewing clips
- Hand-sewing needle
- Iron and ironing surface
- Curved ruler or flexible measuring tape, if available
Optional Finishing Supplies
- Pinking shears for small felt and fabric accents
- Fray-control liquid for ribbon ends
- Small scraps of burgundy, ochre, olive, pumpkin, faded blue, and black fabric
Before You Start
Choose the display wall before setting the size. A crescent about 30 inches high is dramatic but still manageable on a home sewing machine. Make a full paper pattern first, tape it temporarily to the wall, and check its proportion from across the room.
Draw a large outer arc, then a smaller overlapping arc to form a broad crescent. Leave ample width through the lower half so the pocket rows have a stable foundation. Mark four gently rising pocket lines across that broad section. Keep the upper quarter free of pockets so the radiating quilting remains visible.
Protect the table with a cutting mat when using a craft knife. Use a fresh blade, cut away from your hands, and make several light passes rather than forcing one deep cut. Press fabric with the iron setting appropriate for its fiber content.
Step-by-Step Tutorial
1. Make and Test the Crescent Pattern
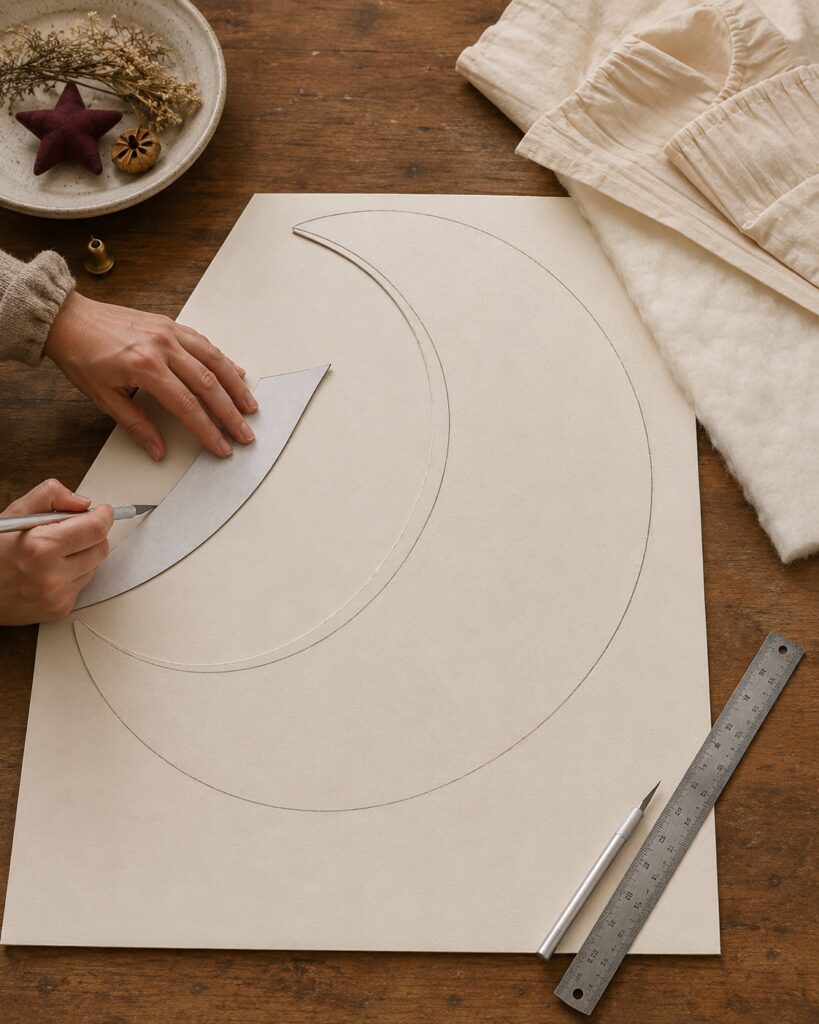
Transfer the paper crescent to the foam board. Before cutting, check that the inner points are not needle-thin. Slightly softened tips are less likely to bend and will be easier to cover neatly. Trace the outline, then mark the top, bottom, inner curve, and intended pocket area.
Cut the board on a protected surface with several controlled passes. Smooth any ragged paper edges with a very light trim. Hold the shape upright to be sure it does not flex excessively. If it feels weak, cut a second identical crescent and laminate the two with an even, thin layer of suitable craft adhesive, keeping adhesive away from the fabric sewing stages.
2. Build the Lightly Padded Front
Use the foam crescent as a pattern to cut one layer of low-loft batting exactly to shape. Cut a cream fabric front with roughly 1 inch of extra fabric around every edge. Baste or pin the batting to the wrong side of the fabric.
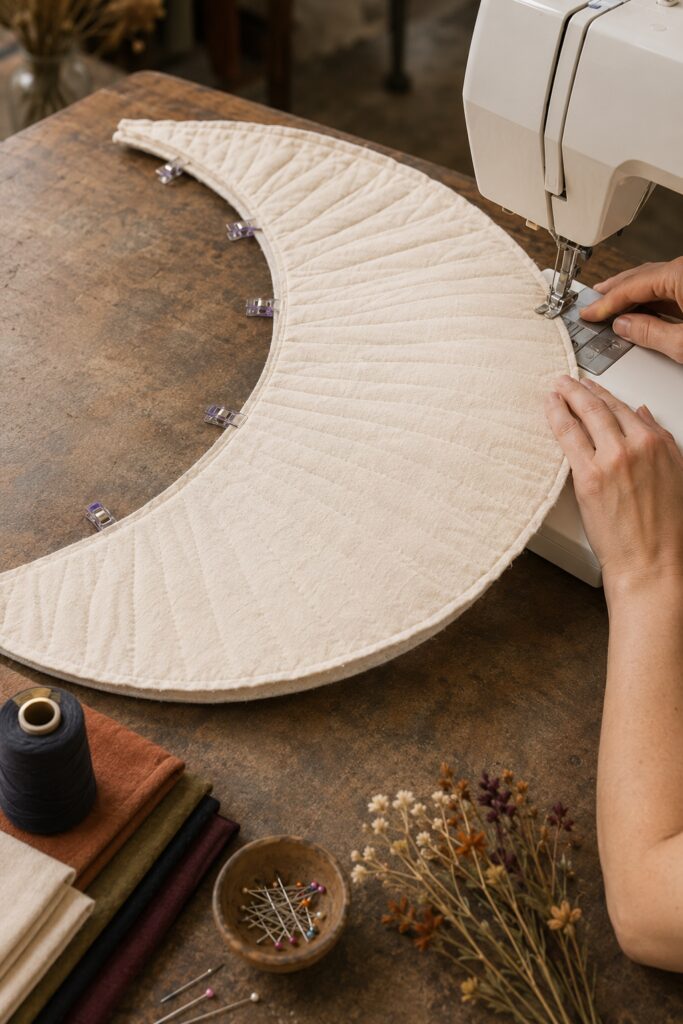
Mark gently radiating lines from the inner curve toward the outer curve, spacing them approximately 1 to 1 1/2 inches apart. The lines do not need to be mathematically perfect. A subtle fan effect looks more natural and helps the fabric conform to the moon.
Quilt through the fabric and batting only. Begin near the center and alternate outward so the layers remain smooth. Keep the upper thread tension moderate and stop to flatten any developing puckers.
3. Fit the Quilted Cover Around the Core
Lay the foam-board crescent on the batting side of the quilted piece. Clip small notches into the fabric allowance along the concave inner curve, stopping well short of the future edge line. Fold the allowance over the board a little at a time. Smooth the outer arc and overlap the clipped inner allowance so it follows the curve without bulky folds.
Secure the allowance temporarily with clips. Cut a plain cream backing crescent with a narrow turned-under edge. Set it aside until the pockets and hanging tabs are attached. This keeps the stitching accessible and allows the backing to hide the working edges at the end.
4. Prepare the Pleated Pocket Bands
Measure each marked pocket path with a flexible tape. Cut four cream fabric strips about 1.6 to 1.8 times the measured path length so there is enough fullness for shallow pleats. The lowest strip can be 7 to 8 inches deep before hemming; gradually reduce the upper strips to about 5 inches. These are suggested proportions rather than fixed measurements.
Hem the top edge of every strip with a narrow double fold. Finish the lower raw edge with a zigzag stitch or narrow turned hem. Press shallow knife pleats at regular intervals, all facing the same general direction. Let the pleats vary slightly through the tightest part of the curve instead of forcing equal spacing.
Pin each band over its marked line with the finished opening facing upward. Start with the lowest row. Shape the band around the curve, then trim and turn its side ends under. The pockets should grow slightly deeper toward the full outer belly of the crescent and narrow near the inner curve.
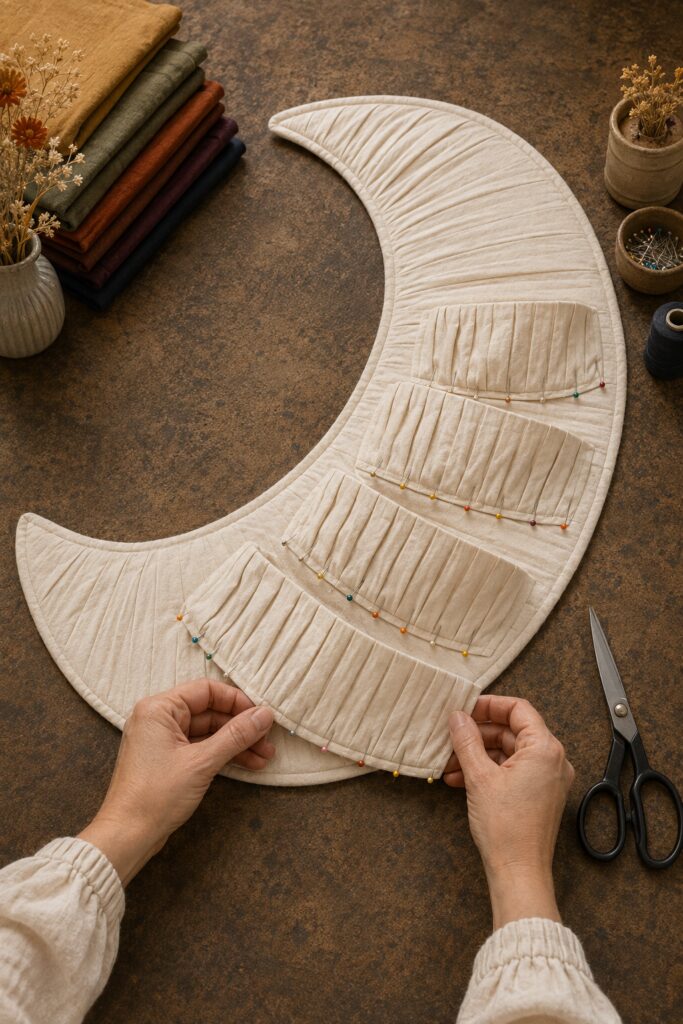
5. Stitch the Pocket Rows Securely
Sew the lower curved edge and both short ends of the lowest band to the quilted cover, stitching through the fabric, batting, and folded fabric allowance where practical. Leave its hemmed top open. Add one or two short vertical dividing seams if the pocket is wide enough for contents to slide toward the lowest point.
Repeat with the remaining bands from bottom to top. Allow each upper band to overlap the row below by roughly 1 inch without covering its opening. Backstitch at every pocket corner. Avoid making the rows so deep that decorations disappear inside them.
6. Add Reinforced Hanging Tabs
Make two short tabs from folded cotton tape or several layers of matching fabric. Position one near each upper end of the crescent, far enough from the delicate tips to sit over a broad section of the rigid core. Hand-stitch each tab through the cover’s folded allowance and around the edge of the core using strong thread. Make several passes and knot them securely on the back.
Thread the velvet ribbon through both tabs and tie or stitch its ends to form a hanger. Test the empty organizer close to the floor before proceeding. The moon should remain level and neither tab should distort the fabric.
7. Close and Finish the Back
Place the backing crescent over the rear surface. Slipstitch its turned edge to the folded edge of the front cover, enclosing the foam board and all raw fabric allowances. Work in short sections so the front remains smooth. Do not stitch through or close the pocket openings.
Sew short reinforced loops at the two tips and lower point, then attach the lightweight bells. Secure the loops with several hand stitches through the fabric allowance around the rigid edge. Bells should be decorative and small enough that they do not pull the points out of shape.
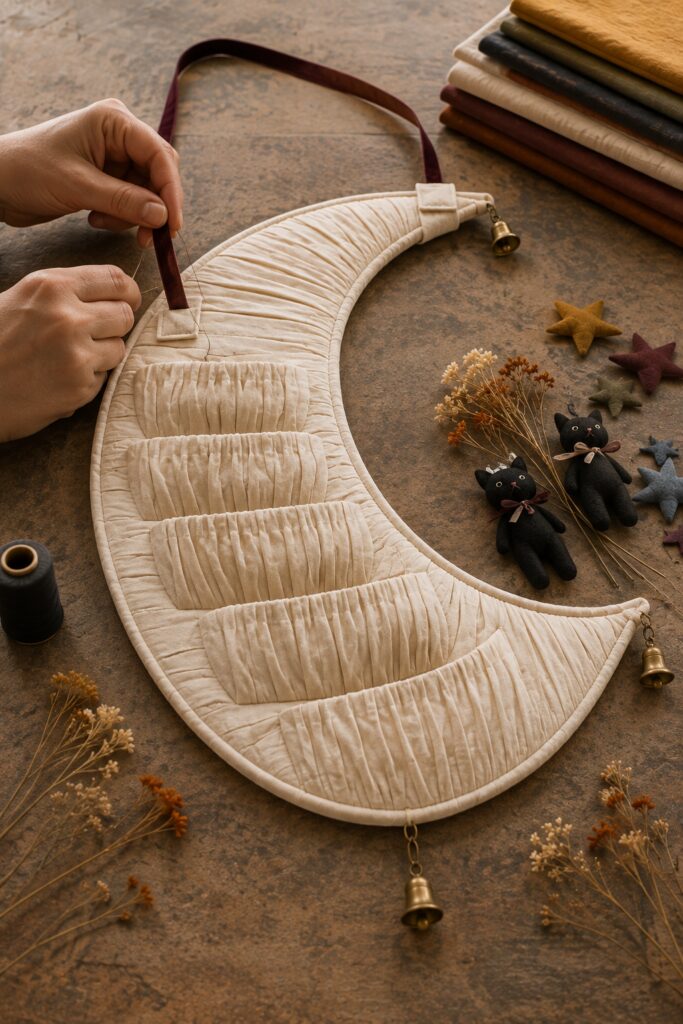
8. Make the Seasonal Pocket Treasures
Cut pairs of small stars from felt or fabric, stitch around their edges, and add only a pinch of filling. For a black cat, use a simple silhouette with pointed ears, a narrow body, and tiny stitched facial details. Keep every ornament soft and light.
Place the largest star or cat in a lower pocket, then stagger smaller pieces upward. Trim dried stems short and wrap their ends with thread or floral tape so they do not shed or poke through the fabric. Fill loosely. The pleats and cream quilting are part of the design and should remain visible.
Tips for Capturing the Layered Look
Use a slightly textured cream fabric rather than optic white. It catches the quilt lines and keeps the neutral moon from feeling flat. Make the pleats shallow and numerous, then let their spacing relax around the curves. Four pocket rows are enough to create abundance without making the lower half heavy.
Limit the accents to a few muted hues. Burgundy, pumpkin, ochre, olive, faded blue, and black echo the inspiration while leaving cream dominant. Repeat brass at all three points of the crescent for balance. Sparse dried stems provide height and movement, but they should never obscure the cat and star shapes.
Easy Ways to Customize It
For a stronger Halloween version, fill the pockets with black cats, bats, moons, and tiny potion-bottle silhouettes in plum, rust, charcoal, and antique gold. For a fall version, exchange the cats for felt acorns, leaves, miniature pumpkins, and wheat-colored stems.
A berry-colored or pumpkin-colored moon can be made with the same pattern, as suggested by the smaller samples in the inspiration image. If using a dark base fabric, choose thread one shade lighter so the radiating quilt lines remain visible. A smaller crescent can hold jewelry, notes, or lightweight craft notions throughout the year.
Displaying the Finished Moon
Hang the organizer indoors from a wall hook rated comfortably above its finished weight. Keep it away from open flames, damp areas, and direct afternoon sun that could fade the fabric or dry the botanicals further. Use only light contents, and mount it beyond the reach of pets or small children because the bells and ornaments are small parts. It is decorative storage, not a toy or a holder for heavy household objects.
The moon does not need every pocket filled or every line perfectly matched to the AI inspiration. A strong crescent silhouette, soft radiating quilting, and a handful of carefully spaced seasonal treasures are what make the idea recognizable and special.