*This post may contain affiliate links for which I earn commissions.*
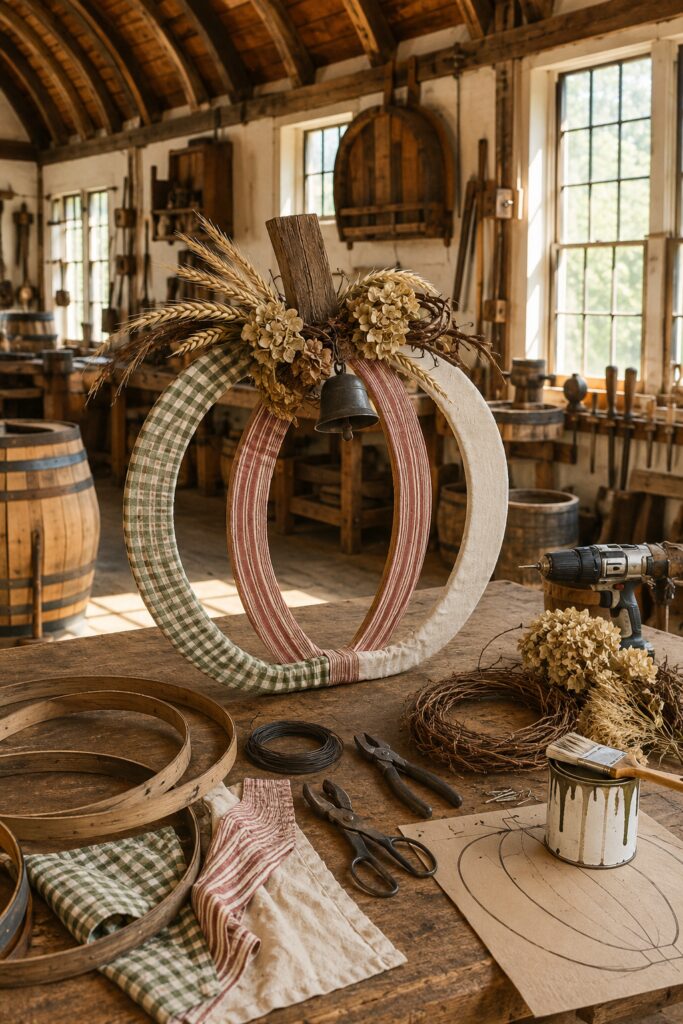
Three overlapping hoops create a wonderfully simple pumpkin shape, but the fabric layers and natural topper give this fall wreath its personality. Sage gingham, faded berry ticking, cream linen, wheat, grapevine, and dried hydrangea make the design feel collected and gently timeworn.
The inspiration appears to use wooden barrel bands, but bending reclaimed wood into matching circles would require specialized equipment and could produce an unstable wreath. This tutorial uses three same-size metal barrel hoops or sturdy metal craft rings instead. Once wrapped, they retain the substantial barrel-hoop appearance while being easier to assemble and hang safely.
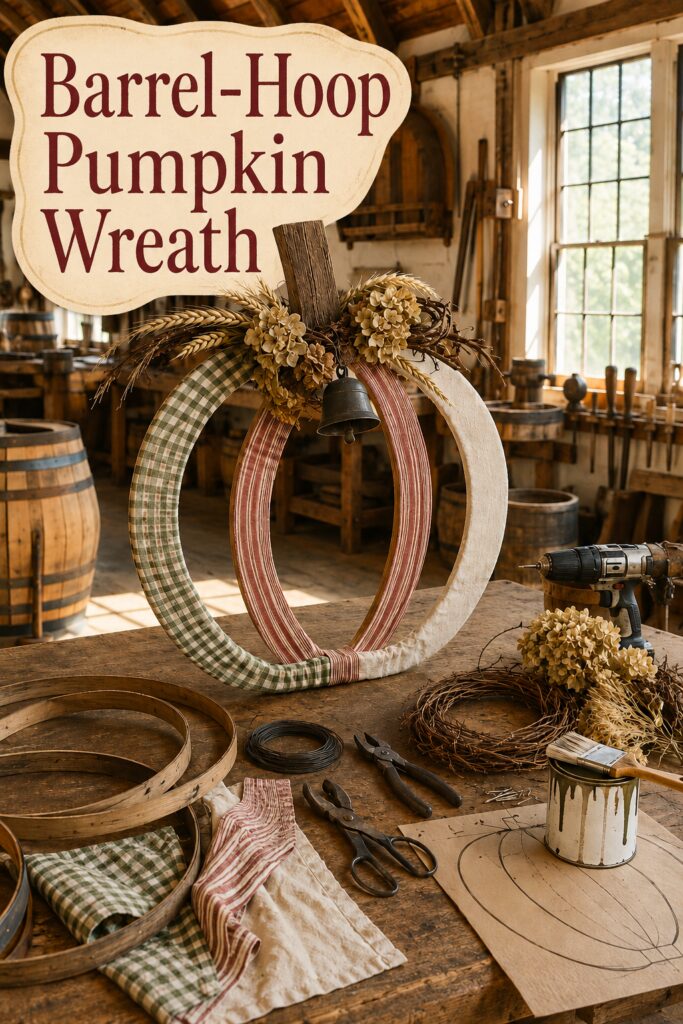
The inspiration and instructional images for this project were created with AI. This tutorial translates the visual concept into a practical DIY project rather than documenting an actual construction process.
What You’re Making
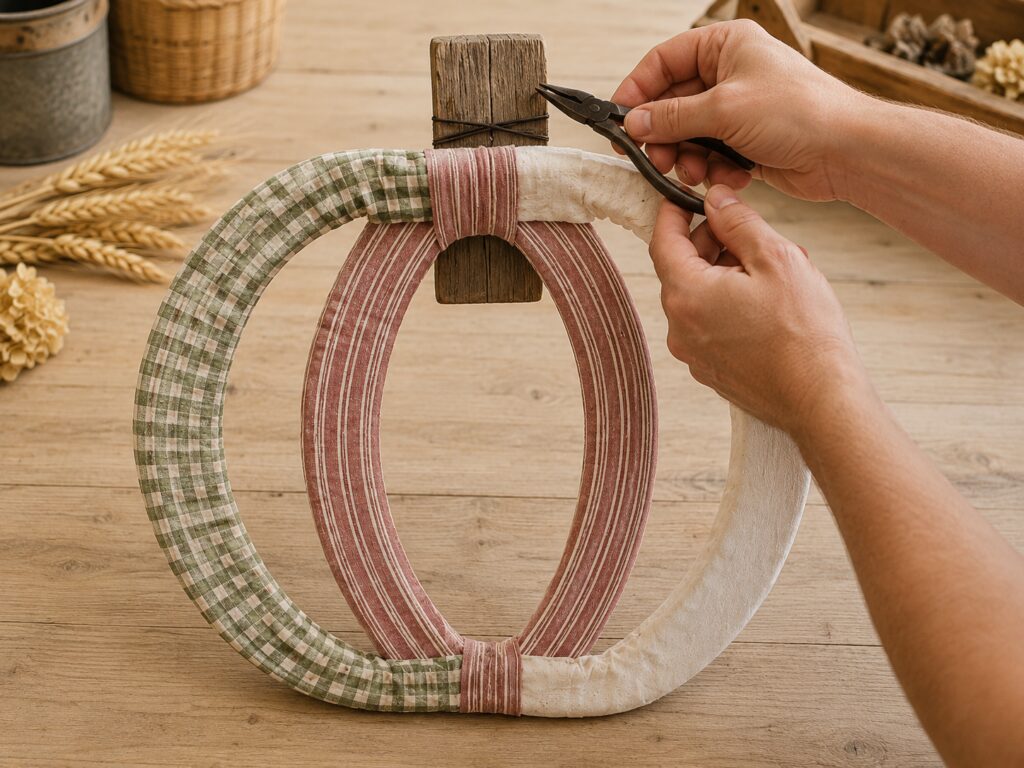
This is an open-frame pumpkin wreath formed from three overlapping metal hoops. The left ring is wrapped in sage gingham, the center in faded berry ticking, and the right in softly textured cream linen.
A small concealed wooden brace stabilizes the upper joint and supports a reclaimed-wood stem. Grapevine, wheat, dried hydrangea, and a small iron bell hide the structural attachments and complete the old-fashioned farmhouse look.
Hoops approximately 22 to 26 inches in diameter will create a generously sized door or wall decoration. The finished width will be several inches wider than a single hoop because the side rings spread outward.
Materials and Supplies
Structural Materials
- Three matching metal barrel hoops or sturdy metal craft rings
- Black annealed wire, approximately 18 or 19 gauge
- Dark floral wire, approximately 22 gauge
- Small reclaimed-wood block for the concealed brace
- Reclaimed wood scrap for the pumpkin stem
- Two short wood screws
- Heavy-duty picture-hanging wire or coated hanging cable
- Small eye screws, optional
Fabric and Decorative Materials
- Sage gingham fabric or wide fabric ribbon
- Faded berry ticking fabric or ribbon
- Cream linen or linen-look fabric
- Flexible grapevine garland or a small grapevine wreath
- Dried wheat stems
- Dried cream or tan hydrangea
- Small iron bell
- Additional dried seed heads, optional
Tools
- Tape measure
- Fabric scissors
- Wire cutters
- Needle-nose pliers
- Drill-driver
- Small drill bit
- Screwdriver
- Fabric-safe adhesive
- Protective work gloves
- Eye protection
Before You Start
Choose three rings that are the same diameter. Barrel hoops can vary considerably, so compare them on a flat surface before purchasing or beginning the project. Slight patina differences are fine, but mismatched diameters will make the finished pumpkin difficult to balance.
Metal barrel bands may have rough edges, rust, or sharp fastening points. Wear gloves while inspecting them. Smooth or cover any hazardous areas before handling the fabric.
Wash, dry, and press ordinary fabric before cutting it into strips. Wired ribbon can be used as supplied. For fabric yardage, cut long strips approximately 2 to 3 inches wide. Exact length will depend on the ring diameter, hoop width, and amount of overlap.
Step-by-Step Tutorial
1. Arrange the Three Hoops
Place one ring vertically in the center of your work surface. Position the second ring behind it and move it slightly to the left. Place the third behind or beside the center ring and spread it equally to the right.
Bring all three hoops together at one shared point at the top and another at the bottom. The center ring should create the narrow middle section of the pumpkin, while the two side rings establish its wider outer contour.
Measure from the center hoop to the farthest point on each side. Adjust the rings until the pumpkin appears balanced. Use small reusable ties to hold the top and bottom temporarily.
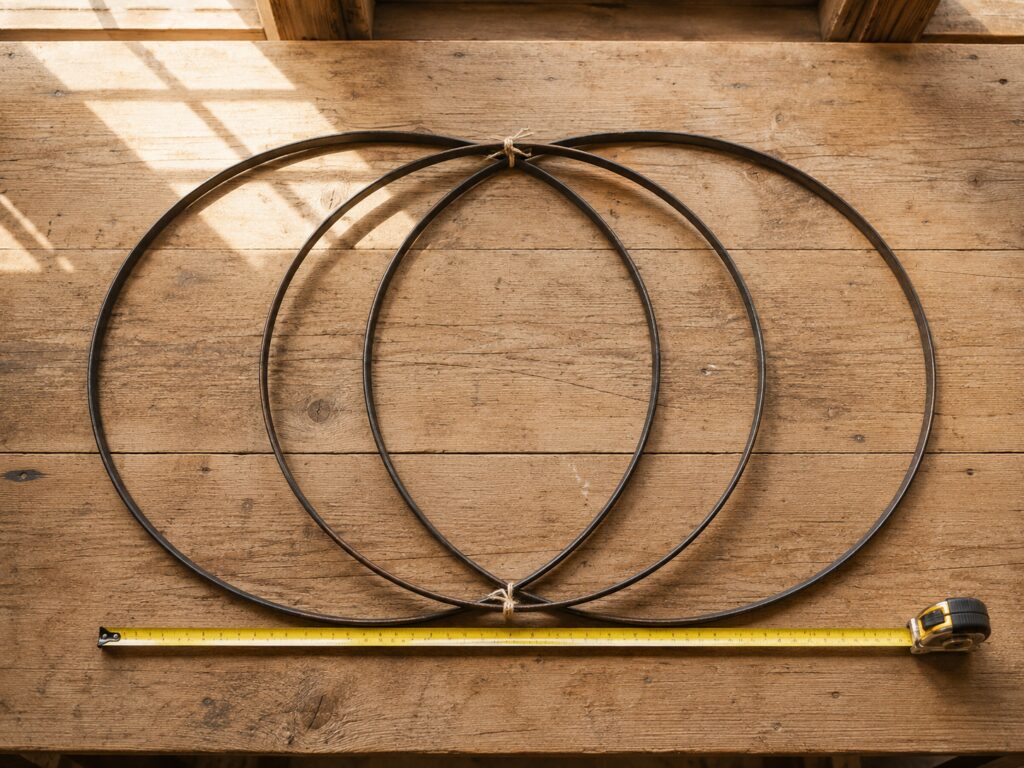
Stand the arrangement upright briefly to judge its proportions, but do not hang it yet. Mark the top and bottom meeting points with removable tape so you can recreate the arrangement after wrapping the rings.
2. Plan the Fabric Placement
Assign one fabric to each hoop. Sage gingham works well on the left, faded berry ticking creates a strong center section, and cream linen softens the right side.
Before cutting all the strips, wrap a short test section around one ring. The fabric should be wide enough to cover the metal with modest overlap but narrow enough to follow the curve without excessive bunching.
For a more rustic effect, leave the fabric edges raw. If the material frays heavily, apply a small amount of fray-control solution or turn the long edges under before wrapping.
3. Wrap Each Hoop
Begin at the portion of the ring that will eventually be hidden beneath the upper topper. Attach the end of the first fabric strip to the back of the hoop with a small amount of fabric-safe adhesive.
Wrap the strip around the narrow circumference of the ring in a spiral, overlapping each pass by approximately one-third. Keep the fabric snug and smooth, but do not pull so tightly that lightweight metal rings begin to distort.
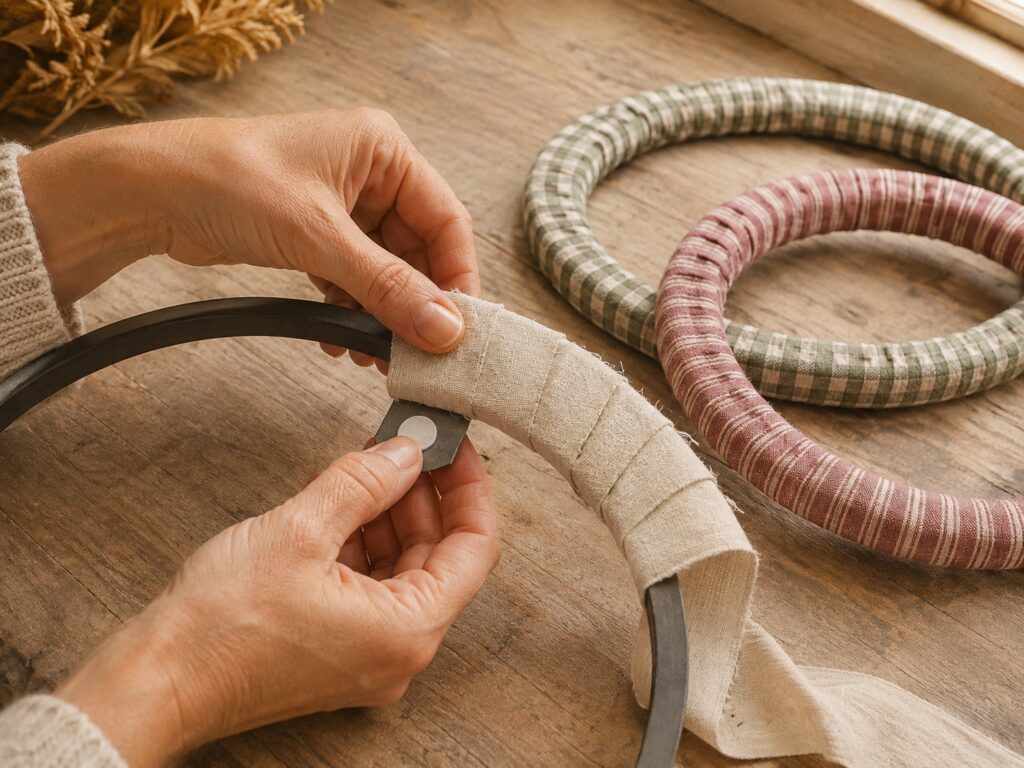
When one strip ends, overlap the next strip on the back of the ring and secure the join. Continue until the entire circle is covered. Finish at the upper back and allow the adhesive to dry according to its instructions.
Repeat the process with the remaining hoops.
4. Reassemble the Pumpkin Shape
Return the wrapped rings to the arrangement established in Step 1. Align the removable top and bottom markers and check the width again.
Decide which hoop should sit slightly forward at each joint. Keeping the center hoop toward the front usually gives the pumpkin a more dimensional shape.
Replace the temporary ties with several tight wraps of black annealed wire. Pass the wire around all three rings at the top, pull it snug with pliers, and twist the ends together at the back. Repeat at the bottom.
Trim the wire with proper cutters. Fold every cut end inward with needle-nose pliers so no sharp point projects toward the fabric, wall, or door.
5. Add the Concealed Upper Brace
Cut a small reclaimed-wood block wide enough to bridge the upper joint without extending noticeably beyond the future botanical topper.
Position it horizontally against the back of the hoops. Bind the block securely to the center hoop and at least one side hoop with annealed wire. If the block has drilled holes, the wire can pass through them for a more secure connection.
Cut a separate wood scrap into a simple pumpkin stem. An uneven or gently angled piece will look more convincing than a perfectly squared block.
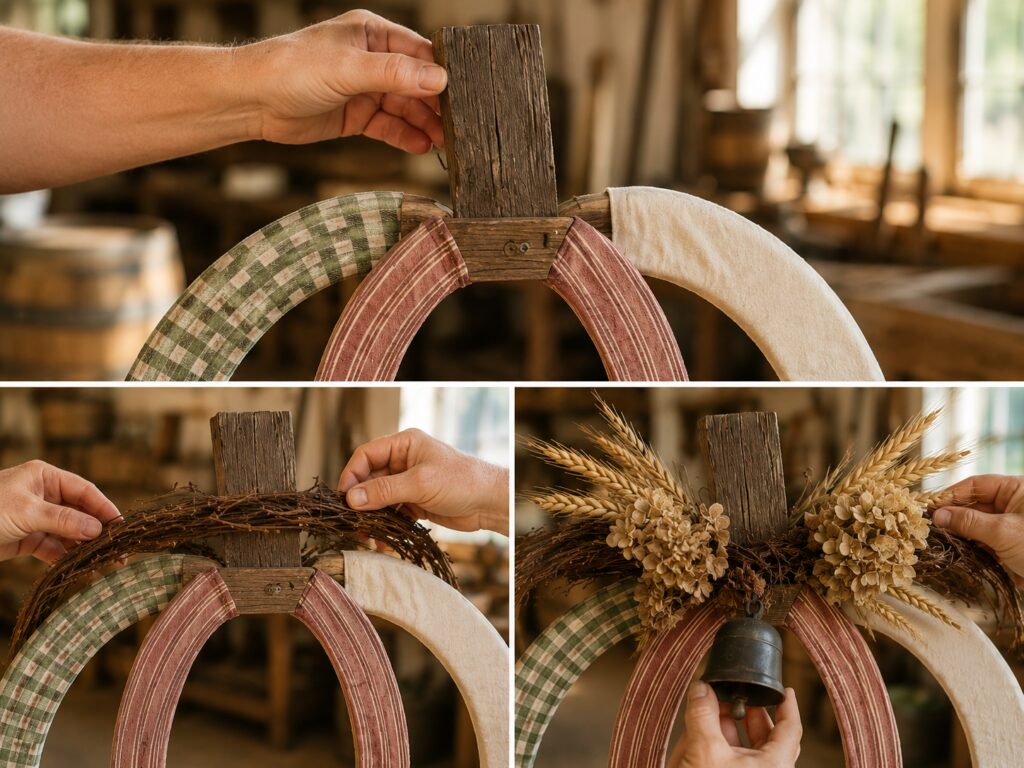
Drill pilot holes through the brace and attach the stem with screws driven from the back. Use screws short enough that their tips cannot emerge through the front of the stem.
The stem and brace should feel stable when you move the wreath. Do not rely on dried grapevine or hot glue to support the stem.
6. Build the Grapevine Foundation
Cut a flexible section of grapevine long enough to stretch across the top of the pumpkin. Bend it into a shallow crescent that follows the upper curve.
Position the grapevine in front of the brace and lower portion of the stem. Secure it with several lengths of floral wire passed around the grapevine, brace, and hoop joint.
Keep the bindings close to sturdy sections of vine. Avoid tightening wire around a single brittle twig because it may snap.
This layer serves two purposes. It hides the structural hardware and provides an anchor for the dried botanical stems.
7. Layer the Wheat and Hydrangea
Divide the wheat into small bundles rather than trying to attach every stalk separately. Place one bundle pointing left and a second pointing right. Let the stems cross near the base of the wooden stem.
Bind the wheat to the grapevine foundation with floral wire. Trim excess stem length only after you are satisfied with the spread.
Nestle two or three modest dried hydrangea clusters around the center. Use floral wire around the stronger branching stems and attach them to the grapevine. Dried hydrangea can crumble under pressure, so do not pull the wire directly across the flower heads.
Keep the arrangement relatively low and horizontal. The wooden stem should remain visible, and the botanicals should not obscure the distinctive three-hoop structure.
8. Add the Iron Bell
Thread floral wire or a small metal loop through the bell’s hanging ring. Attach it to the concealed upper brace or the tightly bound hoop joint, allowing it to hang just below the hydrangea.
Do not attach a relatively heavy bell only to the dried flowers or a delicate grapevine twig. It needs a structural anchor.
Check that it hangs freely without striking a glass door. If necessary, shorten its wire or add a small felt pad behind it.
9. Create a Safe Hanger
Turn the wreath over and attach heavy picture wire to the concealed brace or strongest section of the center hoop. If using eye screws, install them in the wooden brace rather than trying to drive them into the metal bands.
Form a short hanging loop that stays hidden behind the wooden stem. Test the wreath from a sturdy hook close to the floor before mounting it in its final location.
Make any final spacing adjustments, then add another twist of wire at the bottom joint if the side hoops move when the wreath hangs.
Tips for Getting the Finished Look
Keep the colors muted rather than using crisp white or saturated red. Sage, faded berry, and oatmeal cream create the soft farmhouse palette visible in the inspiration.
Use three related fabrics with different patterns or textures. Gingham, ticking, and plain linen create enough variety without making the wreath feel busy.
Allow a little metal or shadow to show between overlapping rings. Those lines define the pumpkin’s segmented shape.
Aim for asymmetrical botanicals with balanced visual weight. The wheat can reach farther on one side, but use enough grapevine or hydrangea on the opposite side to prevent the topper from looking accidental.
A dark bell provides a valuable contrast against the pale flowers and fabric. Keep it small enough that it remains an accent rather than the focal point.
Easy Ways to Customize It
For a more neutral wreath, wrap all three rings in different cream and tan textiles. A combination of grain-sack stripe, natural linen, and subtle herringbone would preserve the layered design.
If authentic barrel rings are unavailable, use three heavy metal floral hoops. Choose rings with enough rigidity to hold their shape under the weight of the topper.
The dried hydrangea can be replaced with preserved oak leaves, strawflowers, seed pods, or small dried sunflowers. Avoid adding too many botanical varieties because the hoop construction should remain visible.
For a wreath that transitions into Thanksgiving, remove the bell and add a narrow velvet ribbon, dried leaves, or several small feathers near the grapevine foundation.
Displaying the Finished Wreath
Display the wreath on an interior door, covered porch, kitchen wall, mudroom hook, or above a fall entry table. Dried flowers and untreated fabric should be protected from rain, strong wind, and prolonged direct sunlight.
Use a door hanger or wall hook rated for more than the completed wreath’s weight. If placing it on a frequently used exterior door, secure the lower portion with a removable outdoor-rated fastener so it does not swing or strike the surface.
Keep loose wire ends, brittle botanicals, and the dangling bell beyond the reach of children and pets.
The finished design does not need to duplicate every detail of the AI inspiration. The recognizable pumpkin silhouette, varied farmhouse fabrics, reclaimed stem, and gathered fall topper will carry the idea even when your materials have their own natural variations.