*This post may contain affiliate links for which I earn commissions.*
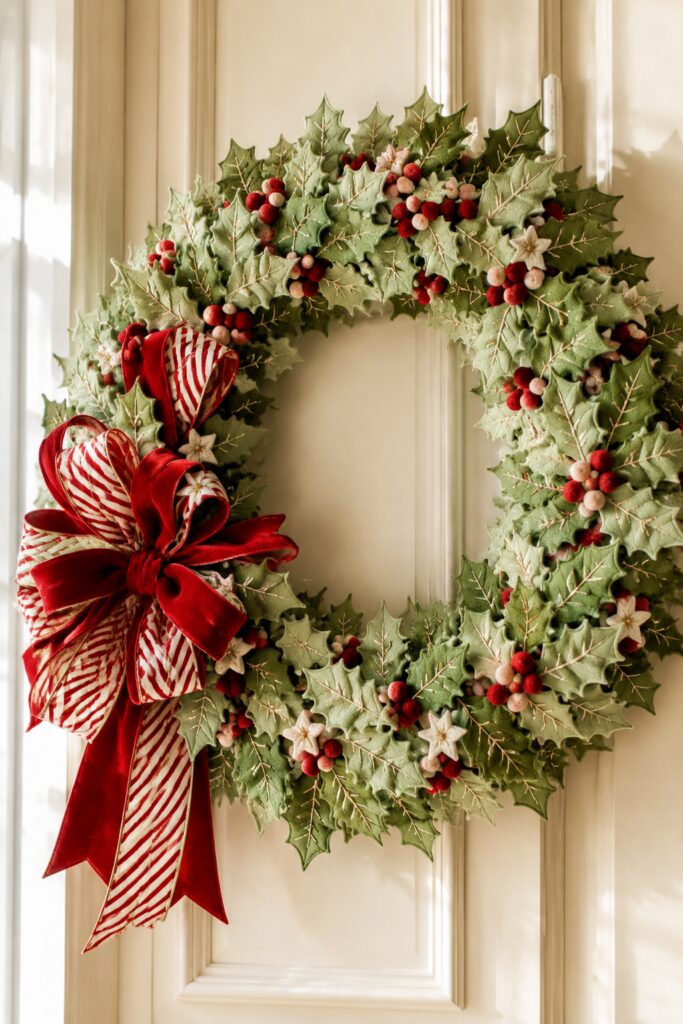
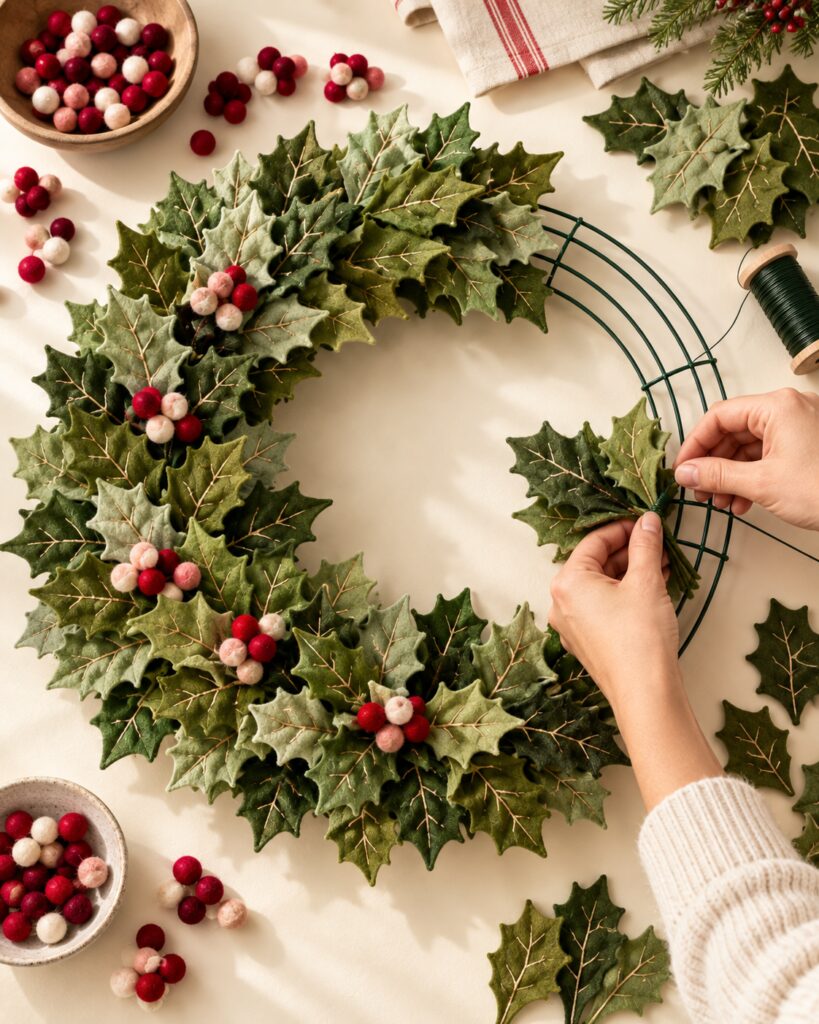
Layers of soft holly leaves, clusters of woolly berries, and a dramatic candy-striped bow give this Christmas wreath the charm of a handmade heirloom. The mixture of sage, moss, olive, and deep green keeps the foliage from looking flat, while small touches of blush and cream soften the traditional red palette.
The inspiration wreath contains an extraordinary number of finely detailed leaves. This tutorial adapts that look into a practical version using three leaf sizes, simple stitched veins, flexible wire supports, and strategic layering.

The inspiration image and instructional demonstration images for this project were created with AI. This tutorial translates the visual idea into a practical craft you can recreate at home.
The first question you’re sure to ask yourself when you read through the instructions is “Why felt?”. This could be made much more quickly with artificial craft leaves and you can certainly make it that way!
I’m not sure doing so would cost that much more, either.
However, if you’re looking for a project you could do with a child who likes crafting, this could be ideal.
Imagine both you and your child or children making the leaves – each your own way – and mixing them together in this wreath. Maybe you stitch the veins in by hand side-by-side in front of a watching of Polar Express as you anticipate the holiday. This could be a craft you make for the memories more than anything else.
What You’re Making
This project is a full felt holly wreath built on an approximately 16- to 18-inch wire frame. Once the leaves and bow are added, the finished wreath may measure about 22 to 26 inches across.
The main features include:
- Layered holly leaves in four shades of green
- Subtle stitched or drawn leaf veins
- Red, burgundy, blush, and cream felt-ball berries
- Small ivory felt stars
- A large bow combining red velvet and candy-striped ribbon
Instead of recreating every tiny branch visible in the inspiration image, the realistic version relies on overlapping wired leaves. They provide fullness and movement without requiring an impractical number of individually constructed stems.
Materials and Supplies
For the wreath
- 16- to 18-inch round wire wreath frame
- Wool-blend or sturdy craft felt in sage, moss, olive, and deep green
- Paper or lightweight cardstock for leaf templates
- Green floral wire, approximately 22 to 24 gauge
- Narrow felt strips for covering wire
- Red, burgundy, blush, and cream felt balls in assorted small sizes
- Strong thread in red or green
- Tan, beige, or muted gold embroidery floss for veins on the leaves or use a fabric paint
- Ivory felt for the star embellishments
- Floral wire or chenille stems for attaching finished components
For the bow
- Deep red wired velvet ribbon, approximately 2½ inches wide
- Red-and-ivory candy-striped wired ribbon, approximately 2½ inches wide
- Additional floral wire or a chenille stem
Tools
- Sharp fabric scissors
- Fine-tip scissors for shaping leaf points
- Low-temperature hot glue gun and glue sticks
- Embroidery needle
- Long, sturdy needle suitable for felt balls
- Wire cutters
- Fabric marker, chalk pencil, or removable marking pen
- Ruler or measuring tape
- Thimble, if desired
Want to Make This Felt Wreath?
I’ve put together a convenient Amazon supply list featuring hand-picked, well-rated products that meet the requirements of the materials list in this post.
See My Hand-Picked Supply ListAs an Amazon Associate I earn from qualifying purchases but this doesn’t increase your price at all!
Before You Start
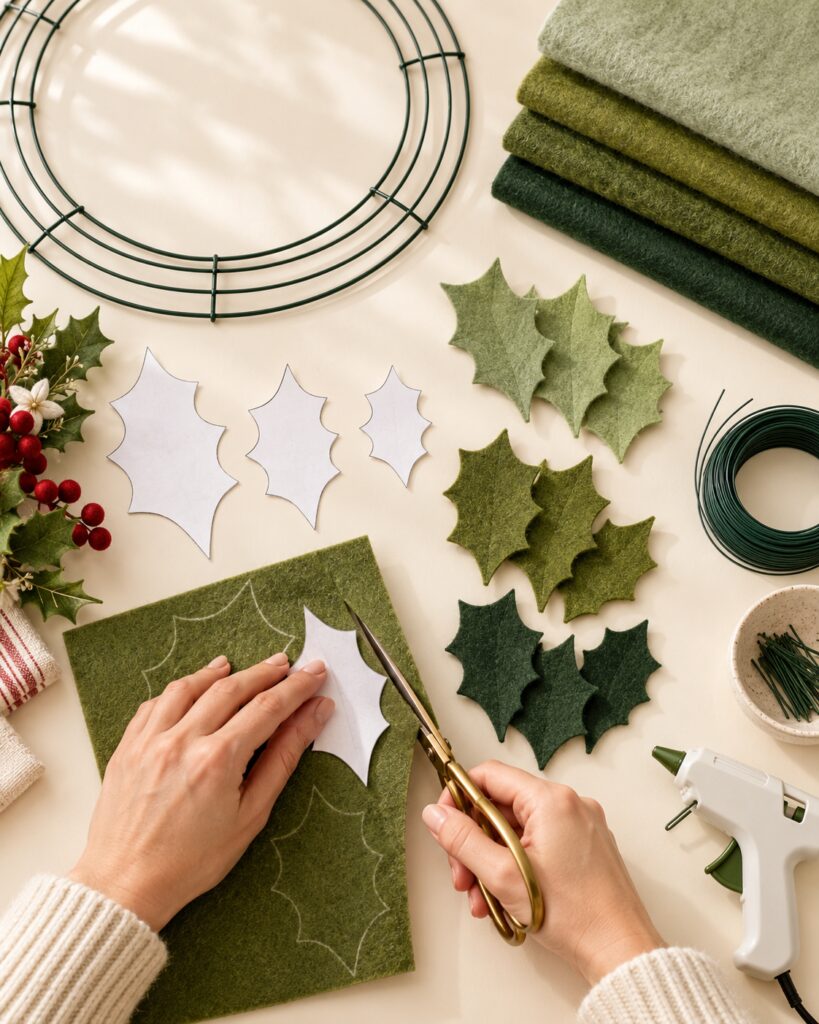
Protect the work surface from glue and cut several paper holly templates before cutting the felt. Three suggested leaf lengths are approximately 3½, 4½, and 5½ inches. The measurements do not need to be exact, but the mixture of sizes is important.
A realistic number for an 18-inch frame is about 70 to 100 leaves, depending on their size and how densely they overlap. Cut a smaller trial batch first. Lay those leaves on one-quarter of the frame to estimate how many more you will need.
Divide the colors unevenly. Sage and olive can form most of the visible foliage, while moss and deep green provide shadow and depth.
Use a low-temperature glue gun to reduce the chance of burns and felt damage. Cut floral wire with wire cutters rather than fabric scissors.
Make the Felt Holly Wreath
1. Create Three Holly Leaf Templates
Draw or print a simplified holly leaf in three sizes. Each leaf should have a pointed tip and three or four gently pointed lobes along each side.
Avoid making the notches excessively deep. Shallow curves with distinct points are easier to cut and less likely to stretch out of shape.
Fold each paper template down the center briefly and reopen it. The crease will help you visualize the center vein when adding wire and stitching.
2. Cut a Varied Collection of Felt Leaves
Trace the templates onto the felt with a removable marker or chalk pencil. Arrange the templates close together to reduce waste, but leave enough space to maneuver the scissors around each point.
Cut the leaves with long, controlled snips. Use fine-tip scissors to refine the narrow valleys between the holly points.
Do not try to make every leaf identical. Slight differences make the finished foliage appear more natural. Keep the sizes and colors in separate piles so you can distribute them evenly later.
3. Add Simple Veins and Flexible Supports
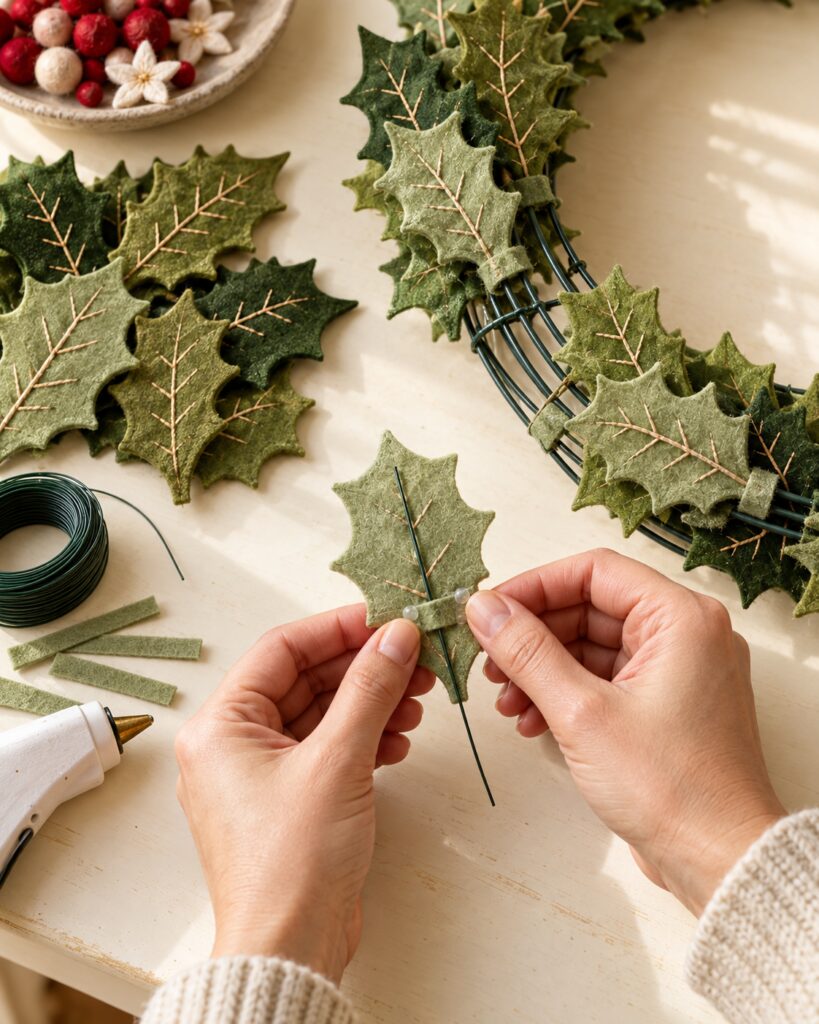
For the dimensional look in the inspiration image, add a short piece of floral wire to the back of most large and medium leaves. Cut the wire slightly shorter than the leaf.
Center it along the back, beginning near the base and ending before the top point. Secure it with two or three tiny dots of low-temperature glue, then cover the wire with a narrow strip of matching felt. Leave about 1½ to 2 inches of wire extending below the leaf so it can be attached to the wreath frame.
For the decorative vein, use two or three strands of tan or muted gold embroidery floss. Make a simple running stitch along the center, then add a few short diagonal stitches extending toward the sides.
If you prefer a faster version, draw the veins with a fine fabric marker or dimensional fabric paint. Test the color on a scrap first.
4. Build the First Layer Around the Frame
Lay the wreath frame flat. Begin attaching the largest deep green and moss leaves to the outer and inner edges.
Place the leaves at a slight angle so their points extend beyond both sides of the frame. Wrap the projecting floral wire around the frame once or twice and twist it securely at the back.
Continue around the circle, overlapping each new leaf over the base of the previous one. Change the angle occasionally so the foliage does not resemble a rigid fan.
Leave the lower-left area slightly less crowded if that is where you plan to place the bow.
5. Fill the Center with Medium and Small Leaves
Add medium sage and olive leaves across the face of the frame. Position them between the first-layer leaves to conceal wire, exposed metal, and obvious gaps.
Use the smaller leaves to fill narrow spaces and soften the inner edge of the wreath. Vary their direction while maintaining a general flow around the circle.
Bend the wire-backed leaves gently along their center veins. Some can curve forward, while others can turn slightly to either side. This shaping is what transforms a flat layer of felt into dense, dimensional foliage.
Step back or hold the wreath upright periodically. A gap that is difficult to see on the table may become obvious when the wreath is vertical.
6. Assemble the Felt-Ball Berry Clusters
Create small clusters containing three to seven felt balls. Mix red and burgundy in most clusters, then use blush or cream sparingly as an accent.
Pass a sturdy needle and strong thread through the balls, joining them into a compact group. Knot the thread securely. Tie or sew a short piece of floral wire onto the back of each cluster so it can be fastened to the wreath.
Distribute the clusters irregularly rather than placing them at equal intervals. A few larger groups near the top and bow will give the design visual weight. Smaller groups can be tucked among the leaves.
Keep the berries concentrated enough to remain visible. Single balls scattered everywhere may disappear into the foliage.
7. Add the Ivory Felt Stars
Cut several simple five-point stars from ivory felt. Approximately 1½ to 2 inches across is large enough to show without competing with the bow.
For a slightly padded appearance, cut two matching stars, glue their edges together, and place a tiny amount of felt scrap or stuffing between them before closing the final edge.
Add a small stitched center or a few embroidery stitches if desired. Attach each star to floral wire and nestle it among the holly leaves. Three to five stars should be sufficient for most wreaths.
8. Make the Velvet and Candy-Striped Bow
Cut several lengths of wired ribbon rather than trying to manipulate the entire roll at once. Form four to six loops from red velvet ribbon and four to six loops from the candy-striped ribbon.
Layer the loops in your hand, alternating the two patterns. Pinch the center firmly and secure it with floral wire or a chenille stem.
Add two or four tails, combining both ribbons. Cut the ends into an inverted V or on a clean diagonal. Allow the tails to extend below the wreath without covering the entire lower section.
Fluff the loops by pulling them in different directions. The striped ribbon should remain visible between the broader areas of velvet.
9. Attach the Bow and Finish the Foliage
Position the bow at the lower left, slightly below the horizontal midpoint. Pass its wire through the leaves and fasten it directly to the metal frame. Do not rely on glue alone to support a large wired-ribbon bow.
After securing it, arrange several small holly leaves around the knot. These leaves should conceal the attachment wire without burying the striped loops.
Add any remaining berry clusters and stars. Fill visible gaps with small leaves, then bend the leaf tips and bow loops forward to restore dimension.

10. Prepare the Wreath for Hanging
Turn the wreath over and flatten any sharp wire ends against the frame. Cover uncomfortable points with a small piece of felt and hot glue.
Make a hanging loop from floral wire or ribbon and secure it to the upper portion of the metal frame. Hang the wreath temporarily and check its balance. Adjust the bow tails, berries, and wired leaves after the wreath is upright.
Tips for Capturing the Layered Look
Use the palest sage leaves on the uppermost layer. Light-colored leaves catch the eye and appear closer, while deep green leaves recede and create the illusion of shadow.
Avoid arranging all the leaf points in the same direction. Let some point outward, some toward the center opening, and some slightly upward.
The bow should be generous but not so large that it hides the handcrafted foliage. Keep the candy-striped loops visible on both the upper and lower portions of the bow.
Tan or muted gold veins give the leaves a delicately illustrated quality. Stark white stitching may create too much contrast.
Easy Ways to Customize It
For a more traditional version, use only red berries and replace the sage felt with a medium evergreen shade.
A softer cottage-style wreath could use dusty rose velvet, faded red stripes, cream berries, and more pale green leaves.
For a quicker project, omit the embroidery and add simple vein lines with fabric paint. You can also decorate only the front-facing leaves rather than every piece.
To make a smaller wreath for an interior door or kitchen cabinet, use a 10- to 12-inch frame and reduce the leaf templates proportionally.
Displaying the Finished Wreath
Display the wreath on an interior door, above a mantel, or on a protected porch. Standard craft felt can absorb moisture and lose its shape, so outdoor display should be limited to a covered location where it will not be exposed to rain or snow.
Keep it away from open flames, heat vents, and surfaces that become hot. Store it flat or loosely supported in a wreath box so the wired leaves and ribbon loops are not crushed.
A Handmade Wreath Does Not Need Perfect Leaves
The appeal of this design comes from its layers, gentle color changes, and oversized ribbon rather than exact duplication of every detail. If the leaves vary slightly or one berry cluster is larger than another, those differences will contribute to the handcrafted character of the finished piece.