*This post may contain affiliate links for which I earn commissions.*
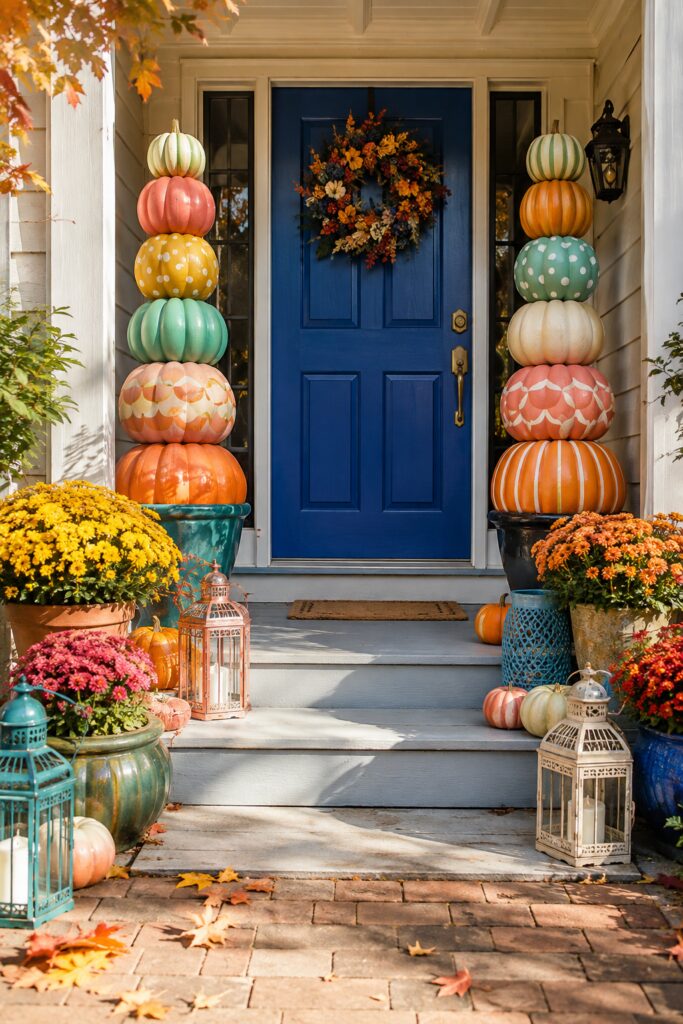
A pair of tall pumpkin towers can turn an ordinary front porch into a colorful fall entrance. This display places painted faux pumpkins in substantial planters, stacking them from largest to smallest to create two playful totems beside a cobalt blue door.
The palette moves far beyond conventional orange. Coral, mustard, mint, turquoise, cream, and warm orange give the porch a cheerful personality, while stripes, dots, and geometric bands make every level of the towers different.
Although the display is large, its visual structure is simple. Two tall stacks frame the entrance, a wreath marks the center, and flowers and lanterns fill the lower part of the porch.
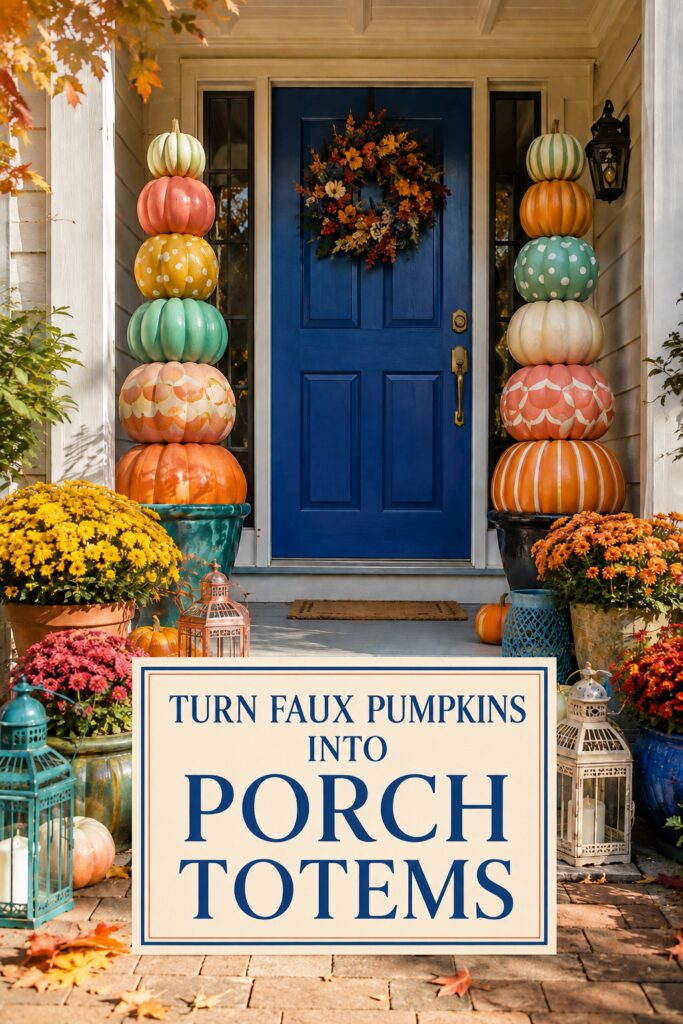
Image disclosure: This inspiration image was created with AI. It is intended to offer decorating and project ideas rather than depict specific products available for purchase.
Why These Painted Pumpkin Towers Work
The pumpkin totems create immediate impact because they emphasize height. Most fall porch decorations remain close to the floor, but these towers draw the eye upward and frame the doorway almost like colorful columns.
Symmetry gives the abundant display a sense of order. Both towers are approximately the same height, begin in large planters, and taper toward smaller pumpkins at the top.
The details are not perfectly mirrored, however. One tower includes a yellow polka-dot pumpkin and a mint solid pumpkin. The other features mint dots, cream, coral scallops, and an orange striped base. This controlled variation prevents the entrance from looking overly formal.
The blue door also plays an important role. Its deep color provides a strong visual resting place between the patterned towers. If your door is neutral, you can create a similar anchor with a dark wreath, deep-colored planters, or a more limited pumpkin palette.
Select Faux Pumpkins in Graduated Sizes
Lightweight faux pumpkins are the most practical starting point for a reusable display. Look for hollow, carvable, or paintable versions in several sizes.
Each tower should taper as it rises. Begin with the widest pumpkin at the bottom, then gradually reduce the diameter. The top pumpkin can be considerably smaller, giving the stack a finished silhouette.
The pumpkins do not have to be identical on both sides. Matching the overall dimensions of the two towers matters more than finding exact pairs.
Before painting, stack the unaltered pumpkins temporarily. Check the height, width, and relationship to the door. Make sure the arrangement does not block the entrance, door swing, steps, handrails, lighting, or house numbers.
Build a Cheerful Fall Color Palette
Choose five or six coordinating colors before painting. The inspiration porch combines coral, mint, turquoise, mustard, cream, and orange, with the blue door and planters acting as darker anchors.
For an especially cohesive result, repeat every major color at least twice across the porch. A turquoise pumpkin might connect with a planter or lantern. Mustard paint can relate to yellow mums, while coral can reappear in flowers and small pumpkins.
Paint the pumpkins in solid base colors first. White or paintable pumpkins may still need primer depending on their surface and the paint being used. Follow the coating instructions and test the complete paint system on an inconspicuous area before covering every pumpkin.
Several thin coats will generally produce a smoother surface than one heavy application. Let every layer cure fully before adding tape, stencils, or painted details.
Give Every Pumpkin a Different Pattern
The mix of patterns is what turns the towers into an art project.
Vertical stripes are particularly effective because they follow the natural ribs of a pumpkin. Use narrow painter’s tape as a guide, or paint the recessed lines freehand for a softer look.
Round sponge tools make evenly sized polka dots easier to produce. Varying the dot size slightly can make the design appear more playful.
For scallops or overlapping geometric bands, create a reusable paper template before transferring the shape to the pumpkin. Flexible stencils are generally easier to position on curved surfaces than rigid ones.
Balance detailed designs with solid pumpkins. If every level has a complicated pattern, the towers may become visually busy. Alternating patterned and solid sections allows the individual designs to stand out.
Plan a Secure Internal Structure
A tall outdoor stack needs more support than pumpkins balanced loosely on one another.
Depending on the construction of the pumpkins, a centered exterior-rated rod or dowel may be used to keep the pieces aligned. Openings should fit closely around the support rather than allowing the pumpkins to shift from side to side.
The rod should connect securely to a stable base inside the planter. Add appropriate weight low in the container rather than filling the upper part with heavy material. The completed assembly should not be top-heavy.
Do not rely on decorative adhesive alone for a tall porch installation. Follow the limitations of the materials, and ask someone experienced with outdoor display construction for help if the porch is exposed to wind.
Check the towers regularly for movement, water intrusion, softened materials, or loose connections. Bring them inside during severe weather. Keep them away from walkways, railings, open flames, and any place where children or pets might pull on them.
Protect the Painted Finish
Even a covered porch can expose decorations to reflected sunlight, humidity, dust, and wind-driven rain.
Choose paints and clear finishes intended for both the pumpkin material and the level of outdoor exposure. Foam, plastic, and resin do not always accept the same coatings.
Some spray products can damage certain types of foam, so confirm compatibility before applying them. Test the base coat and protective finish together on the underside of one pumpkin.
A clear, non-yellowing, ultraviolet-resistant finish can help preserve the colors. Apply it only after the decorative paint has cured, following all ventilation and temperature instructions.
Anchor Each Tower With a Substantial Planter
Large planters give the towers visual weight and help them relate to the surrounding flowers. The inspiration image uses a turquoise planter on one side and a dark planter on the other.
The containers do not have to match, but their scale should be similar. Wide openings provide a more convincing base for large pumpkins than narrow urns.
If you use lightweight planters, add suitable ballast at the bottom and construct the internal support so the weight remains low. Do not fill a container with water or another material that could leak, freeze, shift, or create an unstable load.
A decorative liner, preserved moss, or outdoor greenery can conceal the connection between the bottom pumpkin and the planter.
Fill the Lower Porch With Flowers and Lanterns
The pumpkin towers command attention at eye level, while mums and lanterns fill the lower half of the scene.
Arrange flowerpots near the outside edges of the steps so the route to the door remains completely open. Yellow, orange, raspberry, and red flowers continue the painted palette without needing to match it precisely.
Colorful lanterns introduce metal texture among the flowers and pumpkins. For safety, use flameless candles, particularly around painted foam, faux foliage, dry leaves, and busy walking areas.
A full autumn wreath completes the central composition. Look for orange flowers, berries, darker foliage, and a few cream details that connect it to both the blue door and pumpkin patterns.
Shop Supplies for the Project
Look for Large Paintable Faux Pumpkins
Select lightweight pumpkins in graduated diameters rather than buying one identical multipack.
Shop Outdoor-Suitable Multisurface Paint
Choose coral, mint, turquoise, mustard, cream, and orange, checking that the paint is compatible with the pumpkin material.
Add Stencils and Round Painting Sponges
Use these tools to produce clean dots, scallops, diamonds, and repeating bands.
Look for Rods and Base-Support Materials
Choose a support system appropriate for the pumpkins, planter, porch exposure, and finished height.
Shop Large Outdoor Planters
Look for broad, stable containers that can visually and physically support the towers.
Add a Compatible Protective Finish
Select a non-yellowing exterior finish that is safe for both the paint and pumpkin surface.
A Final Styling Tip
Make the two towers equal in visual weight, but not identical in decoration. Repeating the palette while changing the pattern order will give the porch the lively, handmade character that makes this display so memorable.