*This post may contain affiliate links for which I earn commissions.*
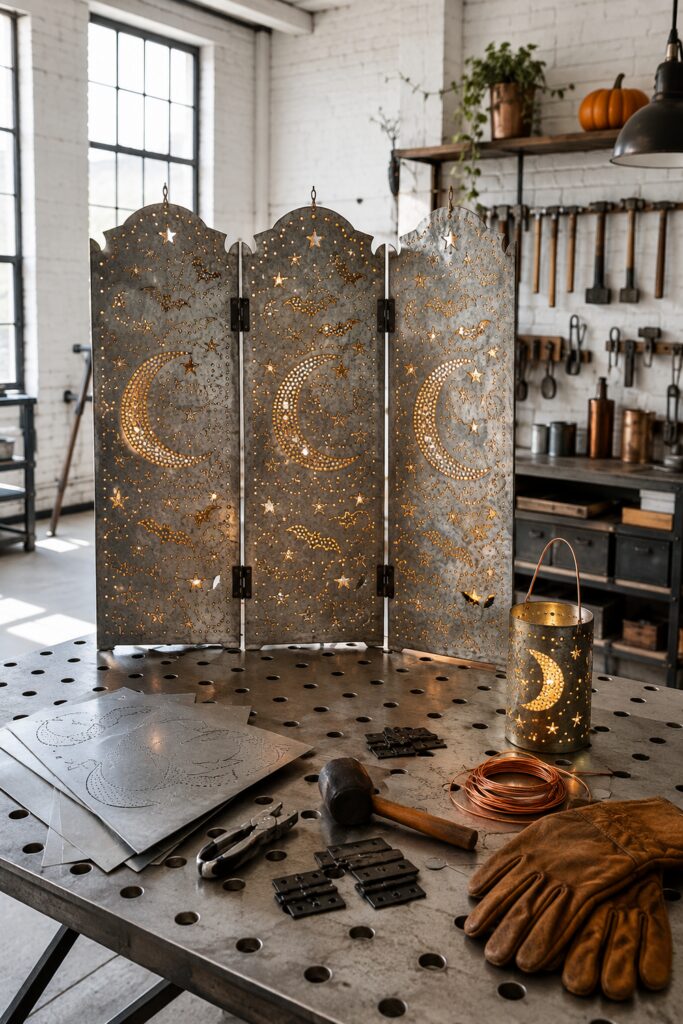
A field of pierced moons, stars and tiny bats gives this three-panel screen its softly glowing character. The folded construction lets it stand on its own, while the warm light shining through hundreds of small openings turns it into an atmospheric Halloween accent.
The original inspiration resembles a large, intricately cut metal screen. This tutorial adapts that concept into a manageable tabletop version made with thin tooling aluminum enclosed inside lightweight wood frames. The celestial designs are created primarily with punched dots instead of large cutouts, which keeps the panels sturdy and makes the project more accessible.
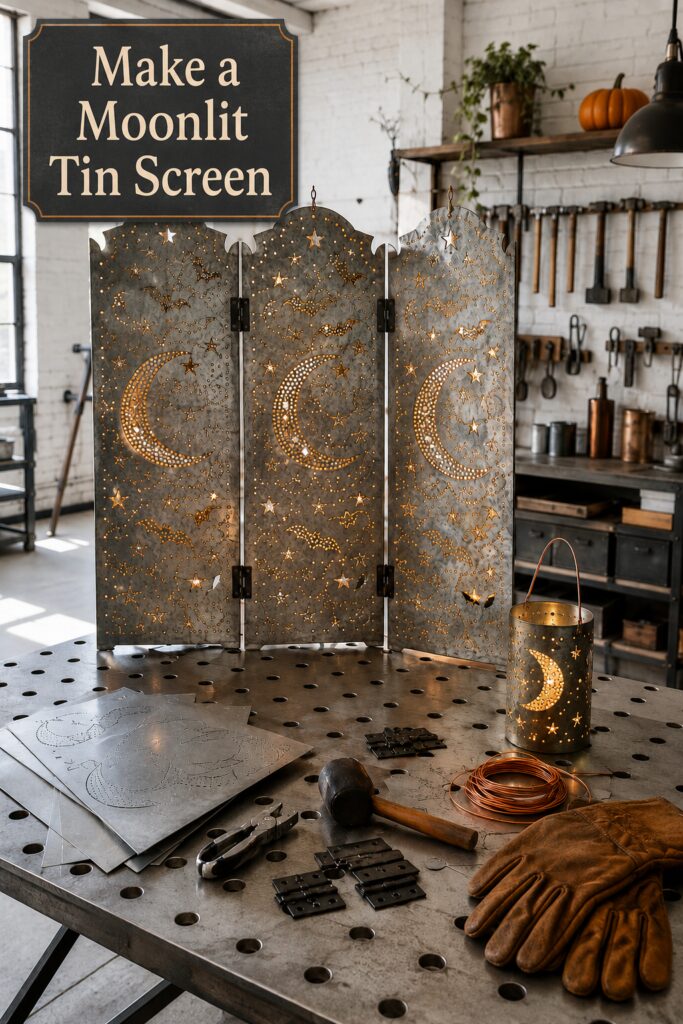
The inspiration and instructional images for this project were created with AI. This tutorial translates that visual idea into a practical project you can recreate at home.
What You’re Making
The finished project is a three-panel folding lantern screen designed for indoor tabletop or mantel display. Each panel can be approximately 9 inches wide and 22 inches tall, although the measurements are flexible.
A large dotted crescent anchors each metal panel. Punched stars, tiny bat outlines and meandering trails of light fill the surrounding space. Narrow wood frames cover every metal edge, while small hinges allow the screen to stand in a shallow zigzag.
Battery-operated warm-white LED micro lights illuminate the screen from behind. The tutorial does not use candles or other open flames.
Materials and Supplies
Materials
- Three sheets of thin tooling aluminum or embossing metal
- Thin wood strips for six matching rectangular frame halves
- Wood glue
- Small brads or short finish nails
- Paintable wood filler
- Charcoal, black-brown or dark bronze wood paint or stain
- Small surface-mount hinges with short screws
- Paper or cardstock for templates
- Removable tape
- Fine-tip permanent marker
- Warm-white battery-operated LED micro lights
- Small clear cord clips or removable adhesive clips
- Removable strap or fastener for the battery pack
- Matte clear protective finish, optional
Tools
- Measuring tape
- Metal ruler
- Combination square
- Pencil
- Heavy-duty scissors or metal snips approved for thin craft metal
- Leather or work gloves
- Safety glasses
- Dense rubber punching mat
- Metal awl
- Small hollow punch set
- Rotary hole-punch pliers suitable for thin metal
- Small decorative metal punches, optional
- Hammer or mallet appropriate for the punches
- Sanding block
- Drill with small drill bits
- Clamps
- Brad nailer or hammer
Before You Start
Tooling aluminum is softer and easier to pierce than ordinary sheet metal, but freshly cut edges can still be sharp. Wear gloves whenever cutting or handling an unfinished panel.
Determine the final dimensions before purchasing the metal and wood. Each metal insert should overlap the wooden frame by approximately 1/2 inch on every side. This hidden margin gives the frame enough material to grip securely.
Plan a one-inch unpunched border around each panel. Avoid placing holes too close to the edge because heavily pierced metal can tear during assembly.
Prepare a sturdy work surface with a dense rubber punching mat. Do not punch directly over a finished table, soft upholstery or your lap.
Step-by-Step Tutorial
1. Cut Three Matching Metal Panels
Measure and mark three identical rectangles on the tooling aluminum. Use a metal ruler and fine marker to keep the lines straight.
Cut the panels with heavy-duty scissors or snips intended for thin craft metal. Work slowly so the sheet does not buckle along the cut. If the aluminum has a protective backing, leave it in place during cutting and pattern transfer.
Handle each panel by its flat surface rather than sliding your fingers along the edges. Set the cut pieces aside where they will not be accidentally brushed or knocked onto the floor.
2. Create the Celestial Templates
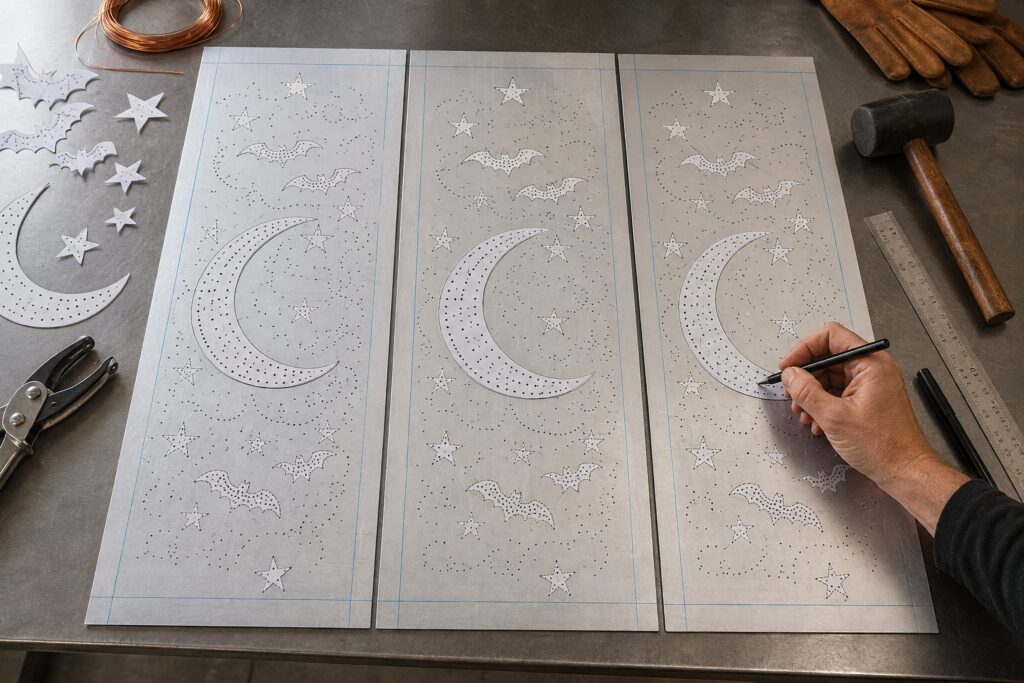
Draw a crescent on cardstock by tracing one large circle and then shifting the same circular object to create the inner curve. Cut out the template and test its size on one metal panel.
Create additional templates for several star sizes and two or three small bats. The bats should have simple silhouettes with broad wings and minimal internal detail.
Instead of cutting large openings, mark dotted outlines and clusters of holes. A dense arrangement of dots will make the crescent appear almost solid when illuminated. Widely spaced dots can form drifting constellations and small bat shapes.
Make one primary layout and then rotate, reverse or reposition its elements on the other panels. The three panels should coordinate without looking like exact copies.
3. Transfer the Designs
Place the metal panels side by side with their front surfaces facing up. Mark a one-inch border around each panel using a square and ruler. Keep all piercing inside these lines.
Secure the crescent template to the first panel with removable tape. Trace its inner and outer curves, then add rows of dots between them. Begin with evenly spaced guide dots and fill the gaps with smaller marks.
Arrange the stars and bats around the moon. Leave some quiet metal areas so the design does not become visually muddy. Curving trails of tiny dots can connect the larger motifs and help the composition move from top to bottom.
Repeat the process on the remaining panels. Keep each crescent at approximately the same height so the three moons form a visual sequence when the screen is opened.
4. Test the Punching Technique
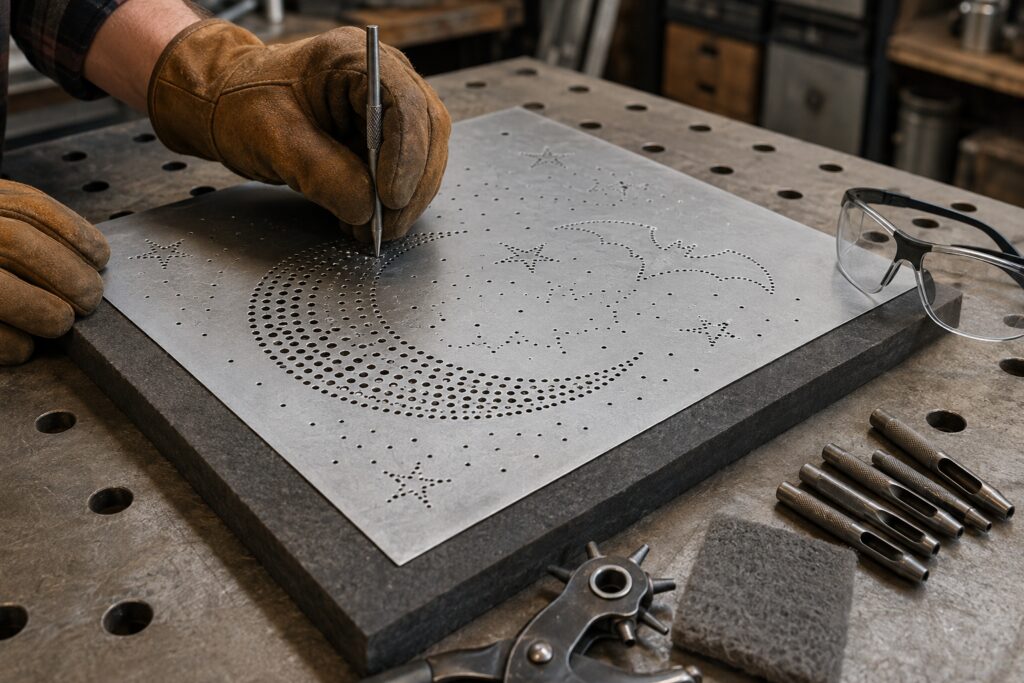
Before working on the main panels, practice on an aluminum offcut. Place it on the rubber mat and try the awl, rotary punch and several hollow punches.
The awl creates the smallest points of light. A rotary punch or narrow hollow punch produces larger openings that make the crescent and prominent stars glow more strongly.
Hold an awl or hollow punch vertically. A slanted tool can stretch or tear the metal rather than making a clean opening. Use controlled pressure or light mallet taps instead of trying to force the tool through with one heavy strike.
Inspect the back of the test piece. If the openings leave rough burrs, reduce the force and work against a firmer mat.
5. Punch the Moon and Surrounding Sky
Place the first marked panel face up on the rubber punching mat. Wear eye protection and keep the hand stabilizing the metal well away from the active punching area.
Begin with the crescent. Use medium and large openings along its center, then introduce smaller awl holes near the inner and outer curves. This gradual change in hole size gives the moon a softly textured edge.
Punch the star outlines next. A few small decorative star punches can be used, but the screen will look more cohesive if most stars are formed from dots.
Outline the bats with very small, closely spaced holes. Do not attempt intricate facial features or narrow wing cutouts. A simple dotted silhouette will read clearly once the lights are switched on.
Finish with scattered pinholes and loose constellation trails. Vary the spacing so the background does not resemble a rigid grid.
Repeat the process on the other panels, frequently lifting each one toward a window or lamp to check the light pattern.
6. Flatten and Smooth the Pierced Panels
Punching may cause the aluminum to curve slightly. Place each completed panel between two clean pieces of cardboard or thin wood, then add an evenly distributed weight. Leave it until the sheet rests flat again.
Check the back carefully for rough points. Smooth minor burrs with a fine abrasive pad while wearing gloves. Do not use bare fingers to test an opening.
If desired, gently mottle the front with watered-down charcoal or brown craft paint, wiping most of it away before it dries. This can create the softly aged pewter appearance suggested by the inspiration. Test the finish on an offcut first.
Allow any applied finish to dry thoroughly before framing.
7. Build the Wood Frames
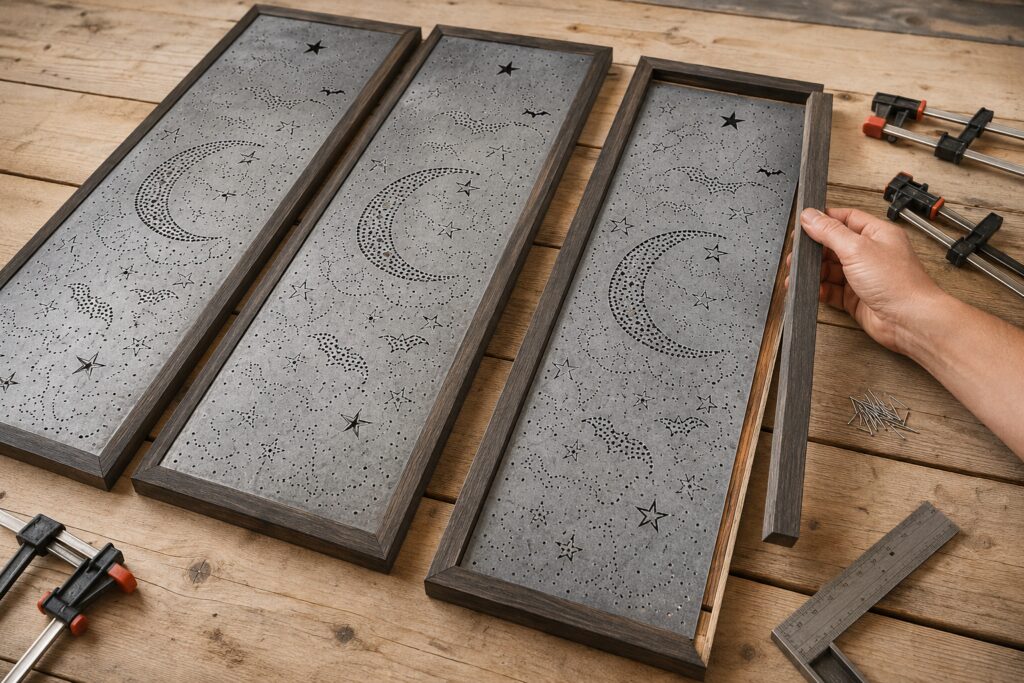
Cut enough wood strips to make two rectangular frame layers for each panel. One layer will sit against the front of the metal and the second will cover the corresponding edges from behind.
Dry-fit the first frame on a flat surface. Check every corner with a square. Glue and clamp the corners, then reinforce them with small brads if needed.
Once the three front frames are dry, paint or stain all six frame layers. A charcoal brown or aged bronze tone provides a strong contrast against the silver-gray metal.
Center one punched panel over the back of a front frame. Confirm that the unpunched metal border overlaps the wood evenly on all four sides.
Apply wood glue to the rear retaining strips without allowing it to spread into the decorative openings. Place the strips over the metal perimeter and secure them to the front frame with clamps and short brads.
The finished frame should sandwich the metal firmly and cover every cut edge. Make sure no nail or brad protrudes through the front.
8. Join the Three Panels
Lay the framed panels face down on a padded surface. Leave a narrow, even gap between them so the hinges can move freely.
Attach two hinges between the left and center panels. Turn the hinge orientation in the opposite direction between the center and right panels. This alternating arrangement lets the finished screen fold accordion-style.
Mark every screw hole and drill shallow pilot holes. Choose screws short enough that they cannot penetrate the front surface of the frames.
Open the screen slowly and test its balance. The two outer panels should angle slightly forward, creating a stable zigzag footprint. If it feels top-heavy, reduce the opening angle rather than trying to make it stand completely flat.
9. Add the LED Lighting
Turn the screen face down. Arrange a strand of warm-white battery-operated micro lights along the rear wooden frames.
Secure the wire with small clear cord clips. Keep the bulbs distributed around the perimeter and behind important stars or moon sections. Avoid pulling the wire tightly across a hinge because it could be pinched when the screen folds.
Attach the battery pack to the lower rear portion of the center frame using a removable strap or reusable fastener. Keep the switch accessible.
Stand the screen upright and turn on the lights. Move individual bulbs as needed until all three crescents glow with similar intensity.
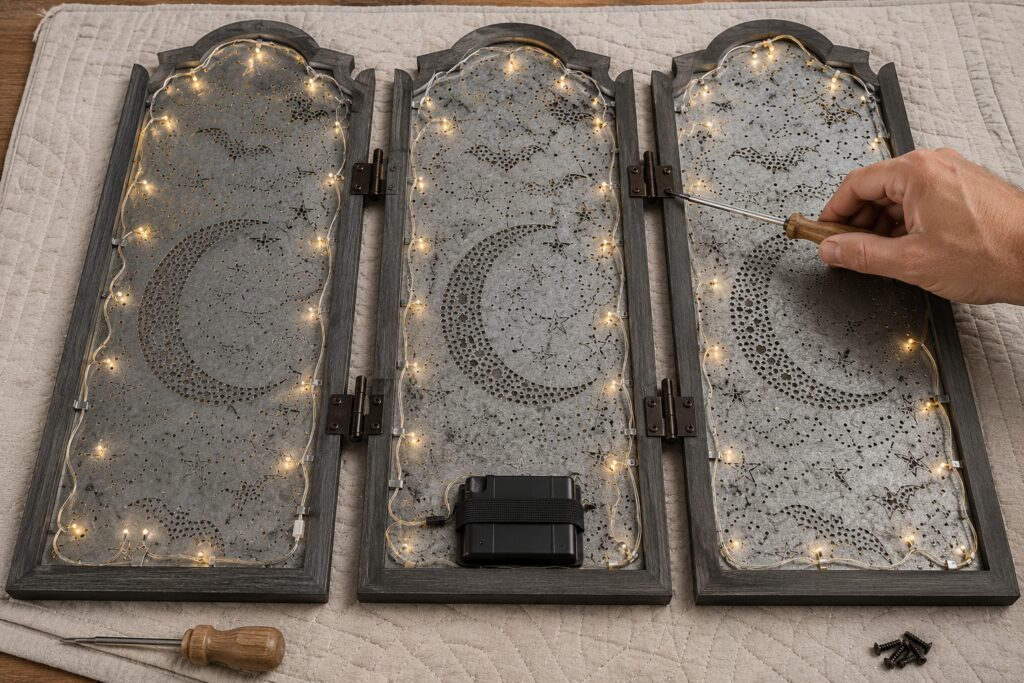
10. Make the Final Adjustments
View the screen in normal room lighting before making changes. The metalwork should remain attractive even when the LEDs are switched off.
If one area appears too dark, add a small number of holes rather than enlarging every opening. New holes cannot be removed, so work gradually.
Check all frame corners, hinges and cord clips. Confirm that the screen stands securely and that no raw metal edge remains exposed.
Tips for Capturing the Finished Look
A mixture of opening sizes is essential. Uniform holes can make the design feel mechanical, while varied points create the softly scattered glow seen in the inspiration.
Concentrate the largest openings inside the moons. Use medium holes for important stars and tiny pinholes for bats, flourishes and background constellations.
Keep the aging restrained. A little charcoal or brown patina will emphasize the punched texture, but a heavy opaque coating can clog the smallest holes.
The light should be warm rather than stark white. It creates a richer contrast against the cool pewter surface and dark frames.
Angle the screen instead of displaying it in a straight line. The shallow folds give it sculptural presence and improve its stability.
Easy Ways to Customize It
For a simpler version, give each panel a different moon phase: crescent, half moon and full moon. This creates a natural progression without requiring many small motifs.
Replace the bats with moths for a softer celestial design that could remain on display beyond Halloween. Small leaves can turn the same construction into an autumn lantern screen.
Copper tooling foil will produce a warmer result. Pair it with blackened wood and amber LEDs for an aged-metal appearance.
The project can also be reduced to two hinged panels for a narrow mantel. Maintain the angled footprint so it cannot tip forward easily.
Displaying the Finished Screen Safely
Place the screen on a broad, level mantel, console, shelf or tabletop where the folded panels cannot be bumped. Keep it away from walkway edges and secure it discreetly if children or pets might reach it.
Use only cool-running, battery-operated LEDs. Never place a candle, tea light, incandescent bulb or other heat source behind the metal.
The tutorial is intended for indoor or protected seasonal display. Outdoor use would require weather-resistant frames, hardware, finishes and lighting specifically rated for that environment.
The charm of this project comes from the glowing pattern, not from duplicating every tiny mark in the inspiration. A few well-spaced bats, a strong crescent and a loose field of stars will capture the same moonlit mood.