*This post may contain affiliate links for which I earn commissions.*
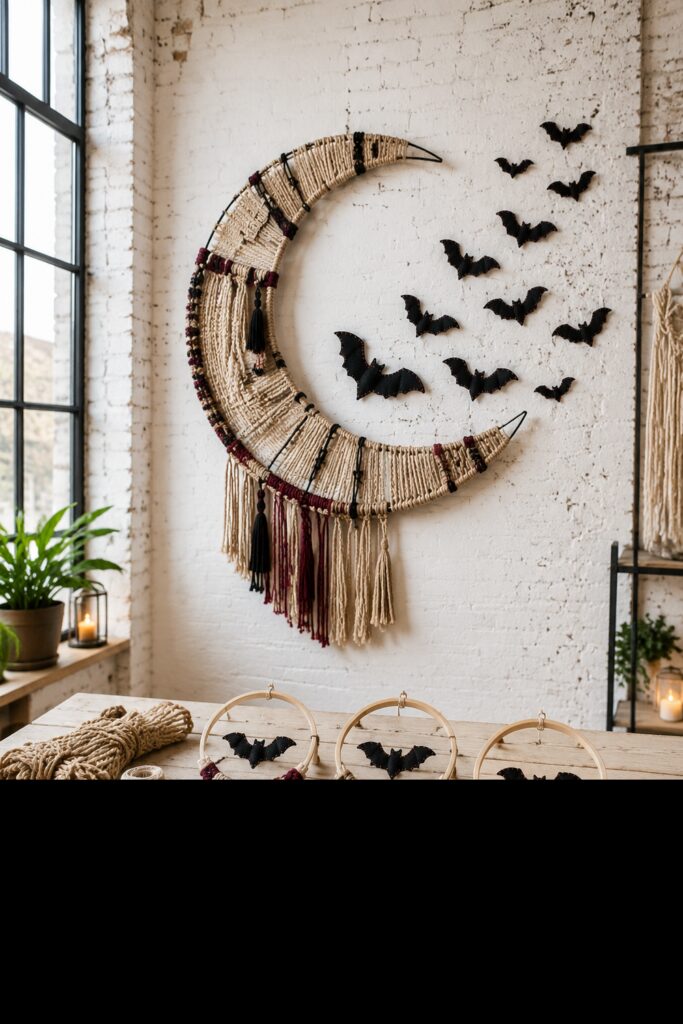
A large crescent moon covered in natural cord brings softness and texture to Halloween decorating without losing the unmistakable seasonal silhouette. In the inspiration image, dark berry accents, black knots, long fringe, tassels, and a flight of stitched bats turn a neutral fiber piece into a dramatic wall display.
This tutorial adapts that intricate design into a realistic lightweight build. Two wooden hoop arcs form the moon, small wood spacers keep the frame rigid, and cotton cord wraps and weaves across the crescent. The felt bats are made separately, so they can sweep across the wall without placing extra strain on the woven frame.
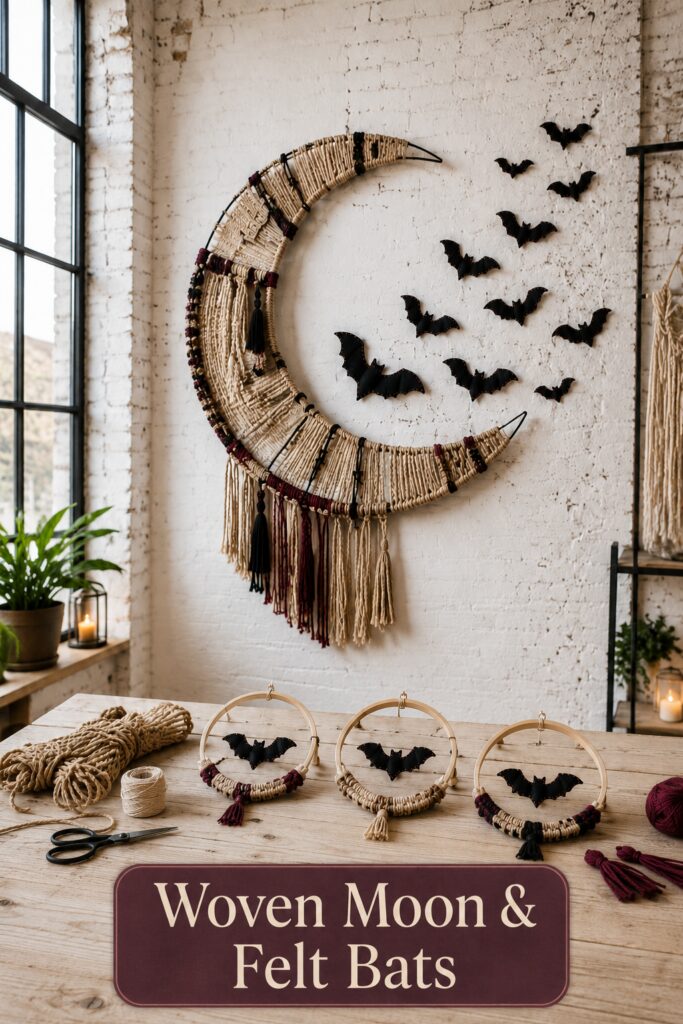
The inspiration and instructional images for this project were created with AI. This tutorial translates the visual idea into a practical project you can recreate at home; the images are illustrative rather than photographs of a completed build.
What you are making
The finished project is a large crescent-shaped fiber wall hanging with a wood core, woven cotton center, and graduated lower fringe. Natural cream is the main color, while dark berry and black appear in smaller bands, knots, and tassels. A group of hand-stitched black felt bats curves through the open side of the moon.
A finished height of roughly 24 to 30 inches creates statement-piece scale while remaining manageable. Smaller versions can use ordinary embroidery hoops. The inspiration appears to use an extremely thin continuous crescent frame, so this practical version introduces hidden wood spacers and cord-wrapped joints for strength.
Materials and supplies
Materials
- Two wooden quilting or embroidery hoops in different diameters
- Small basswood or lightweight wood blocks for spacers and tip joints
- Natural cotton macrame cord, approximately 3 mm for most of the weaving
- Smaller amounts of dark berry and black cotton cord
- Strong wood glue
- Waxed cord or strong thread for lashing the frame joints
- Black wool-blend or firm craft felt
- Dark berry embroidery floss and embroidery needle
- Two small screw eyes and a short length of braided hanging cord
- Surface-appropriate removable picture-hanging strips for the bats
Tools
- Large paper or cardboard for a full-size crescent pattern
- Pencil, measuring tape, and straight ruler
- Small hand miter box and fine-tooth craft saw
- Sanding sponge or fine sandpaper
- Small clamps
- Sharp fabric scissors
- Cord scissors
- Comb or fringe brush
- Fabric clips or pins
- Small awl for starting screw-eye holes
Optional embellishments
- Wood beads with holes large enough for the chosen cord
- Additional tassels
- Narrow metallic cord for one restrained accent
- Anti-fray liquid suitable for the selected cord, used only if needed
Before you start
Draw the desired crescent at full size on paper. A practical starting point is a 24-to-30-inch outer arc paired with a smaller inner arc. The width should be generous through the center and narrow gradually toward both tips. Place the two intact hoops over the pattern and mark only the arc sections needed for the outline.
The hoop sizes do not need to follow an exact formula. What matters is that the selected outer and inner arcs meet at two points and leave enough room between them for weaving. Plan three to five hidden spacer locations through the broadest section. The uppermost sturdy spacer will also support the hanging hardware.
Protect the table before sawing or gluing. Wear eye protection, secure the hoop in a small miter box, and keep hands outside the cutting path. If cutting large wood hoops feels uncomfortable, have the arcs cut at a local workshop before beginning the fiber work.
Step-by-step tutorial
1. Cut the wooden arcs
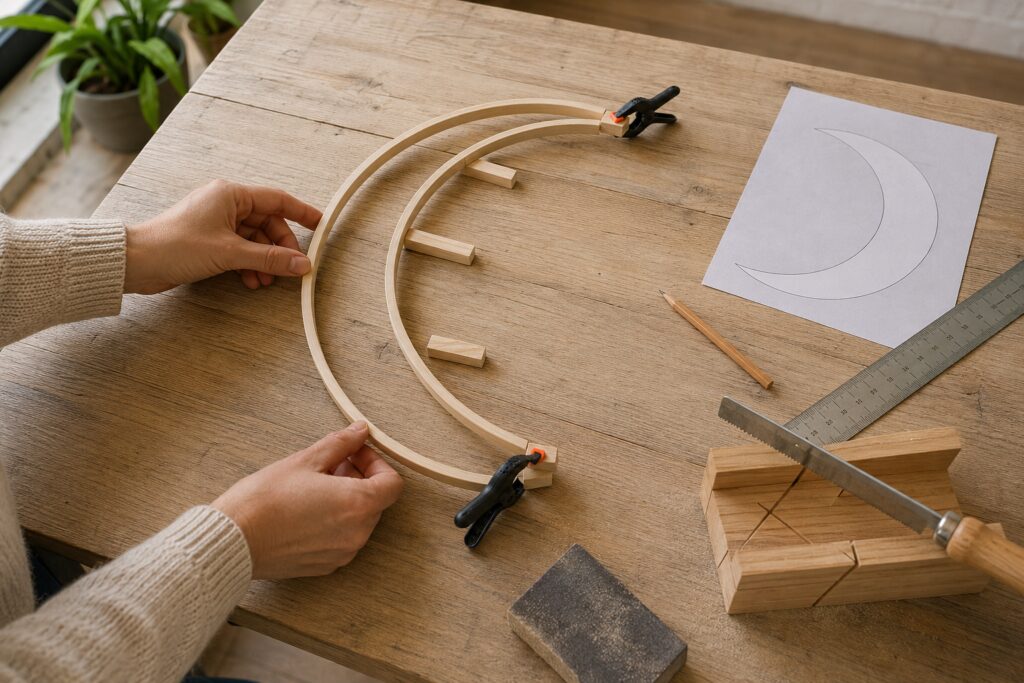
Transfer the crescent tip locations from the paper pattern to both hoops. Use the fine-tooth saw to cut the outer-hoop arc and inner-hoop arc. Make slow, shallow strokes so the thin wood does not splinter. Sand every cut edge smooth.
Return the arcs to the pattern and adjust their positions until both tips align. The opening should look balanced, but it does not need to be perfectly symmetrical. A slightly fuller lower curve resembles the handmade shape in the inspiration.
2. Join and brace the crescent
Cut small wood blocks to bridge the space between the arcs. Place blocks at both tips, at the widest lower section, and at two or three points around the upper curve. Keep every block behind the front plane of the frame so the cord can hide it.
Glue and clamp the tip blocks first, checking the frame against the pattern before the glue sets. Add the remaining spacers one at a time. After the glue has cured according to its directions, lash each joint tightly with waxed cord. The lashings add strength and give the wrapping cord a secure starting point.
3. Wrap the frame
Tie natural cord to the back of the outer arc near one tip. Wrap it firmly around the wood, placing each turn beside the previous one. Work over the spacer joints and lashings until the frame looks continuous. Add a small drop of glue on the back only when starting a new length.
Wrap the inner arc separately. Keep the tension snug but not so tight that the thin wood bows. Insert occasional black or berry wraps at selected points rather than changing color at regular intervals. This creates the collected, irregular rhythm visible in the inspiration.
4. Add the foundation cords
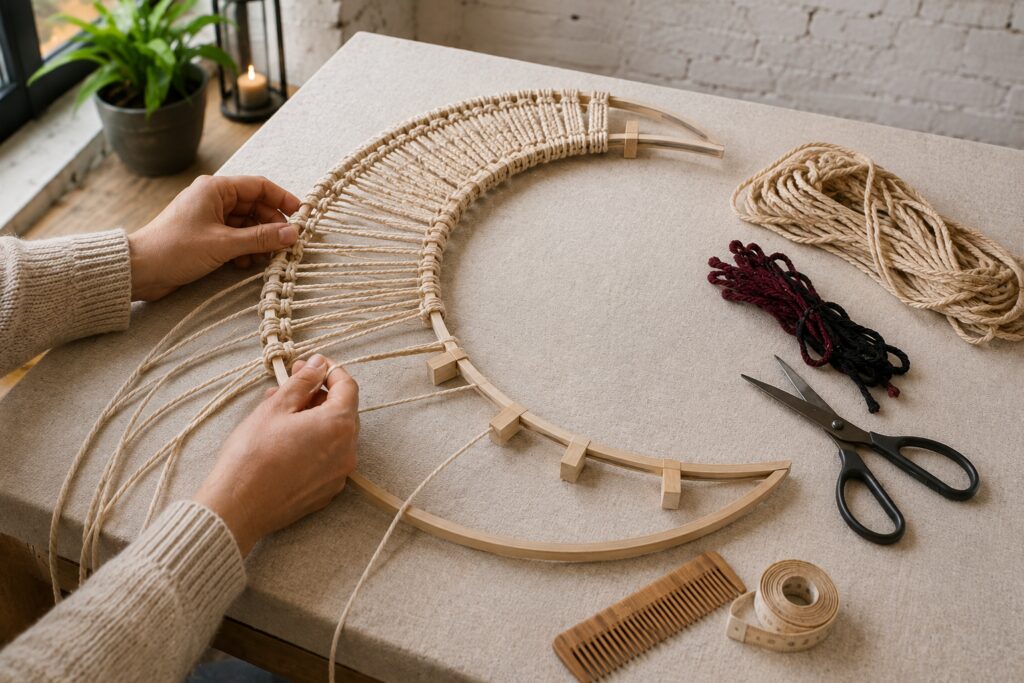
Cut natural cords long enough to cross the crescent and wrap securely around both arcs. Attach the first group to the outer arc with lark’s-head knots. Carry each cord across the open center, wrap it around the inner arc, and return or tie it on the back according to the planned weave.
Space the foundation cords evenly through the broad center and slightly closer near the narrowing tips. Work from the widest section outward so the changing angles are easier to manage. Check frequently that the arcs remain flat.
5. Weave texture across the moon
Use a long working cord to weave over and under the foundation strands. Reverse the sequence on the next row. Push each row into place with your fingers, keeping the fabric firm but not rigid. Curved frames naturally create uneven row lengths, which adds character.
Change the texture in a few sections with paired square knots or short diagonal knot bands. Add dark berry and black cord sparingly, concentrating most of it near the lower curve and one upper section. Hide tails on the back by weaving them through several rows before trimming.
Do not fill every opening. A few narrow spaces between woven sections help the piece feel light and make the crescent outline easier to recognize.
6. Add graduated fringe
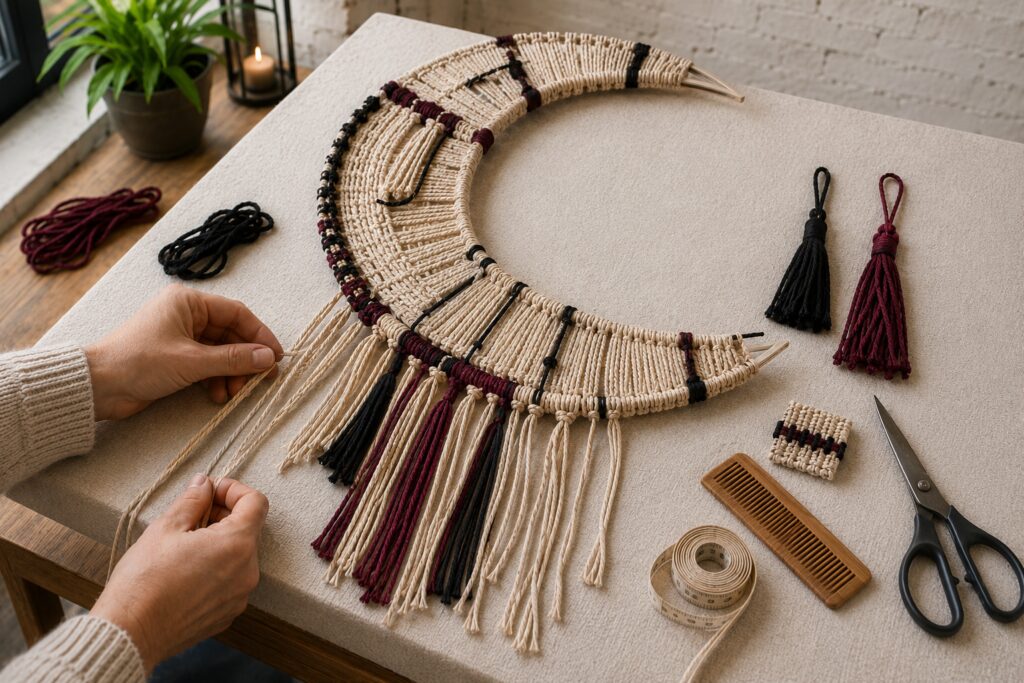
Cut fringe cords longer than the intended finished length. Attach grouped cords along the lower outer arc with lark’s-head knots. Place the longest strands near the center-left of the curve and shorten them gradually toward both sides.
Mix smaller groups of berry and black into the natural fringe. Add one or two tassels at different heights rather than placing them symmetrically. When all fringe is attached, hang the moon temporarily, comb the strands, and trim the lower edge while gravity holds everything straight.
7. Make the felt bats
Draw one simple bat with a recognizable wing shape and a narrow body. Copy it in three sizes. Avoid deep, delicate points because slightly broader wings cut and stitch more cleanly.
For each bat, cut two matching black felt pieces. Clip them together and sew around the edge with a small blanket stitch using dark berry floss. Leave the bat unstuffed or add only a tiny scrap of felt at the body so it stays light. Bend the wings gently along a stitched line to give the silhouette depth.
Make an odd-numbered group, such as seven or nine bats, and vary their wing angles by rotating the template or folding the finished wings differently.
8. Install the hanging hardware
Turn the crescent face down. Use an awl to start shallow holes in two substantial upper spacer blocks, then install the screw eyes without splitting the wood. Tie a short braided cord between them and test the completed hanging from a secure temporary support.
Weigh the finished piece and use a wall hook or anchor rated for more than that weight and appropriate for the wall material. Never rely on a decorative nail unless it is properly secured. Keep the hanging cord short enough that it does not show above the crescent.
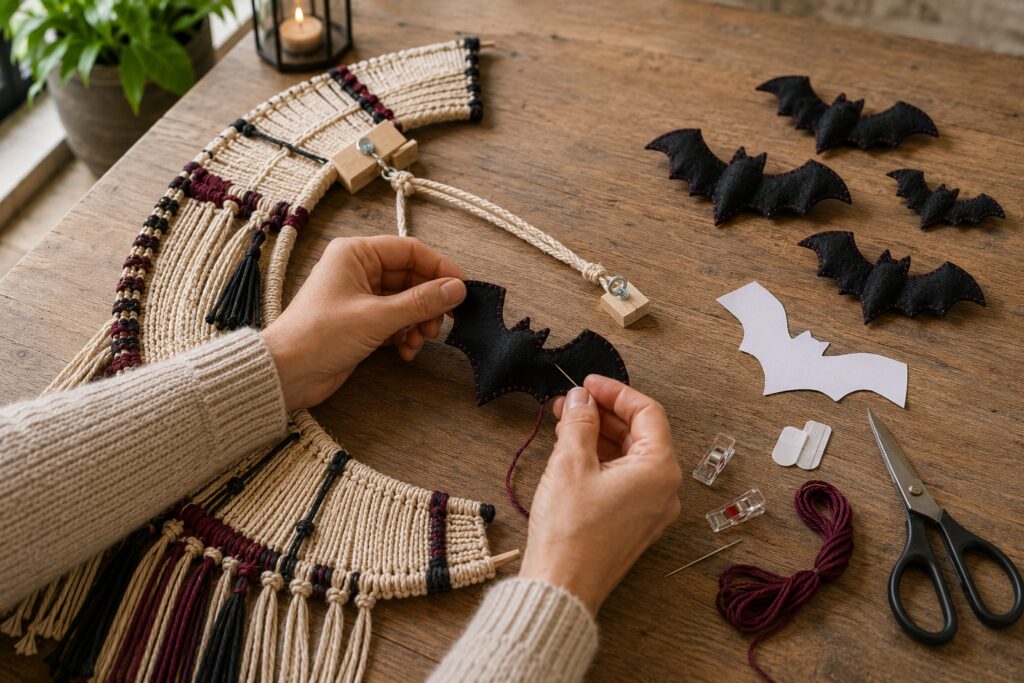
[STEP IMAGE 4: Place after this paragraph. Show screw eyes and braided hanging cord attached to sturdy upper spacer blocks on the back of the completed moon, with a felt bat being blanket-stitched and finished bats in graduated sizes nearby.]
9. Arrange the flight of bats
Hang the crescent first. Lay the bats on the floor in a rising, curved path before transferring the spacing to the wall. Begin with the largest bat near the open center and reduce the scale as the flight moves upward and outward.
Mount each lightweight felt bat using a removable strip approved for the wall finish, following its weight and surface instructions. Keep the adhesive entirely behind the body so the wings remain dimensional. Press for the required time before letting go.
Display the fiber piece indoors, away from open flames, hot bulbs, active fireplaces, cooking areas, moisture, and strong vents. Check the hardware and removable bat attachments periodically.
Tips for getting the finished look
- Let natural cord dominate. The cream fiber makes the dark bats and berry details more striking.
- Concentrate texture unevenly. Dense weaving through the broad curve and lighter work near the tips keeps the moon from looking heavy.
- Repeat accent colors in small doses. Three or four berry sections are enough to carry the color through the piece.
- Vary the fringe. Straight, perfectly even fringe feels formal. Gradual length changes and a few tassels suit the handmade silhouette.
- Curve the bat flight. A loose arc that begins within the crescent and escapes upward makes the separate components read as one composition.
Easy ways to customize it
- Replace berry with burnt orange, deep plum, or muted gold.
- Use gray felt bats for softer contrast against a dark wall.
- Make a 12-inch version from smaller hoops for a door or narrow shelf area.
- Add wooden beads to only two or three fringe groups.
- Omit the bats after Halloween and display the neutral moon as year-round fiber art.
Practical note
The inspiration suggests an uninterrupted crescent frame that would be difficult to keep rigid at this scale. The hidden spacer-block structure creates a stronger wall hanging while allowing the wrapped cord to preserve the continuous moon shape. Making the bats as separate, lightweight wall pieces also avoids pulling the crescent out of balance.