*This post may contain affiliate links for which I earn commissions.*
The translucent diamonds in this inspiration have crisp points, warm paper tones, and narrow ribbon loops. Light passes through their faces and makes the folds part of the decoration. This tutorial uses two paper pyramids joined at their square bases to make a practical version of that faceted shape.

The inspiration and instructional images were created with AI. They illustrate the design and a proposed DIY method rather than documenting a tested project in progress.
What You’re Making
NOTE: Instead of the more complex six and eight sided diamond show in the top image, these instructions are for a four-sided diamond with a point at the top and bottom. Two matching square pyramids meet at the middle. Their square base panels stay inside the ornament, helping you align the halves without trying to join eight loose edges in midair.
This makes the creation process much easier but still gives a similar look and decorative appeal.
The supplied template uses a 2 inch square base with four triangles, each having a 2 inch base and a 3 inch perpendicular slant height. Two assembled halves make a diamond approximately 5 2/3 inches tall and 2 inches wide across a flat face. Those are proposed starting dimensions, not measurements taken from the inspiration.
This version has broad triangular faces rather than the image’s dense pleats.
It preserves the pointed silhouette and translucent layers while keeping the construction manageable. Make one plain paper sample before cutting your vellum.
You can then decorate with drawn lines that imply additional pleats, sprinkle with glitter, paint on some dots, or add other kinds of sparkle and detail as you wish.
Materials and Supplies
Materials
- Two sheets of translucent craft vellum large enough for the template per ornament (and I found some beautiful colored vellum sheets that would be cute, too!)
- Narrow double-sided craft tape suitable for paper and vellum
- Narrow ivory ribbon approximately 1/8-3/8 inch wide for a hanging loop
- Small scraps of vellum for reinforcing the ribbon holes
- Plain copy paper for a test ornament
Tools
- The supplied square pyramid template printed at actual size (see below)
- Scissors
- Ruler and pencil
- Bone folder or another smooth blunt scoring tool
- Fine hole punch or a careful way to make a small ribbon hole
- Cutting mat if you use a craft knife
Optional Finishing Supplies
- Pale honey or softly patterned translucent vellum for another ornament
- Small flat paper clips with scrap-paper padding for holding seams
Choose vellum that holds a crease without splitting. Different papers behave differently, so test your tape and folding pressure on a scrap. Adhesive can remain visible through translucent paper. Keeping it within narrow seam tabs makes that part of the construction more consistent.
Before You Start
Print the template below without fitting it to the page. Measure the central square to check that it is 2 inches across. The sheet includes a calibration line for the same reason.
If your printed copy is not the right size, use your printer settings to increase or decrease the image as needed.
If your printer trims an outer tab, use the dimensions to redraw that little section before cutting.
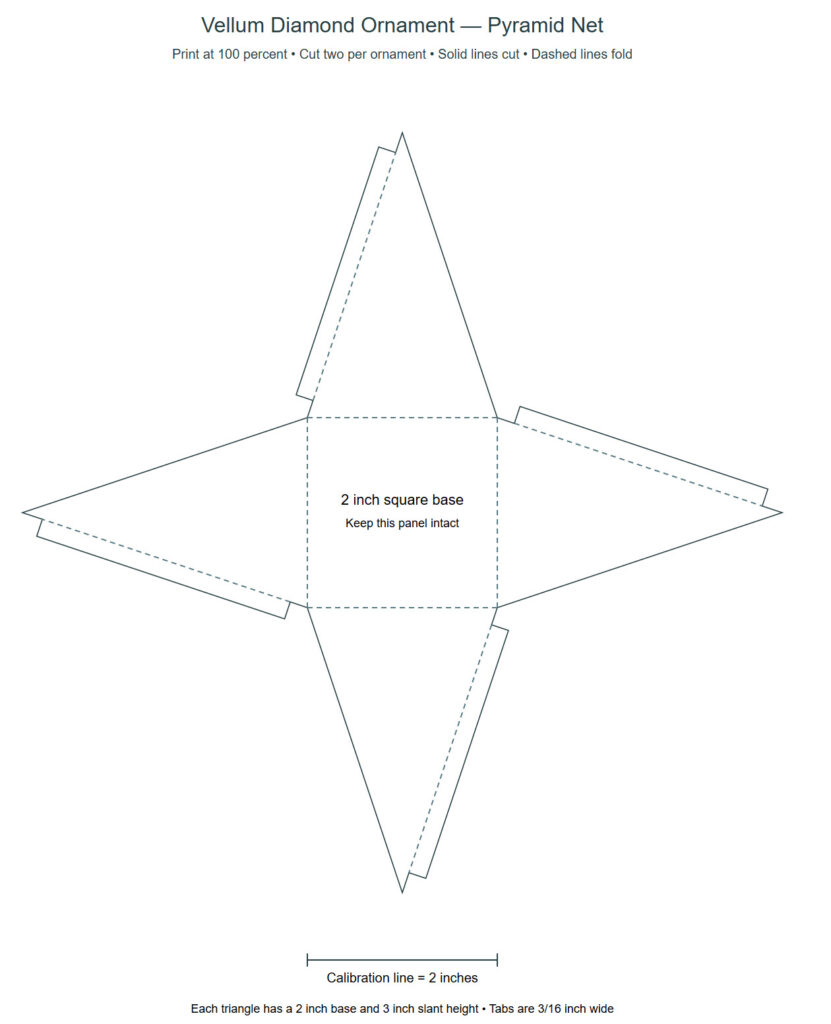
The solid outline is the cutting line. Dashed lines are folds: four around the central square and one along each narrow side tab. Each triangle has a tab on only one sloping edge. Those four tabs join the four side seams when the triangles rise into a pyramid.
Cut and assemble both halves in copy paper first. If the points don’t meet neatly, check the printing scale and fold placement before moving to vellum. A small error along four faces can become quite noticeable at the top.
Step by Step Tutorial
1. Cut Two Matching Pyramid Nets
Place the template over the vellum and transfer the outline and fold positions lightly. Alternatively, trace onto scrap paper first and use that as your cutting pattern. Avoid printing directly on vellum unless your printer and the paper are compatible.
Cut around the full outside edge, keeping all four narrow tabs. You should have a central square surrounded by four tall triangles, one on each side. Don’t cut along the square’s edges; those are the hinges that keep the piece together. Repeat to make the second matching net.
Score every dashed fold gently against a ruler, then fold the four triangles upward. Fold the seam tabs inward. Use light pressure and keep the scoring tool blunt so it bends the material without slicing through it.
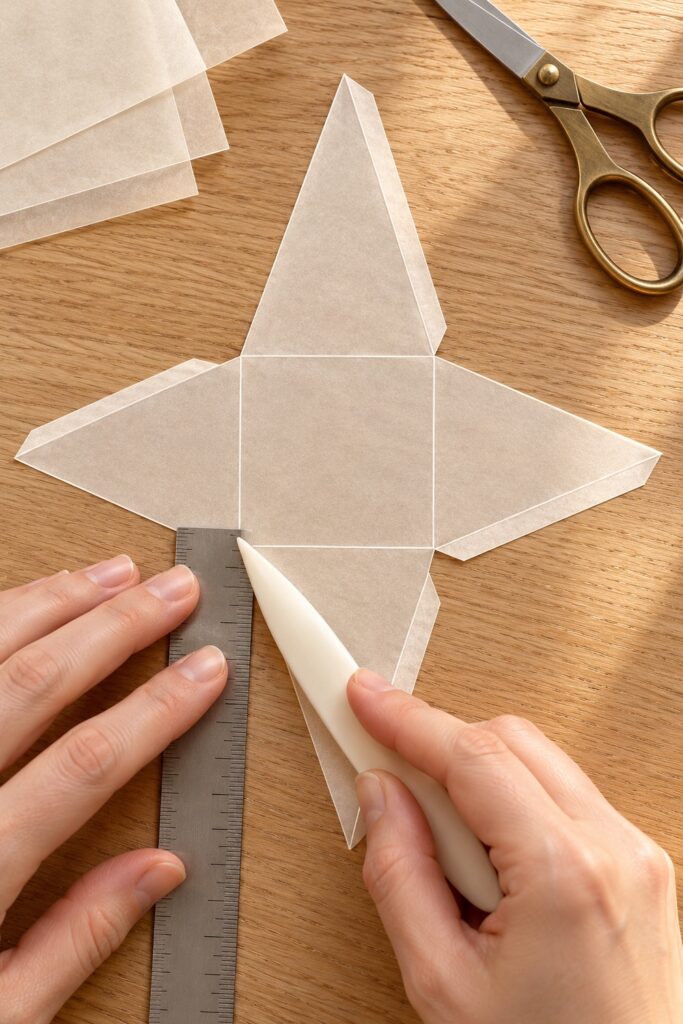
2. Form the Lower Pyramid
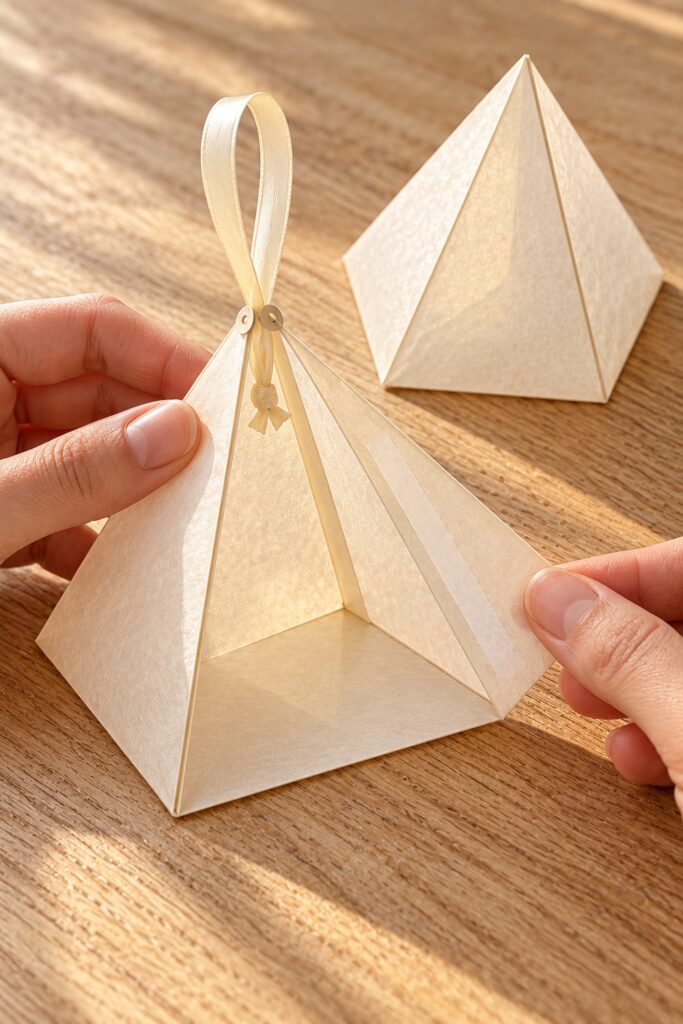
Dry fit the first net by raising the triangles around the square. All four tips should meet above its center. Bring each tab behind the neighboring triangle, keeping the visible face edges aligned. Trim only a tiny projecting tab corner if it interferes at the point; don’t shorten the triangular faces.
Apply narrow tape along one tab, keeping it inside the tab outline. Peel off the liner and join that tab to the adjacent face. Press the seam from inside while the other faces are still open. Continue around the pyramid, leaving the last seam until you’ve checked the point and the base corners.
Close the last seam by supporting it gently between your fingers. Don’t squeeze the point flat. You now have a closed pyramid with an intact square base. Set it aside without attaching a hanging ribbon.
3. Add the Ribbon to the Upper Half
Prepare the second net before closing its side seams. Add a small reinforcing scrap of vellum inside each of two opposite triangular faces near their tips. Keep the scraps small enough to stay within the face edges, and secure them with the same tested tape.
Make one small hole through each reinforced area, leaving enough paper around it that it won’t tear immediately. About 3/8 inch below each tip is a starting position. Adjust for your ribbon and paper sample rather than forcing a large punch into a narrow point.
Pass the two ends of a ribbon through the holes from the outside into the pyramid. Leave a loop outside, then tie the ends together inside. Trim the internal tails so they won’t interfere with the base. Test the loop gently while the net is open; if the paper puckers or tears, enlarge the reinforcement and revise the hole position.
Join the upper pyramid’s side tabs in the same order as the lower one. Check the ribbon before sealing the final seam. The loop should rise above the point, and its internal knot should remain enclosed without pulling the two faces out of shape.
4. Join the Square Bases
Place the pyramids base to base without adhesive first. Match the four square corners and check that the points line up above and below the center. If one base is slightly distorted, reopen the affected seam gently and correct it before joining the halves.
Apply narrow tape around the perimeter of one square base. Keep it inside the edge so no sticky strip is exposed along the finished equator. Remove the liners, align one corner, and bring the remaining corners together carefully. Press around the square seam without crushing the triangular faces.
The two square panels remain hidden inside. They may make the middle look slightly denser when backlit, which is part of this practical adaptation. Don’t cut them out after assembly, since they help keep the halves aligned.
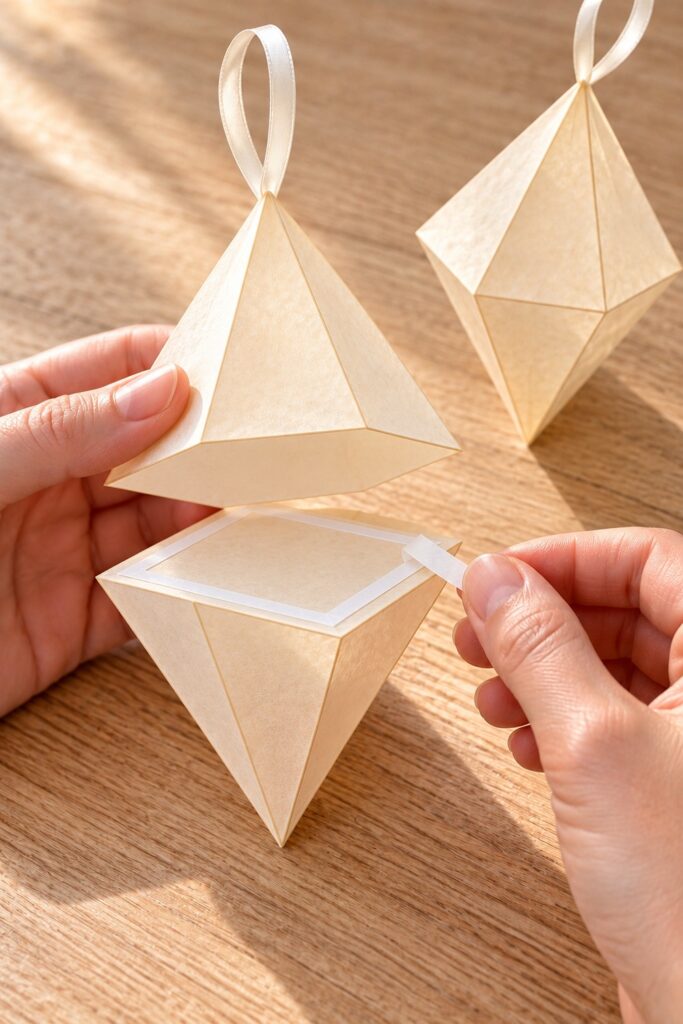
5. Check the Ornament Before Hanging
Lift it gently by the loop over a padded surface. Check the reinforced holes, the four side seams on each half, and the middle join. Follow the tape maker’s guidance for pressure and setting time. If a seam lifts, repair it before putting the ornament on display.
Tips for Getting the Finished Look
Keep the seams narrow and consistent. They will show through the vellum, so treating them as deliberate edges looks better than using large irregular patches of adhesive. Leave the broad faces plain on your first ornament so you can judge the shape clearly.
For a collection, repeat the same template in cream and pale honey vellum. Change the hanging heights instead of changing every ornament’s construction. Daylight beside a window will reveal the layers without any light source inside the paper.
Easy Ways to Customize It
Once the first ornament fits together, scale both nets equally for a smaller diamond. Check the printed square and keep the ribbon reinforcement large enough to work. A softly dotted vellum can vary the surface while preserving the same pointed outline. Avoid heavy beads or decorations that add weight to the paper hanger.
Displaying the Finished Ornaments
Hang them indoors from a stable branch display or suitable ornament support. Space them so the points don’t knock against one another. Keep paper away from flames, hot bulbs, heaters, and damp windows, and don’t place a candle or electrical light inside the ornament.
Final Encouragement
Finish one plain sample before making the whole collection. Once the square corners and points align, the vellum version becomes a matter of careful folds and tidy seams rather than guesswork.