*This post may contain affiliate links for which I earn commissions.*
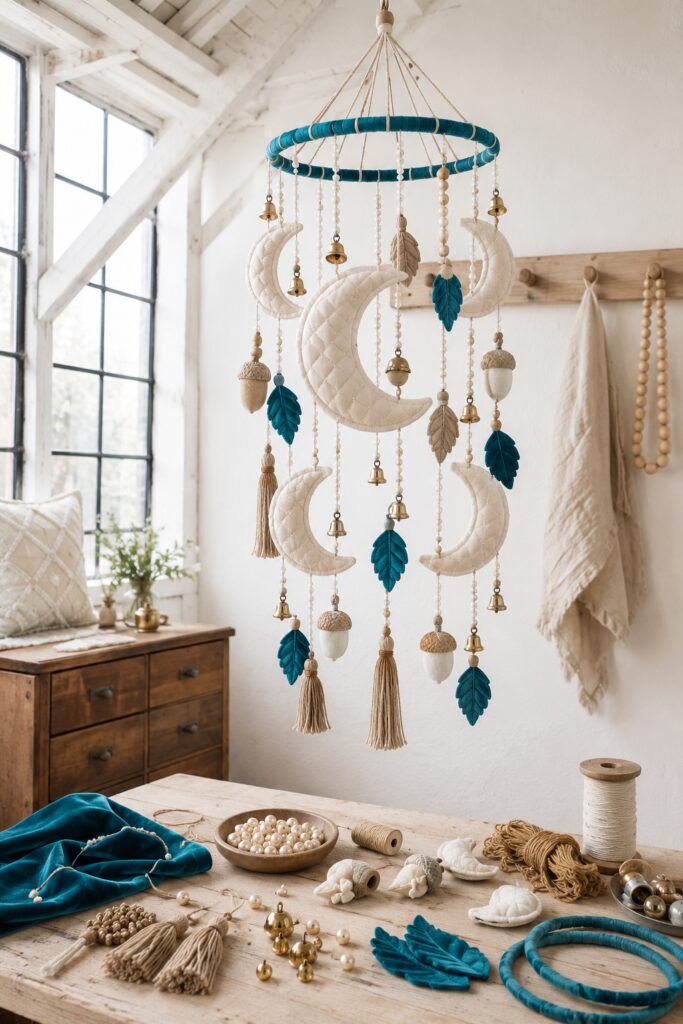
Ivory crescent moons, velvet acorns, and little flax tassels give this fall mobile the feeling of a woodland collection suspended in the air. The unexpected detail is the turquoise: rich leaves and a wrapped hoop that stand out against the soft neutrals without overwhelming them.
This tutorial translates the inspiration into a lightweight hanging decoration with quilted fabric shapes, hand-sewn embellishments, and a balanced cord support. Make the pieces in small batches, then enjoy arranging them into a gentle cascade.
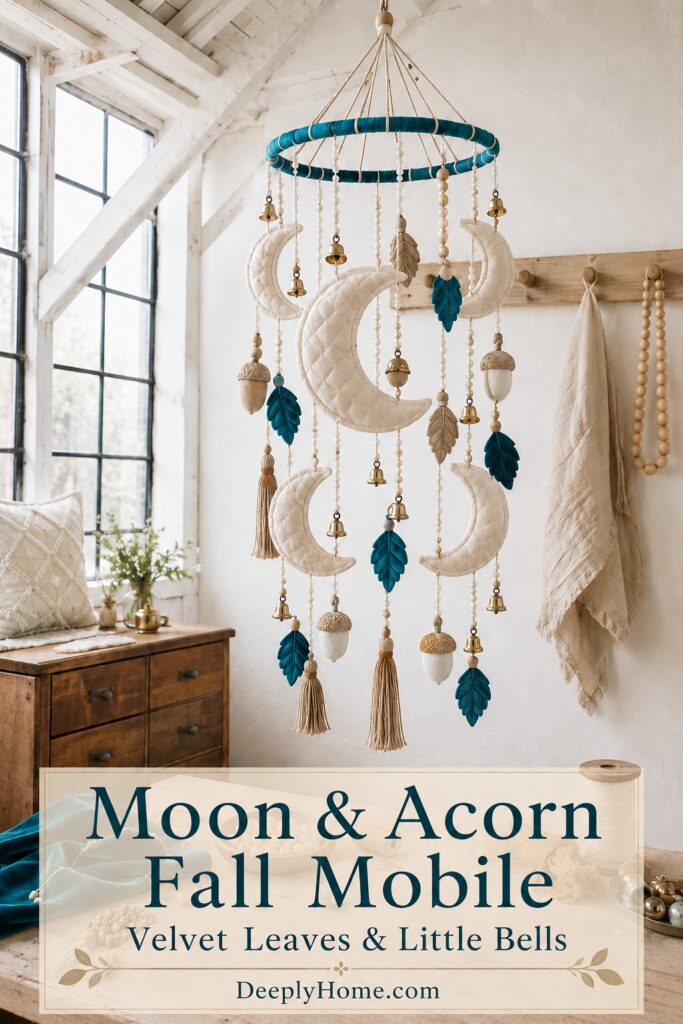
The inspiration and instructional images were created with AI. They illustrate a proposed DIY method rather than a photographed project made by hand.
A Little Woodland Sky for Fall
The suggested version uses a 12-inch hoop, one 7-inch moon, four 4-inch moons, four small acorns, six leaves, three tassels, and six lightweight bells. These are starting dimensions, not measurements taken from the image. Aim for approximately 24 to 30 inches below the hoop, plus the suspension above it.
The moons are flat quilted sandwiches rather than stuffed shapes. Embroidered felt caps replace the inspiration’s intricate acorn-cap texture. Most importantly, continuous cords support the hanging strands; decorative pearl strings and fabric ornaments do not carry the pieces below them.
This is adult home decor, not a nursery mobile or toy.
Materials for the Mobile
Fabric and Decorative Pieces
- About ½ yard of ivory linen or firmly woven cotton for moon fronts and backs
- Low-loft batting, approximately 18 by 22 inches
- A fat quarter of saturated turquoise nonstretch velvet for leaves
- A small piece of ivory or champagne nonstretch velvet for acorns
- Two approximately 9-by-12-inch sheets of oatmeal felt for leaf backs and acorn caps
- A small amount of polyester fiberfill for the acorns
- Ivory sewing thread
- Ivory and oatmeal embroidery floss
- Approximately 100 to 150 lightweight drilled imitation pearls, around 6 mm, with holes that fit the strand cord OR craft pearl strands OR mix the pearl beads with wood beads
- Six small brass or brass-colored bells with smooth hanging eyes
- Fine flax, linen, or cotton yarn, approximately 35 yards, for tassels
Frame and Hanging Supplies
- One rigid, continuous 12-inch metal craft hoop with a closed joint
- Approximately 3 to 5 yards of ¾- to 1-inch turquoise velvet ribbon for wrapping
- One closed hanging ring, approximately 1½ to 2½ inches across
- Approximately 5 yards of strong 2 mm braided cord for the suspension and center support
- Approximately 12 yards of strong 0.8 to 1 mm braided cord for strands and ornament tabs
- A ceiling hook or wall bracket and fixings suited to the mounting surface and completed weight
Tools
- Fabric scissors, paper, pencil, ruler, and a fabric marking tool
- Sewing needles, beading needle, pins or clips, and optional sewing machine
- Cardboard approximately 5 inches tall for winding tassels
- Tape measure and a stable temporary hanging point within easy reach
NOTES: Match the pearl holes to your actual cord before buying the full quantity. Opaque plastic imitation pearls keep the decoration lighter than glass. Use strong braided cord for structure; save soft flax yarn for the tassels.
Want to make this mobile?
I’ve put together a convenient Amazon supply list featuring hand-picked, well-rated products for the materials needed to complete this project. Save time by jumping right to that list to find what you need.
See My Hand-Picked Supply ListAs an Amazon Associate I earn from qualifying purchases but this doesn’t increase your price at all!
Sketch the Hanging Arrangement
Draw a circle and mark eight equally spaced attachment points. Plan a small moon on every other strand and an acorn on each remaining strand. Hang the large moon in the center from a separate cross-cord.
Add leaves to the four acorn strands and two moon strands. Place a bell at the bottom of each moon strand, including the central one. Finish three acorn strands with tassels and the last with a bell. This uses the suggested counts without crowding every strand with every material.
Vary the lower ends by a few inches and keep adjacent shapes from occupying exactly the same height. Test the layout with paper pieces before sewing.
Make the Fabric Pieces and Assemble the Mobile
1. Draw Soft Crescent Shapes
Draw a crescent about 7 inches tall with a broad middle and gently rounded tips. Create a smaller version about 4 inches tall. Keep enough width between the inner and outer curves for a visible quilted pattern.
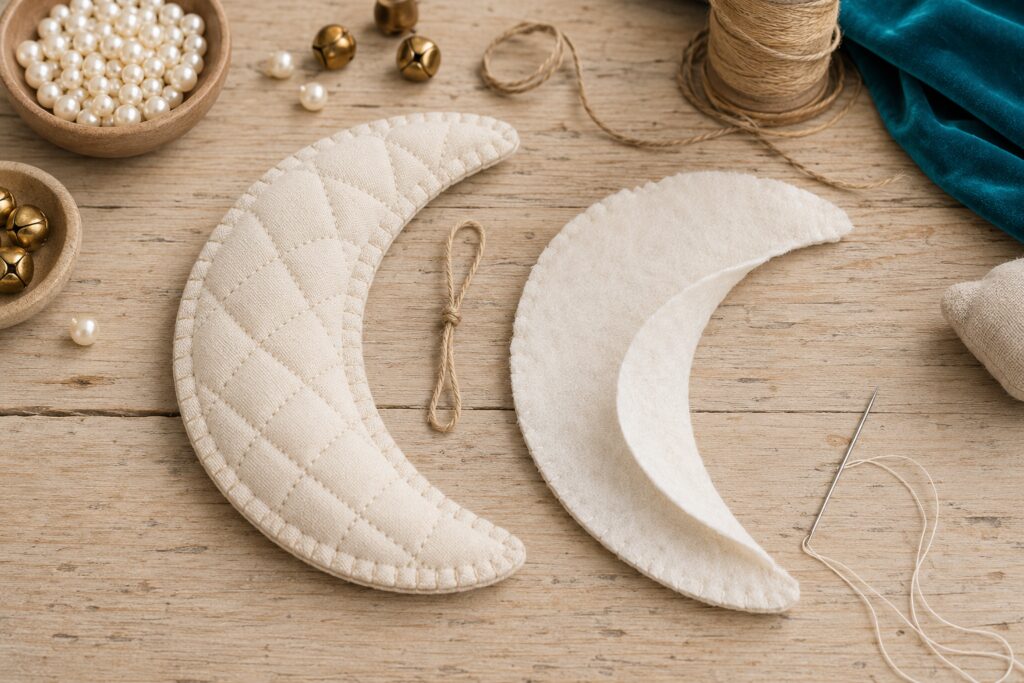
These templates show the finished fabric outline; no turning allowance is needed. Cut two ivory fabric pieces for each moon. Cut matching batting slightly smaller, approximately ⅛ inch inside the fabric edge. For asymmetrical templates, cut mirrored fabric pairs so their wrong sides face inward when layered.
2. Quilt and Finish the Moons
Layer a fabric back right side down, batting, then a fabric front right side up. Baste through the layers. Mark a loose diamond grid, about ¾ to 1 inch apart, adjusting the spacing on the smaller shapes.
Quilt through all layers with small running stitches or a sewing machine, working outward from the middle. Finish the entire perimeter with closely spaced blanket stitches that enclose the raw edges. Keep the batting tucked inside; there is no opening to turn or fill.
Sew a small closed cord tab firmly to the back near the top of each crescent, catching the edge stitches and both fabric layers. Test-hang it and adjust the tab position until the crescent faces the direction you want.
3. Shape the Velvet Acorns
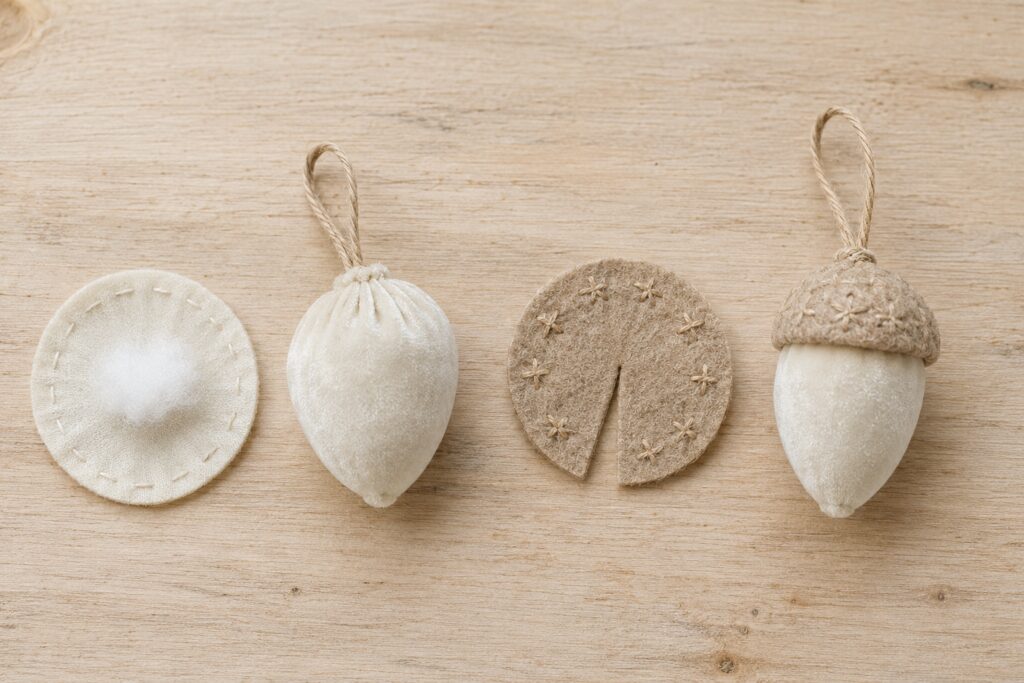
Cut an approximately 4-inch circle of ivory velvet. Sew running stitches about ¼ inch from the edge using doubled strong thread. Add a small tuft of fiberfill, draw the thread inward, and shape the lower portion into a slightly tapered oval. Adjust the filling until the body is approximately 1½ inches tall.
Secure the gathering with several stitches. Sew a short cord loop through the gathered neck so it has a firm attachment before adding a cap.
Cut a felt circle about 2 inches across. Add little crossed embroidery stitches for texture. Snip from one edge to the center and make a tiny center opening for the loop. Overlap the cut edges into a shallow cone, trying it over the acorn until it covers the gathering. Stitch the overlap, pass the loop through the opening, and sew the cap around the upper body.
4. Stitch Leaves and Wind Tassels
Draw a simple lobed oak leaf about 3 inches long. Cut six velvet leaves and matching felt backs. Place each pair wrong sides together, sew a center vein and angled side veins through both layers, then stitch close to the perimeter. Leave a small raw border and trim stray fibers. Sew a cord tab to each leaf base.
For each tassel, wind fine flax yarn around the 5-inch cardboard about 25 to 35 times. Slide a strong cord tie beneath the loops at one end and knot securely. Cut through the opposite end. Wrap another length of yarn around the bundle about ½ inch below the tied top, knot it, and bury the tails with a needle. Trim the fringe evenly. Repeat twice.
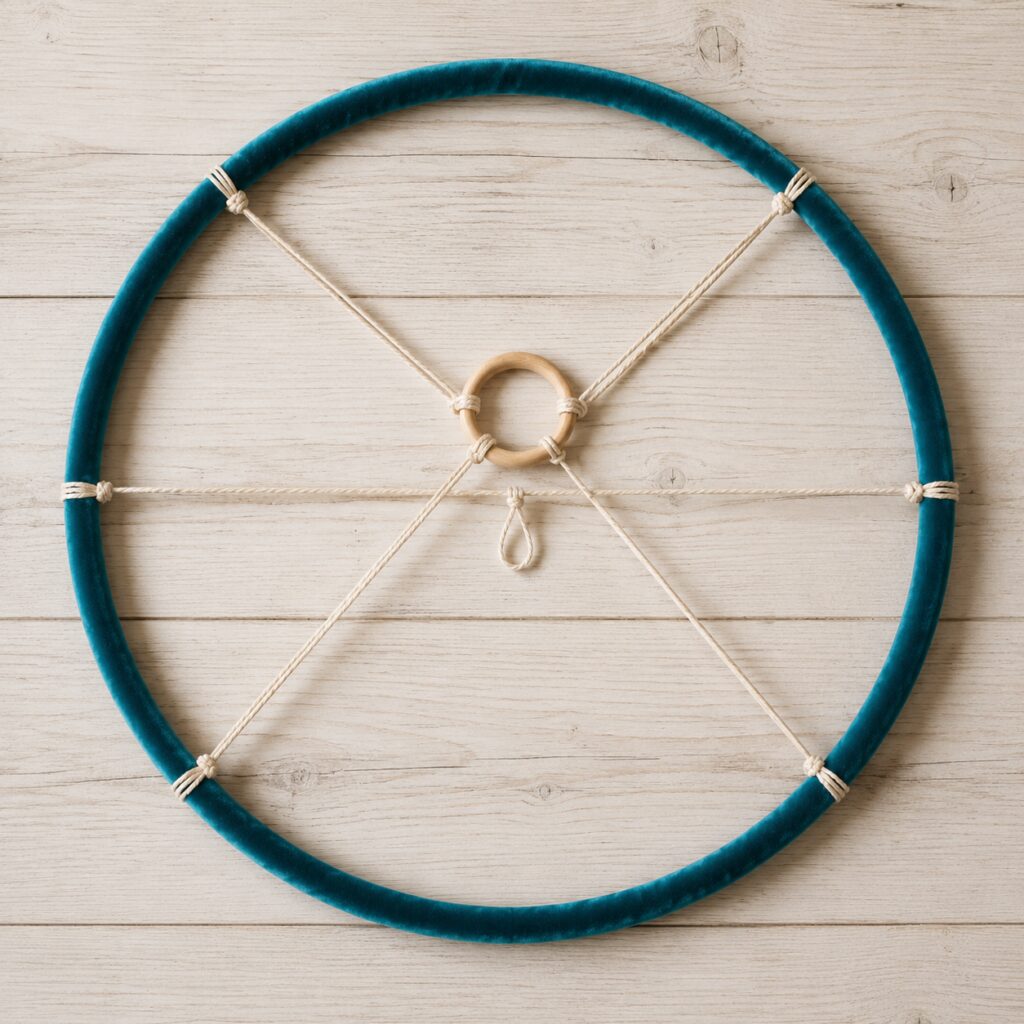
5. Wrap and Suspend the Hoop
Wrap velvet ribbon snugly around the metal hoop, overlapping each turn slightly. Secure the beginning and end by stitching the ribbon to itself. Join extra lengths with sewn overlaps underneath the ring.
At four evenly spaced quarter points, attach equal lengths of 2 mm cord using a full turn around the hoop followed by two half hitches. Bring the free ends to the closed hanging ring and secure them with the same knot arrangement. Start with generous lengths, approximately 30 inches each, and adjust until the hoop hangs level with roughly 12 to 16 inches of rise above it. Leave several inches of tail beyond each knot.
Tie a separate cord across the hoop’s diameter, snug enough to limit sag without bending the frame. Tie a small attachment loop at its midpoint for the central strand. Stitch around the hoop knots through the ribbon to discourage sideways movement; the knots around the metal provide the support.
6. Build the Beaded Hanging Strands
Cut eight strand cords approximately 42 inches long, allowing extra for knots and adjustment. Lay each out flat. Thread pearls onto the cord in short groups, using stopper knots above and below each group. Double the stopper knots if necessary so the beads cannot slide over them.
At an ornament position, pass the continuous cord through the piece’s sewn tab and secure the tab between knots. Route the cord behind the ornament and continue downward. Do not cut the strand and ask a fabric moon or acorn to support the next decoration.
Tie the terminal bell through its eye or the tassel through its strong top tie. Use secure knots with tails tucked neatly behind the piece. Make a ninth, shorter strand for the large moon and its bell, adjusting its length during hanging.
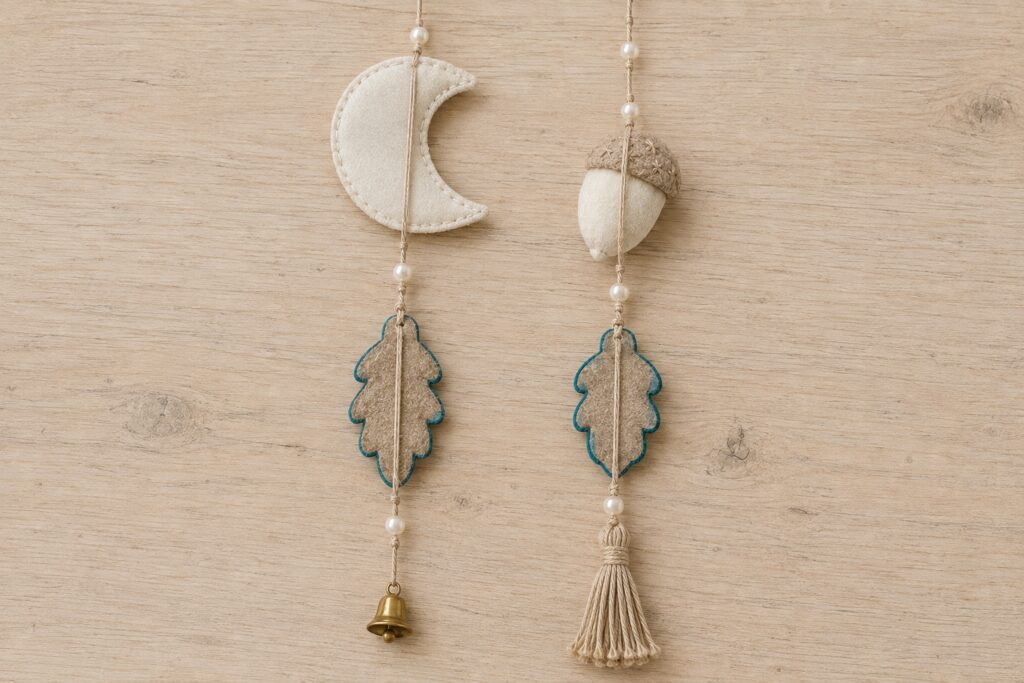
[STEP IMAGE 4: Place here. Show two strands laid flat with ornaments turned over to expose the continuous cords across their backs and the sewn tabs pearls and knots.]
7. Hang, Balance, and Check the Connections
Attach the eight outer strands at the planned positions using a full turn and two half hitches. Attach the central strand to the midpoint loop. Keep every connection adjustable until the arrangement is balanced.
Add pieces in opposite pairs. If one side dips, move or exchange a heavier strand with a lighter one before changing the suspension lengths. Check the hoop from two directions, then secure the knots and leave useful tails rather than cutting them flush.
Gently turn the mobile and watch for snagging. Shorten a strand or move a leaf if neighboring pieces repeatedly catch. Give every ornament tab and terminal knot a gentle pull over the worktable before choosing the permanent display spot.
Give the Neutrals Room to Show
Use the same turquoise family for the hoop and leaves. Let the ivory crescents remain the largest shapes, with the acorns and tassels acting as smaller accents. Spaces between pearl groups help the strands look airy and keep the weight down.
For a quieter version, make two leaves from oatmeal felt. For a shorter arrangement, raise the lowest tassels and reduce the strand lengths while preserving clearance between shapes. You can omit bells without changing the construction.
Display It Where It Can Move Gently
Choose an indoor corner away from walking routes, candles, heaters, fans, and strong drafts. Use mounting hardware rated for the completed weight and appropriate to the wall or ceiling material. Keep all cords, beads, and bells beyond the reach of children and pets, and never hang this project over a crib, cot, or play area.
A plain wall lets the quilting and velvet stand out. Begin with a few balanced strands, then add the remaining pieces slowly. Leaving a little breathing room will do more for the finished mobile than filling every gap.