*This post may contain affiliate links for which I earn commissions.*
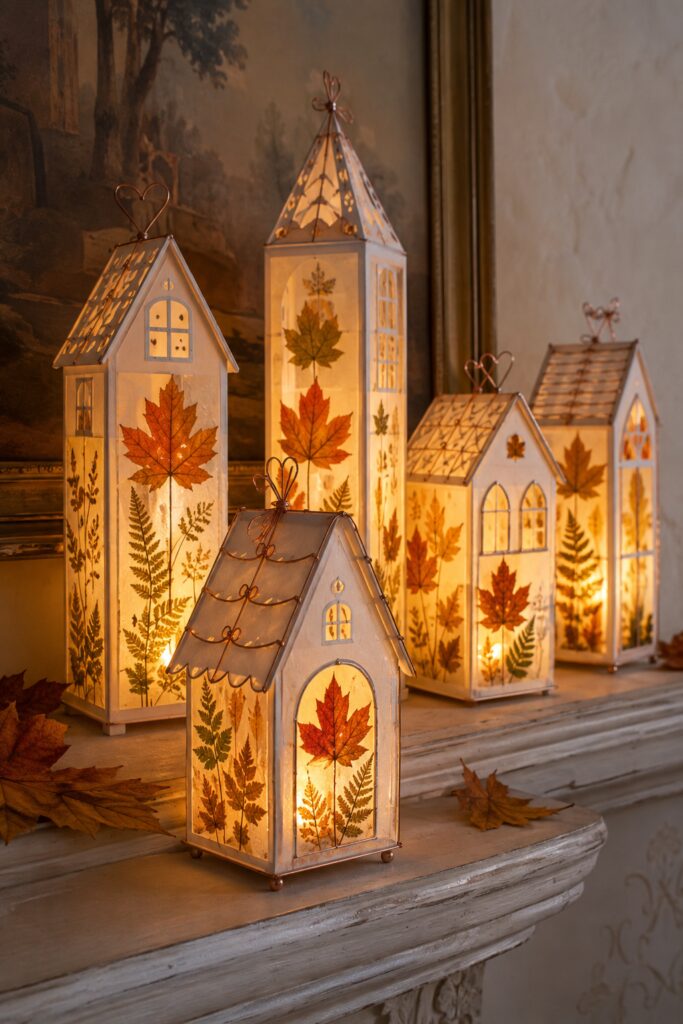
Pressed leaves become especially beautiful when light passes through them. Their fine veins sharpen, faded greens deepen, and rust-colored maple leaves take on an amber glow. This little lantern village uses that effect across a collection of house-shaped frames, turning familiar fall botanicals into softly illuminated window panels.
The houses in the inspiration image include intricate roof piercing, metal edging, and tiny architectural details. This tutorial simplifies the construction into slim basswood frames, layered vellum panels, and removable cardstock roofs. The result keeps the magical village character while making the project realistic for an ordinary craft workspace.
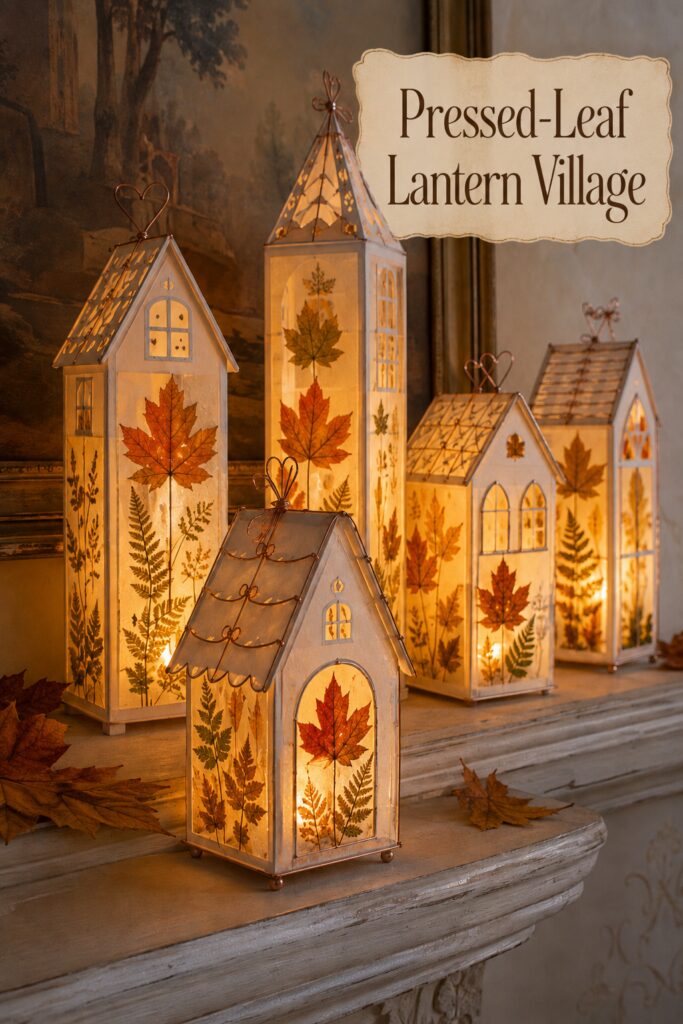
The inspiration image and instructional demonstration images for this project were created with AI. This tutorial translates the visual idea into a practical DIY method; the demonstration images are visual guides rather than photographs of an actually completed project.
What You’re Making
You will build a group of freestanding house lanterns with lightweight wooden skeletons and translucent botanical walls. Each lantern has a flat base, four framed walls, a peaked upper frame, and a lift-off paper roof. A battery-operated tea light rests inside.
A five-building village can include two cottages about 8 to 10 inches tall, two taller houses about 11 to 13 inches, and one slender tower. These are suggested proportions rather than fixed measurements. Start with one medium cottage, then adjust the same plan after you understand the joints and panel fit.
The distinctive features are the warm ivory structure, pressed maple and fern compositions, varied rooflines, and repeated amber illumination. Copper wire finials are optional and should remain decorative rather than structural.
Materials and Supplies
Materials
- Fully dried pressed maple leaves, fern fronds, and small delicate foliage
- Medium-weight translucent vellum
- Slim square basswood craft strips, approximately 1/8 to 1/4 inch thick
- Thin craft plywood or sturdy chipboard for each base
- Ivory acrylic craft paint or water-based stain
- Wood glue
- Clear-drying paper adhesive or archival decoupage medium
- Narrow clear double-sided craft tape
- Heavyweight ivory cardstock for the roofs
- Fine copper-colored craft wire, optional
- Small round wooden beads, optional feet
- Warm-white battery-operated LED tea lights
Tools
- Botanical press or heavy books and absorbent paper
- Metal ruler and pencil
- Fine-tooth craft saw or sturdy craft knife suitable for thin wood
- Cutting mat
- Small square
- Fine-grit sandpaper
- Small spring clips
- Flat soft-bristle brush
- Scissors
- Bone folder or blunt scoring stylus
- Needle-nose pliers and wire cutters, if adding copper details
Before You Begin
Press the leaves until they are completely dry and flat. Large maple leaves may need one to two weeks in absorbent paper, with the paper changed if it becomes damp. Trapping moisture between vellum sheets can cause cloudy adhesive, curling, or discoloration.
Sketch the village before cutting wood. Use the same base width for two or three buildings, then vary the height and roof pitch. A practical first cottage might have a base approximately 4 inches wide by 3 inches deep, but the exact dimensions can change to suit your leaves and LED lights.
Dry-fit the tea light on the proposed base. Leave open space on every side and make certain the roof can lift away without catching the frame. Protect the work surface while cutting, gluing, or painting.
Step-by-Step Tutorial
1. Design the First House Frame
Draw a front view, side view, and top view of one simple cottage. The front and back frames need two vertical posts, one upper horizontal rail, and two angled gable pieces. Each side needs two vertical posts and upper and lower rails. The corner posts are shared, so count the pieces from the assembled structure rather than cutting four separate wall frames.
Mark every cut before starting. Cut the base first, then use its edges to determine the rail lengths. Four vertical posts should match exactly. The four sloping gable pieces should form two identical triangles.
2. Prepare the Botanical Panels
For each wall opening, cut two vellum pieces slightly larger than the clear space inside the wooden rails. The extra margin will remain hidden behind the frame.
Arrange one focal leaf and several smaller fronds on the first layer. Keep the foliage away from the attachment margin. Brush a very thin coat of clear-drying paper medium beneath the leaves and smooth them gently with a clean brush. Place the second vellum sheet over the arrangement, cover it with a nonstick sheet, and press it flat beneath a book until dry.
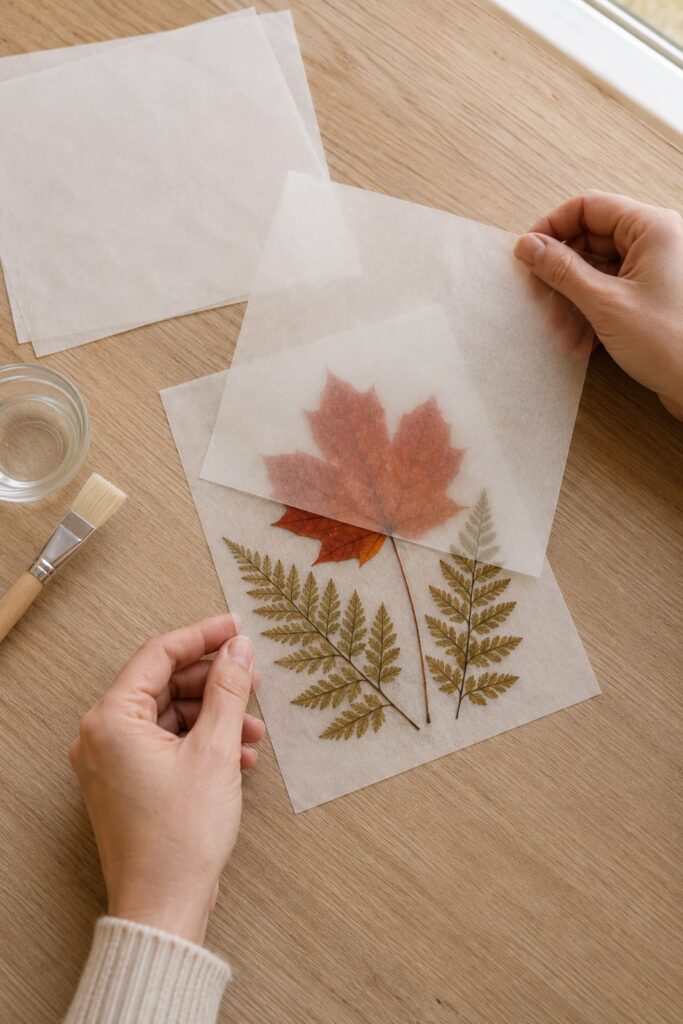
Repeat for four wall panels. Use related botanicals without making every panel identical. A large maple leaf can anchor the front, while side walls can feature taller fern fronds and smaller compound leaves.
3. Cut and Finish the Wooden Pieces
Cut the basswood strips with a fine-tooth saw or other tool appropriate for the chosen thickness. Sand each end lightly so the joints meet cleanly. Lay paired pieces beside one another and correct any visible difference before assembly.
Paint the strips warm ivory while they are still separate. Two thin coats generally look smoother than one heavy coat. Leave the final glue surfaces lightly coated rather than glossy so the adhesive can grip.
Cut a base from thin craft plywood or sturdy chipboard. Paint its visible edges to match. If you want small feet, glue four wooden beads beneath the base only after confirming that all four touch the table evenly.
4. Assemble the Rectangular Skeleton
Glue four lower rails around the base. Add one vertical corner post at each corner, checking every post with a small square. Use light clips or temporary blocks to hold the pieces while the glue sets.
Join the four posts with upper horizontal rails. Build two matching triangular gable frames from the sloping pieces, then attach one above the front rail and one above the back. Connect their peaks with a ridge strip.
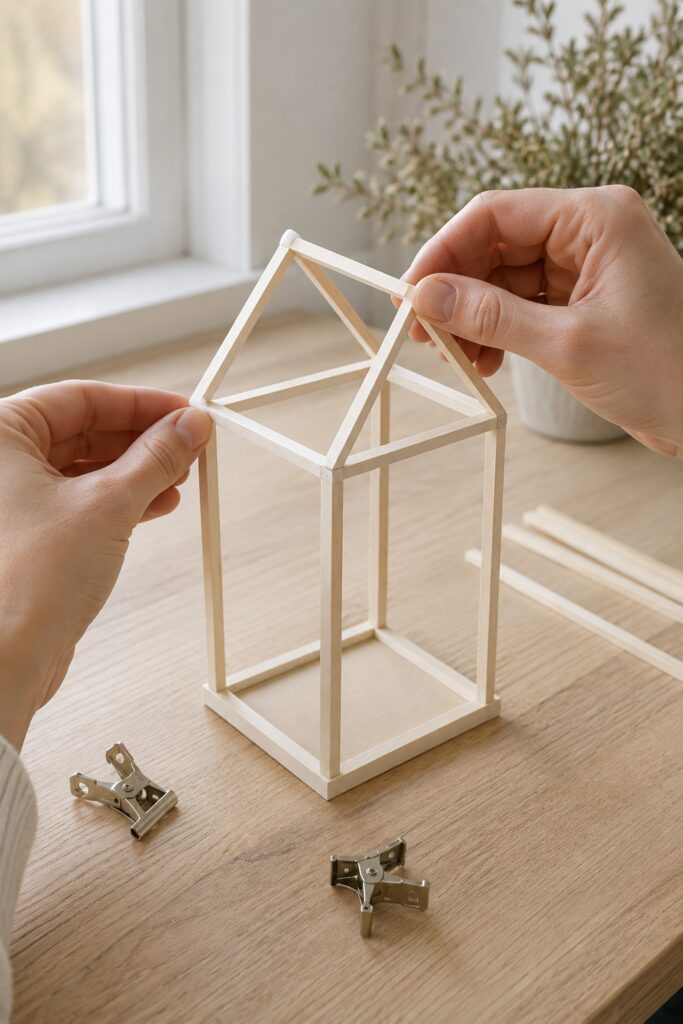
Let the structure cure on a level surface. A twisted frame will make the flat vellum panels difficult to install, so correct alignment before the glue becomes firm.
5. Trim and Attach the Leaf Panels
Measure each opening separately. Even a carefully built handmade frame may vary slightly from side to side. Trim the corresponding botanical panel so it overlaps the inside face of every surrounding rail without extending beyond the outside edges.
Apply narrow clear double-sided tape to the inside of the rails. Press the panel into place from the center outward, keeping it smooth without stretching it. Install the opposite wall next to balance the frame, then complete the remaining sides.
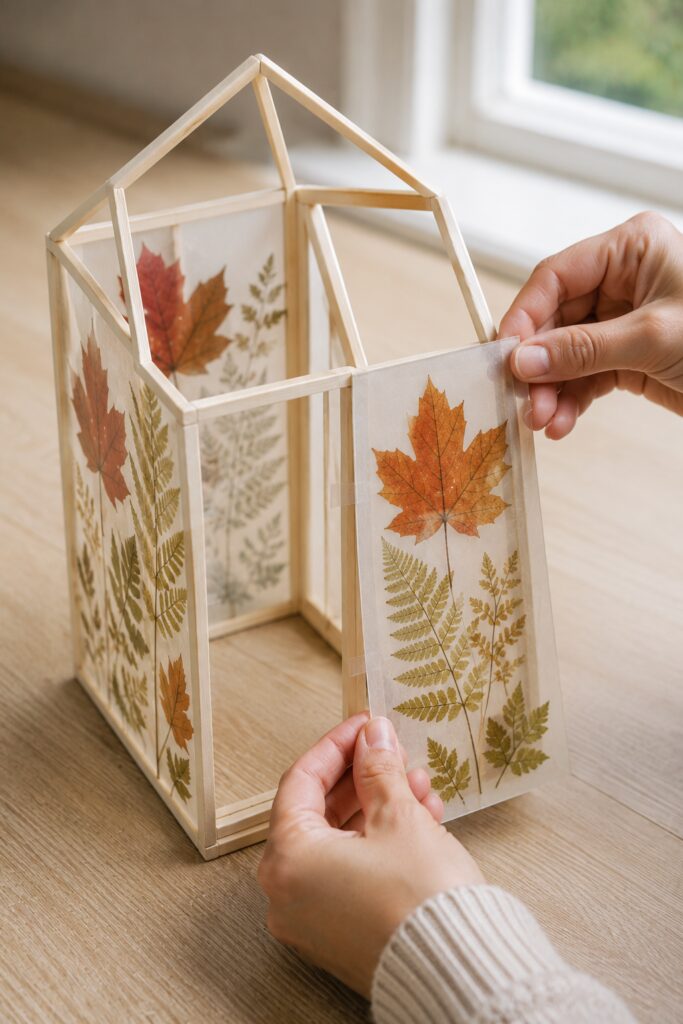
Inspect the corners in daylight and again with a temporary LED inside. If a pale edge shows beyond a rail, trim it carefully. Do not cover a loose edge with wet glue unless the adhesive has already been tested on a vellum scrap.
6. Make a Removable Roof
Measure from the roof ridge down one slope and add a modest overhang. Cut a cardstock rectangle twice that measurement, plus the desired overhang at the front and back. Score the center line and fold it sharply with a bone folder.
For a cottage roof, the folded piece can simply rest over the gables. Add two narrow interior cardstock stops beneath the roof, positioned just outside the gable frames, to keep it from sliding sideways. A tower can use a four-sided pyramid cap made from four connected triangles with glue tabs.
Scalloped edges, narrow layered strips, or small pierced leaf shapes can add detail, but keep the roof strong enough to lift by its ridge. The roof must remain removable for battery access.
7. Add a Copper Loop Finial
If desired, bend a short length of copper-colored craft wire into a simple heart, oval, or leaf-shaped loop. Twist the ends together to form a short stem. Pierce a small reinforced hole at the roof ridge, insert the stem, and bend the ends flat against the roof interior.
Cover the ends with a small cardstock patch so they do not catch on the wooden frame. The finial is decorative and should not be used as a handle. Lift the roof by supporting both slopes.
8. Install the Flameless Light
Set a warm-white battery tea light in the center of the base. Make sure it does not touch the vellum walls. Lower the removable roof over the gables and view the lantern from each side. If the light produces one harsh spot, place a small extra vellum screen around the LED without enclosing it tightly.
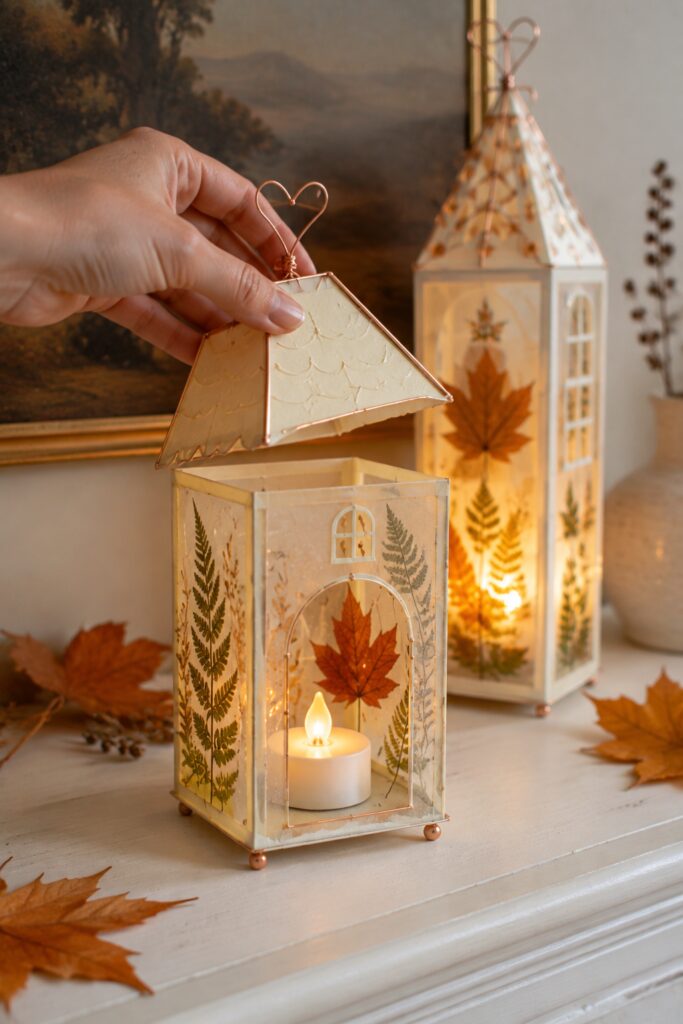
Use only a cool, battery-operated LED. Real candles and other open flames are unsafe near dried leaves, paper, wood, wire, and adhesive. Do not substitute an incandescent bulb or any light that produces noticeable heat.
9. Expand One House Into a Village
After completing the first cottage, change the proportions rather than the construction method. Lengthen the corner posts for a townhouse. Narrow the base and steepen the roof for a tower. Widen a low cottage and use a shallow gable to create a contrasting silhouette.
Repeat the same ivory finish, botanical palette, and vellum weight across every building. Give each house one distinctive detail, such as a tall fern side panel, a centered maple leaf, a pyramid roof, or a copper heart finial.
Arrange the tallest lantern slightly behind the group rather than exactly in the middle. Overlap some rooflines while leaving enough space to see the illuminated side panels.
Details That Give the Village Its Finished Character
Treat the leaves as compositions rather than filler. One intact maple leaf has more impact when surrounded by open vellum and a few slender ferns. If every panel is packed edge to edge, the lanterns will lose their luminous quality.
Keep the frames pale and the botanical colors earthy. Warm ivory softens the structure and allows rust, ochre, tobacco brown, and olive to read clearly. Copper should appear in small repeated touches, not around every joint.
Use the same warm-white LED tone throughout the village. Mixed cool and warm lights will make some vellum panels look gray. Timer tea lights are particularly useful once several houses are arranged together.
Easy Ways to Customize It
A woodland version could feature pressed grasses, seed heads, and delicate oak leaves with natural unstained wood. For a softer cottage look, use blush-tinted vellum, pale honey frames, and simple loop finials without copper roof edging.
You can also make a three-house village for a narrow shelf. Choose one compact cottage, one medium house, and one slender tower so the smaller grouping still has a varied skyline.
If real leaves are unavailable, use thin dried botanical inclusions intended for paper crafts. Avoid thick stems, curled leaves, or bulky flowers that prevent the vellum sheets from lying flat.
Displaying and Storing the Finished Village
Display the houses on a mantel, console, sideboard, or deep bookcase shelf. Keep them indoors and away from damp windows, heating vents, and direct sunlight, which can fade pressed leaves. Use removable museum putty beneath the bases if pets or children could bump the display.
Remove the tea lights before storage. Wrap each roof separately in tissue and keep the lanterns upright in a dry container. Do not stack objects against the vellum panels.
Your village does not need the elaborate pierced roofs or fine metal details shown in the AI inspiration. Crisp frames, thoughtfully spaced leaves, varied house proportions, and one consistent amber glow will preserve the idea that makes the display feel special.