*This post may contain affiliate links for which I earn commissions.*
A pool house is not the first setting most people picture for Christmas dinner. Its open doors, pale surfaces, and view of blue water have little in common with a traditional fireside holiday scene.
That contrast is exactly what makes this table memorable.
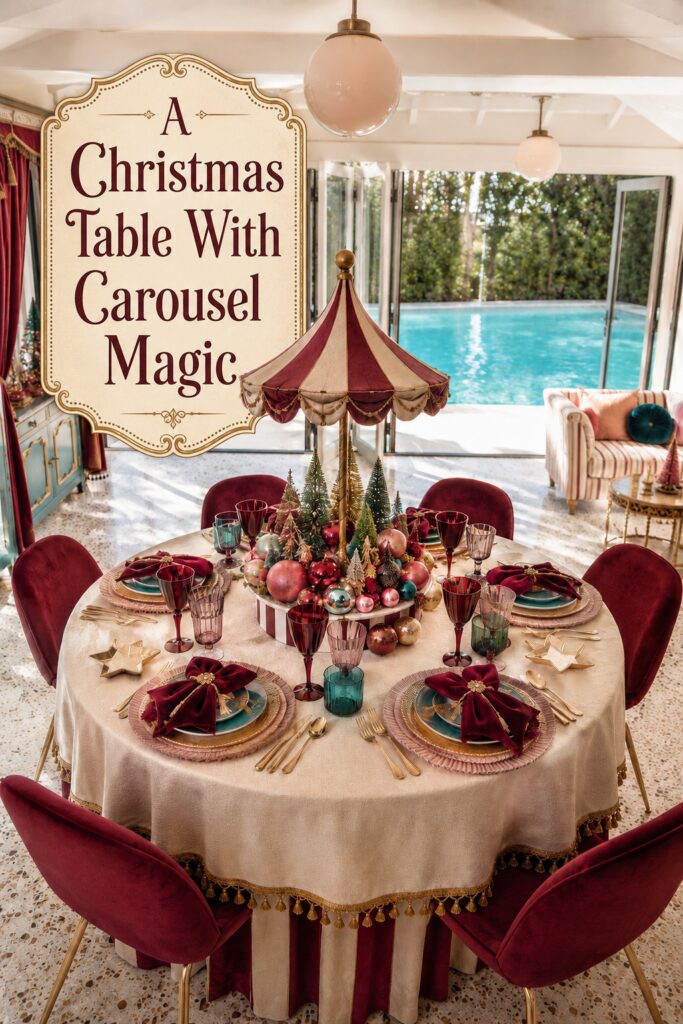
Instead of trying to disguise the summery architecture, the tablescape introduces its own Christmas world at the center of the room. A striped canopy rises above miniature trees and ornaments, creating the impression of a tiny carousel assembled directly on the table.
Burgundy, blush, teal, cream, and gold connect the holiday display to the water, curtains, furniture, and surrounding room. The result feels festive and imaginative while still belonging in a light-filled pool house.
Make the Centerpiece the Main Attraction
The carousel-inspired centerpiece gives the table a clear identity. Without it, the setting would still be elegant, but it would lose the element that makes it feel original.
The display has three principal sections:
- A wide circular base
- A central vertical pole
- A striped canopy with a finished scalloped edge
The ornaments and trees fill the space between the base and the canopy. The pole provides the visual connection between them.
Before building or purchasing any components, determine the maximum size the table can accommodate. Every guest needs room for plates, glasses, flatware, and comfortable arm movement.
A centerpiece can be visually impressive without occupying most of the tabletop. On a round table, preserving a consistent ring of open space around the display is more important than filling the entire center.
Follow the Geometry of the Table
A circular centerpiece is particularly effective on a round dining table because it looks balanced from every seat.
There is no obvious front or back. Each guest sees a similar arrangement of trees and ornaments, and the striped canopy feels centered within the table rather than directed toward one side of the room.
For a rectangular table, adapt the concept into two or three smaller carousel-inspired displays. A single round centerpiece may feel isolated in the middle of a long surface.
The same geometry appears in the plates, chargers, ornament balls, goblet bowls, pendant lights, and round table. Repeating circles allows the stripes, stars, tassels, and multiple colors to coexist without making the scene feel disorganized.
Build the Centerpiece on a Removable Base
A removable base makes the arrangement easier to assemble, transport, store, and clear from the table when food is served.
Use a sturdy round tray, wood disc, cake stand, or nonspinning display platform. A turntable can help during assembly, but it should not rotate freely while guests are seated unless it is specifically suited to that use and the decorations are secure.
Paint or wrap the outside edge in alternating burgundy and cream sections. The vertical stripes make the base resemble the platform of an old carousel.
Add a thin gold line along the top or bottom rim. A narrow metallic detail will relate the base to the canopy trim, tablecloth fringe, flatware, and napkin rings.
Check that the base remains level after it is decorated. Ornaments placed around the edge can hide an unstable or uneven support until the display is moved.
Create the Striped Canopy
The canopy repeats the burgundy-and-cream stripes while giving the centerpiece height and a strong silhouette.
A lightweight fabric covering could be fitted over a rigid form, or the canopy could be constructed from card, thin craft wood, or another suitable material. The finished piece should remain light enough for its support system.
Divide the cone or domed form into even tapered panels before adding the stripes. Each section should narrow toward the top and broaden toward the scalloped edge.
Warm cream is preferable to pure white because it complements the champagne tablecloth and antique-gold details. Burgundy provides rich contrast without feeling as casual as primary red.
Slight variation can make the canopy look handcrafted, but the sections should still meet neatly at the top.
Finish the Canopy With Scallops and Trim
The scalloped edge gives the canopy its carousel character. Without it, a striped cone could resemble a tent or umbrella.
Alternate burgundy and cream scallops beneath the matching roof panels. Add narrow gold cord, braid, or tassel trim along the curves.
Keep dangling embellishments short. Long fringe could interfere with sightlines, brush against the trees, or become tangled while the centerpiece is moved.
Small gold chains or loops between the scallops can introduce extra detail, but restraint matters. The stripes already make a strong statement.
The canopy needs to look finished from all directions. Check the reverse side of every trim piece and conceal raw joins where guests might see them.
Give the Carousel a Stable Center Pole
The image uses a slim gold pole extending from the middle of the display to a round finial above the canopy.
Any homemade structure needs a base wide and heavy enough to resist tipping. The pole should be fixed securely at the bottom and attached properly to the canopy rather than balancing loosely beneath it.
A hollow support can make the structure lighter, but it still needs adequate rigidity. The pole should not bend when the display is moved.
The gold ball at the top provides a simple finishing point. A wood sphere, lightweight ornament, or purpose-made finial could create the same shape.
Do not place a suspended centerpiece beneath a ceiling light or fixture unless there is adequate clearance. The carousel should remain entirely independent of the pool-house ceiling.
Check the Height From Every Seat
The canopy creates drama, but it also sits near seated eye level. Before decorating the base, test the structure with chairs pulled into place.
Guests should be able to see one another without leaning around the pole or canopy. If the canopy blocks faces, raise it, reduce its diameter, or make the full arrangement removable.
Another option is to display the carousel when guests arrive and lift it away before the meal. A nearby console can hold it during dinner so it continues decorating the room.
The centerpiece shown appears designed for a styled display, so a practical adaptation may need to be smaller or more easily moved.
Sightlines matter even more in a pool house because the open doors and water view are part of the experience. The canopy should frame the setting rather than conceal it.
Build a Miniature Forest Around the Pole
Bottle-brush trees occupy the central portion of the display and help disguise the support pole.
Use varying heights to create a layered miniature landscape. Position the tallest trees closer to the center and shorter ones near the outer edge.
The tree colors include traditional green along with teal, cream, pink, and metallic gold. These unexpected shades connect the centerpiece to the plates, chairs, glasses, and ornaments.
Distribute the shades rather than arranging them in separate color groups. A teal tree on one side should be balanced by another teal element elsewhere.
Stable wood or weighted bases are useful. If trees tip easily, secure them to the centerpiece platform with a removable method compatible with both surfaces.
Fill the Gaps With Oversized Ornaments
The ornaments provide shine and help the centerpiece feel full without requiring dozens of miniature objects.
Mix several sizes and finishes:
- Large matte or satin balls
- Medium glossy ornaments
- Small glittered or mirrored pieces
- Ribbed or textured ornaments
- A few metallic gold accents
Burgundy and blush should appear most frequently, with teal, champagne, silver, and pink scattered through the arrangement.
Place the largest ornaments first. Use medium pieces to establish the main color rhythm, then fill remaining gaps with smaller balls.
Shatter-resistant ornaments are more practical on a dining table and especially sensible near a pool. They reduce the risk created by glass decorations falling onto a hard floor or near the water.
Keep Decorations Away From Food
The ornament display should remain visually separate from food and serving dishes.
Do not allow loose glitter, faux snow, flocking, shedding greenery, floral wire, adhesives, or small decorative pieces to come into contact with plates or uncovered food.
A tray or low border can contain the arrangement. It also creates a clear division between decorative materials and the dining surface.
Inspect ornaments for loose caps and hanging wires before using them. Remove dangling hooks that could catch napkins or sleeves.
If food will be served family-style, move the centerpiece to a nearby surface. Trying to fit platters around a large display may make the table difficult to use.
Layer Blush and Teal at Each Place
The place settings bring the centerpiece palette to the outer edge of the table.
A blush or dusty-pink charger provides the broad foundation. A gold dinner plate or gold-toned layer adds warmth, while a teal plate creates the strongest contrast.
The order of the layers matters. Pink beside teal can feel playful, but the thin gold division makes the combination more polished.
If metallic dinner plates are not practical, use a gold-rimmed neutral plate or place a gold charger beneath the teal dish. Chargers are decorative and should not automatically be treated as food-safe dinnerware.
Keep the number of layers reasonable for the meal being served. A beautiful arrangement should not require guests to remove several unnecessary pieces before they can eat.
Make Burgundy Napkins Feel Ceremonial
The napkins are gathered into soft, full folds rather than placed in conventional rectangles. Small jeweled or gold-toned rings make them resemble bows or rosettes.
Burgundy velvet creates an especially luxurious look, but velvet napkin rings or bow-shaped holders may be easier to use than velvet dining napkins.
If using fabric napkins, choose a washable material that can be folded with enough volume to reproduce the effect. Cotton, linen blends, or matte polyester can provide a similar shape.
Position each napkin in the center of the top plate. This repeats the centered carousel arrangement on a smaller scale at every place.
Keep embellishments removable so the napkins remain comfortable and functional.
Mix Goblet Colors Around the Table
The glassware includes burgundy stems, smoky pink goblets, and teal tumblers. The variation moves the palette around the table and prevents all eight settings from looking identical.
Choose two or three glass colors and alternate them rather than trying to place every shade at every seat.
One practical pattern might be:
- Burgundy stemware at alternating settings
- Teal tumblers between them
- Clear or smoky-pink water glasses at every place
Acrylic drinkware may be a sensible alternative if guests will move between the table and pool area. It can reproduce the jewel-toned effect with less risk of broken glass.
Regardless of material, confirm that drinkware is food-safe and appropriate for the intended beverages.
Add Gold Through Useful Details
Gold appears throughout the table, but most of it serves a purpose.
The flatware, napkin rings, plate borders, carousel trim, finial, and small star dishes all contribute to the design. Because these pieces are distributed evenly, the metallic finish feels integrated rather than added at the last moment.
Choose one general gold tone. Mixing pale champagne, yellow gold, and bronze can work, but one finish should dominate.
The star-shaped dishes can hold wrapped sweets, individual place cards, or small favors. They can also remain empty as decorative punctuation between settings.
Avoid filling every open area with another gold object. Some visible tablecloth is necessary to keep the arrangement readable.
Finish the Table With a Tassel-Edged Cloth
The cream tablecloth provides a quiet field beneath the strong centerpiece and place settings.
Its subtle texture keeps it from looking flat, while gold tassels echo the canopy trim and burgundy theater-style curtains in the room.
For a similar effect, begin with a round cream cloth that reaches well below the tabletop. Add detachable tassel trim if a ready-made fringed version is unavailable.
The image also suggests burgundy fabric beneath the cream layer. A second cloth or table skirt can allow narrow red sections to appear between the cream folds.
Keep hanging fabric away from walkways, chair legs, doors, and any area where wet feet could reach it. Pool-house floors can become slippery, and a long cloth should not create an additional tripping risk.
Let the Pool House Remain Part of the Scene
The table does not attempt to cover the open doors or compete with the water. Teal plates, glasses, and trees connect the Christmas palette to the pool.
This is a useful strategy whenever seasonal decor is placed in a room with a strong existing feature. Rather than ignoring the blue water, the table repeats related tones in smaller amounts.
Burgundy curtains and chairs add winter richness, while cream walls and terrazzo-style flooring keep the room light.
If the pool house is less formal, the same idea could be adapted with simpler linens, acrylic goblets, unbreakable ornaments, and a smaller handmade canopy.
Plan for Humidity and Poolside Use
Pool houses can have more moisture and temperature variation than ordinary dining rooms.
Paper, untreated wood, metal trim, adhesives, and fabric may respond differently in humid conditions. Store the centerpiece in a dry interior location when it is not being used.
Glassware and ornaments require extra consideration near a pool. Shatter-resistant materials can reduce risk, but no object should be placed where it could easily fall into the water or onto a wet walkway.
Keep electrical decorations away from the centerpiece unless they are properly rated and safely positioned for the environment. The table can achieve a luminous effect through reflective ornaments and surrounding room light without adding electrical components.
Close or secure doors as needed so wind does not disturb napkins, place cards, lightweight trees, or ornaments.
Create a Smaller Carousel Table
A more compact version can preserve the concept with:
- One striped canopy approximately 12 to 16 inches wide
- Five or seven miniature bottle-brush trees
- A mixed group of shatter-resistant ornaments
- Burgundy napkins with gold rings
- Blush chargers and teal plates
- Alternating burgundy and teal drinkware
Use a removable tray as the base and omit the full tablecloth fringe if the setting is casual.
For a four-person table, reduce the canopy width and keep the ornaments inside a shallow circular tray. The smaller arrangement should still leave a generous ring of open space for dining.
Why the Table Feels Like an Experience
This setting succeeds because it offers more than coordinated dishes and a seasonal centerpiece.
The canopy introduces architecture at the center of the table. Trees and ornaments create a miniature landscape beneath it. Repeated circles link the display to the table, place settings, glasses, lights, and ornaments.
Burgundy brings winter depth, teal responds to the pool, blush softens the contrast, and gold adds a sense of occasion.
The pool-house location makes the concept even more distinctive. It places Christmas against sunlight and blue water, then uses the carousel to establish a complete holiday world within that unexpected setting.
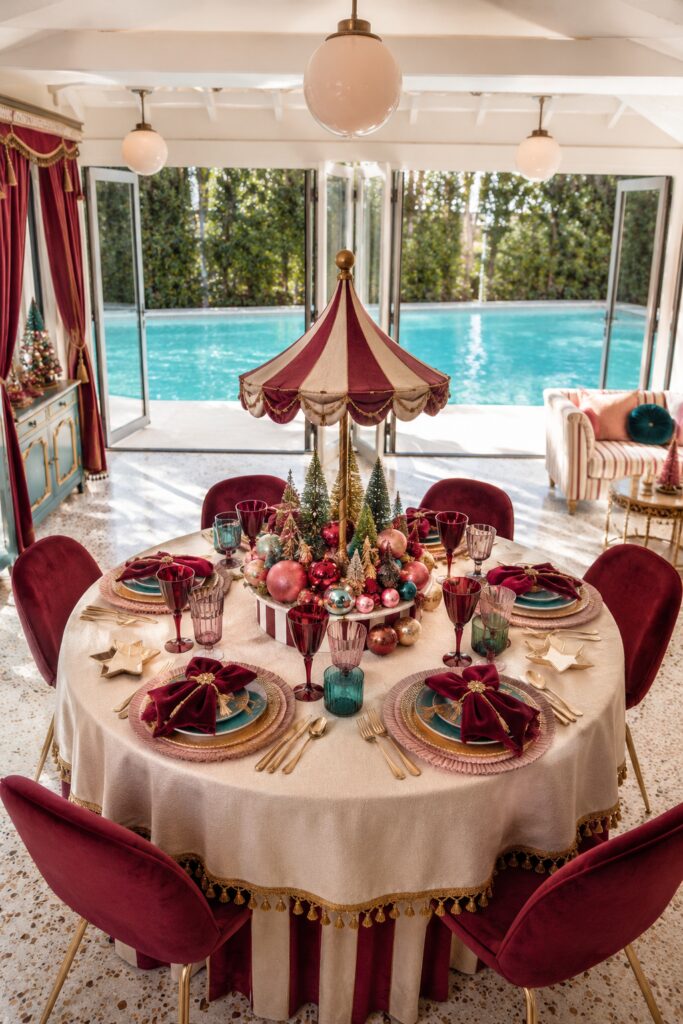
Image disclosure: This AI-generated image is presented as decorating inspiration. Suggested products are visual alternatives rather than claims that exact items shown are available. Product colors, materials, dimensions, prices, ratings, and availability may change.