*This post may contain affiliate links for which I earn commissions.*
Three ivory linen cones turn a simple peg rail into a Christmas display. Their pointed bottoms hang neatly above the console, while narrow lace cuffs frame small sprays of cedar and burgundy rosebuds. The dark ribbon loops give the pale fabric a clear outline against the wall.
You can make a similar set with hand sewing and a quarter-circle paper pattern. Each cone has one back seam, a bound opening, and a ribbon handle sewn to opposite sides. Light interfacing helps it keep its shape. The filling stays small and dry, so the linen remains the main feature. Make one sample first, then use its fit and finish to guide the other two.

These images were generated with AI as decorating inspiration and construction illustrations. The following method is a suggested approach, not a physically tested project.
Plan the Shape and the Small Filling
A six-inch-radius quarter circle makes a small decorative pocket, with some size lost to the seam and rim finishing. Expect roughly five and a half to six inches of height, then check your sample. The lace should frame the opening without covering most of the linen.
The cone is for a few lightweight artificial stems. It is not a vase or a container for soil, water, candles, or heavy flower foam. Choose three short cedar tips and one small fabric rosebud for each pocket. A little tissue near the mouth can hold their positions without packing the pointed bottom.
Allow about an hour or two for a first sample, depending on sewing experience and trim handling. A repeated set may go faster once the pattern, ribbon length, and filling are settled. Let the actual materials and your sample determine the final measurements.
Gather Fabric and Finishing Materials
- Midweight ivory linen, enough for three six-inch quarter circles plus a test piece.
- Suitable medium woven fusible interfacing in a pale color.
- Narrow ivory double-fold bias binding for each curved opening.
- Ivory scalloped lace, about half to three quarters of an inch wide.
- Burgundy ribbon, about a quarter to three eighths of an inch wide.
- Matching sewing thread and a suitable hand needle.
- Three short faux cedar tips and one small fabric rosebud per cone.
- Small pieces of white tissue for light filling support.
Keep paper, a ruler, pencil, compass, fabric scissors, small sewing clips, an iron, and a pressing cloth nearby. Wired artificial stems need cutters intended for that material. Use an existing peg rail that is mounted according to its own hardware directions.
Before cutting the full set, press a scrap of linen with the selected interfacing. Follow the interfacing maker’s heat, steam, pressing time, and cooling directions. Check that the bond holds without changing the linen’s color or leaving glue on the face.
Cut and Sew the Cone Body
1. Make the Pattern and Cut the Supported Linen
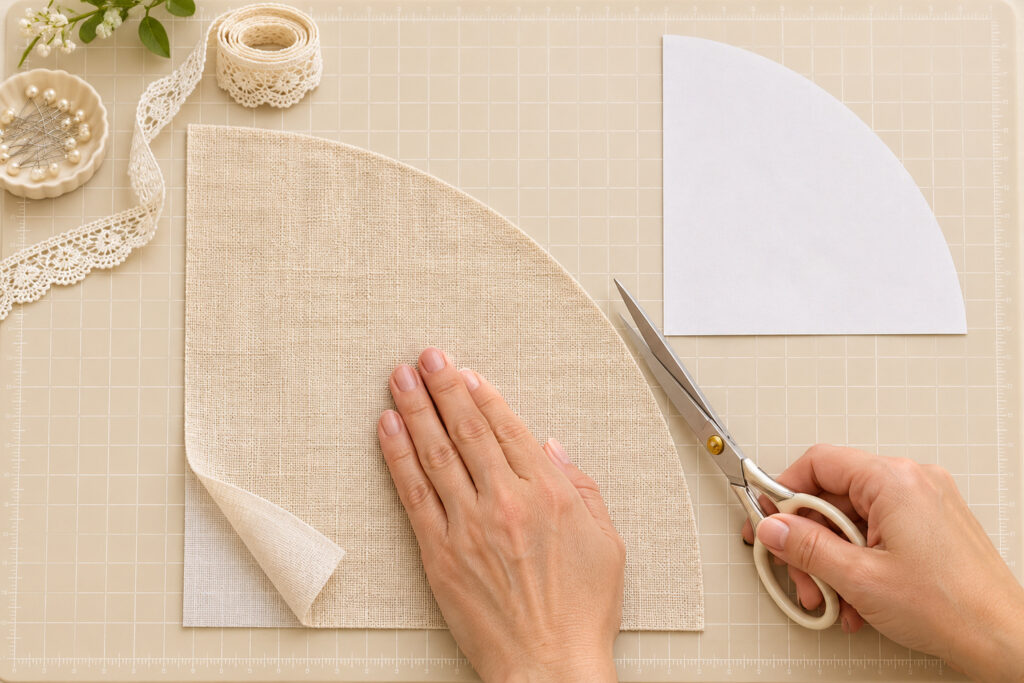
Draw two six-inch lines from one corner of a piece of paper at a right angle. Using that corner as the center, draw a six-inch-radius arc joining their outer ends. Cut out the quarter circle. Its two straight edges will become the single back seam; the curved edge will remain the mouth.
Fuse the interfacing to the wrong side of a linen piece large enough for the pattern, then let it cool as directed. Place the paper on the supported fabric, trace the shape, and cut one quarter circle. Do not add another curved side or turn the pattern into a half circle. Keep the fabric flat as you cut around the arc.
2. Join the Straight Edges and Turn the Point
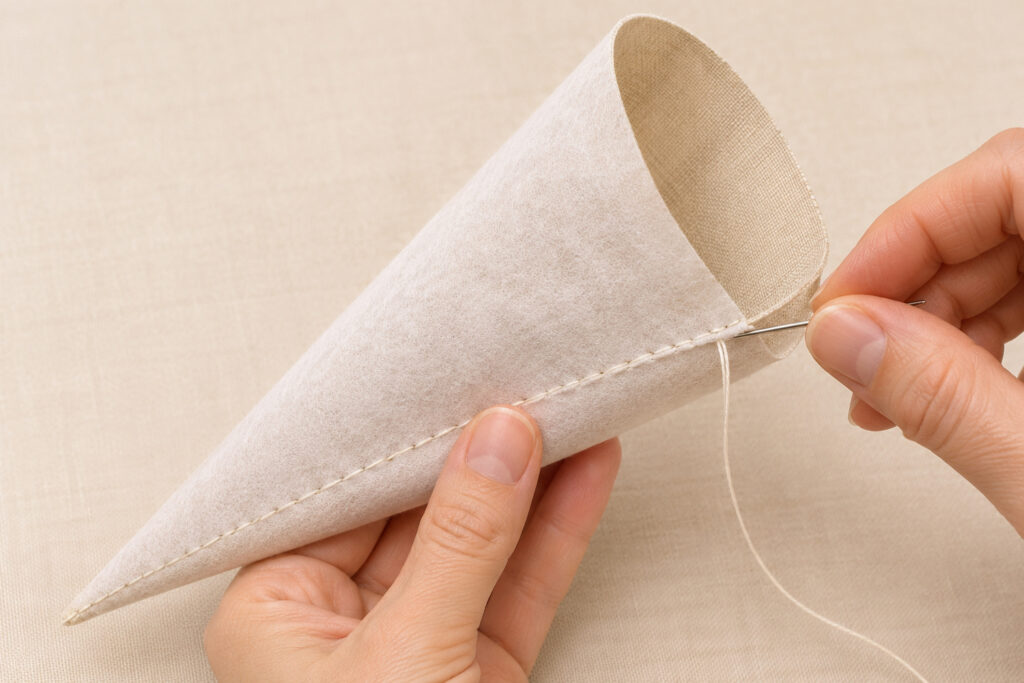
Fold the quarter circle with the linen right sides together, matching its two straight edges. The interfacing faces outward. Clip the edges and sew about a quarter inch from them, from the narrow tip toward the curved mouth. Use small backstitches and secure both ends, leaving the entire curved opening unsewn.
Check the seam before turning. Close any gap at the point with a few small stitches. Trim only excess seam allowance that prevents the tip turning, leaving enough fabric to hold the stitching. Turn the cone right side out through the mouth and ease the point out with a blunt tool. Stop if the linen begins to stretch or the seam strains.
Finish the Mouth and the Hanging Loop
3. Bind the Opening and Add the Lace
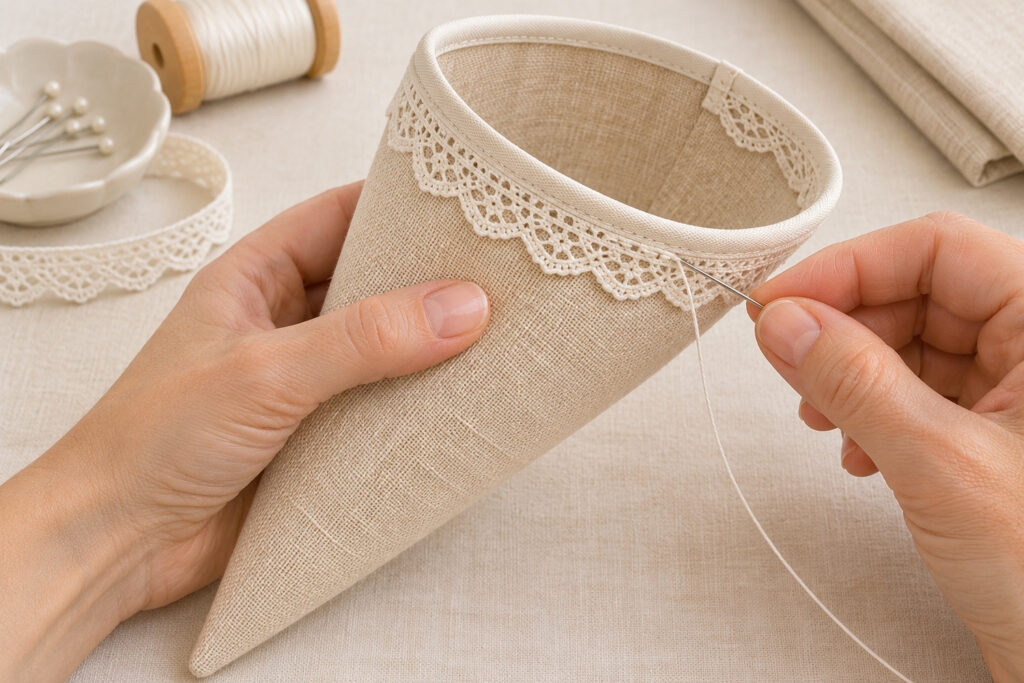
Fit double-fold bias binding around the curved raw edge so it encloses both the linen and interfacing. Use clips to hold it without flattening the cone into a pouch. Turn under the short raw ends where they meet at the back seam, allowing a small overlap. Hand stitch through both sides of the binding, checking inside as you go.
Wrap the lace around the outside just below the bound rim. Keep the scallops facing down and the upper edge level. Turn under its cut ends and overlap them neatly at the back. Sew the upper edge to the cone with small stitches, catching the linen without sewing the front and back walls together. The opening must remain round and usable.
4. Sew the Ribbon to Opposite Sides
Start with a twelve-inch length of burgundy ribbon for one continuous handle. Test the loop over the actual peg before stitching, adjusting the length so the cone hangs below it without brushing the display underneath. Put one ribbon end inside each side of the mouth, with the back seam facing the wall.
Overlap each end about half to three quarters of an inch inside. Sew a small box with crossed stitches through the ribbon, linen, and interfacing. If the fabric pulls, add a small matching linen reinforcement behind the attachment and sew through it too. Keep the two ends level so the mouth does not tip sharply to one side.
Fill and Arrange the Finished Set
5. Add a Small Spray and Check the Hang
Hang the empty cone low over a protected surface first. Check the handle, seams, and rim before adding a small loose piece of tissue near the opening. Shorten the faux stems with an appropriate tool, covering any sharp cut ends. Arrange three cedar tips around one small fabric rosebud, with most of each stem hidden inside.
Keep the pointed lower section lightly filled or empty. If the cone bulges, remove tissue or shorten the stems. The finished pocket should show a clear stretch of plain linen beneath the lace. Check the ribbon attachments again with the complete lightweight filling in place.
Repeat the sample for the other two cones. Hang each loop on its own peg, leaving space between the pockets so their pointed shapes stay distinct. A slightly different direction for each cedar tip adds variety without changing the repeated linen, lace, and ribbon treatment.
Keep the Linen Neat Between Seasons
For a coordinated set, compare the three empty cones before filling them. Their openings and hanging lengths should look related, while a small difference in the linen weave is fine. Adjust an uneven ribbon now, when you can reach its stitches easily. Keep the lace join and body seam facing the same direction at the back.
If an opening collapses, check the interfacing bond and the amount of filling before adding more trim. If the cone twists, check whether the handle ends sit at equal heights. A few corrected stitches usually make more difference than another ribbon bow.
Empty the pockets for storage and follow the care directions for the chosen materials. Keep the cones supported and dry, with the lace uncrushed. Fold the ribbon loops inside only when doing so will not crease the rims. The finished set can return to the peg rail next Christmas with fresh small sprays and the same simple ivory shapes.