*This post may contain affiliate links for which I earn commissions.*
Green velvet holly leaves and red fabric berries turn plain cord curtain tiebacks into Christmas accents. The leaves sit against pale floral curtains, so their pointed edges show clearly. Red cord repeats the berry color without adding another pattern to the window.
For a practical version, make small padded leaves and hand-sewn berries, then stitch them to ready-made cord tiebacks. This keeps the curtain-holding part separate from the decoration. You’ll make two matching clusters, with three leaves and three berries on each. The suggested measurements below are a starting point for ordinary curtains, not measurements taken from the image.

The inspiration and instructional images were generated with AI. This tutorial proposes a practical adaptation and does not document a tested physical project.
Plan the Cluster Around Your Curtains
Test your plain tiebacks on the gathered curtains first. Both end loops should sit securely on a suitable wall hook, with enough slack for a soft fold. Use existing properly installed hooks or follow the hardware maker’s installation directions. The decoration won’t hold the curtain’s weight.
Aim for finished leaves about 5 inches long, including a short base, and roughly 2 1/2 inches across at their widest point. Three leaves should fan outward rather than stack in a thick pile. Make a paper mock-up and hold it against the curtain before cutting velvet. Reduce the pattern if the leaves overwhelm a narrow panel.
Gather Fabric and Sewing Supplies
For two tiebacks, gather:
- Two plain red cord curtain tiebacks, with finished end loops, sized for your curtains
- Dark green non-stretch velvet, enough for six leaf fronts and six leaf backs, approximately a 12 by 24 inch piece with careful layout
- Red non-stretch velvet, enough for six circles about 3 inches across
- A small amount of polyester craft stuffing
- Matching green and red sewing thread
- Muted gold embroidery floss, for the leaf center veins
- Dark green felt, for two backing circles about 2 inches across
You’ll also need paper, a pencil, a ruler, fabric scissors, small clips or pins, a hand-sewing needle and an embroidery needle. A sewing machine can sew the leaf seams, but hand backstitching is the primary method described here. Use a blunt turning tool, such as a rounded wooden stick, rather than scissor points.
Check the fabric allowance against your paper layout before purchasing. Velvet nap is the direction the pile lies; stroke it both ways to see the difference. Keep all leaf fronts facing the same direction so they reflect light consistently.
Sew and Shape the Holly Leaves
1. Draw a Leaf Pattern with Broad Points
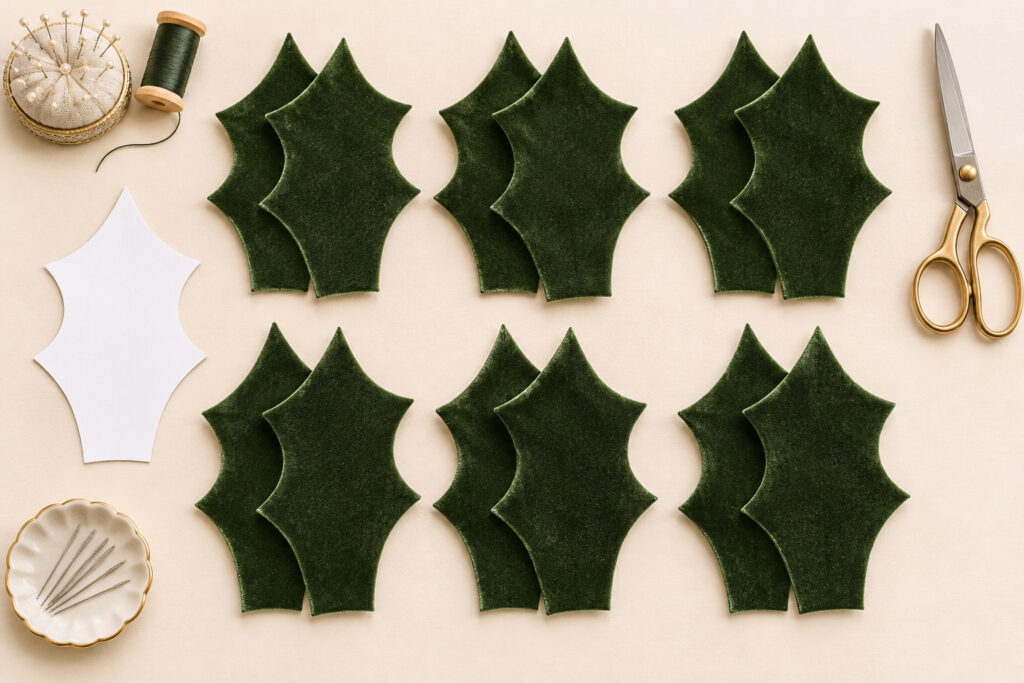
Draw a center line about 5 inches long. Build a holly outline around it, with a pointed tip, three broad points down each side and a short, narrow base. Avoid tiny teeth or very deep cuts between points. Broad curves are easier to sew and turn.
Add a 1/4 inch seam allowance around the finished outline. Cut this larger paper pattern out. Arrange it on the green velvet and cut twelve pieces, making six pairs. Keep the pile direction consistent on the pieces that will face forward.
2. Stitch Around Each Paired Shape
Put two leaf pieces right sides together, with the soft velvet faces touching. Clip or pin them without stretching the edges. Backstitch along the finished outline using small stitches, leaving an opening about 1 inch long near the base on one side.
Trim excess seam allowance at the sharp tips without cutting the thread. Make small clips into the inward curves, stopping short of the seam. These clips let the edge spread when you turn it. Turn the leaf right side out through the opening, easing the points with the blunt tool.
3. Add Light Padding and a Center Vein
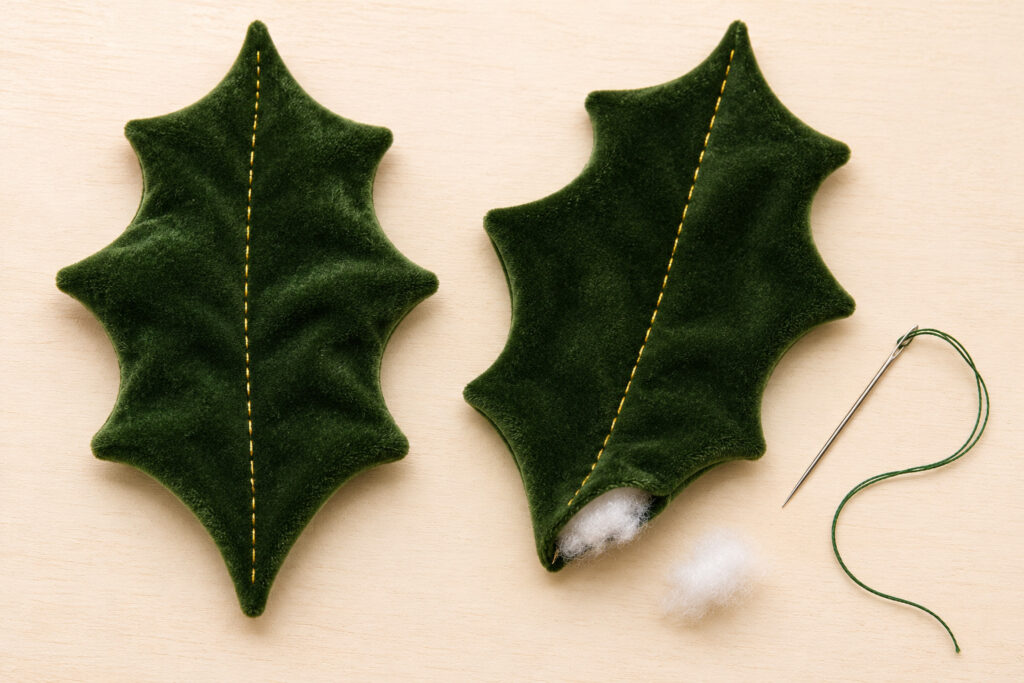
Feed in small wisps of stuffing. Keep the leaf thin enough to bend, with no hard lump at its tip. Keep the base opening accessible while you check the padding. Using two strands of gold floss, stitch a simple running-stitch vein down the center. Pass through both layers with light tension to form a shallow line without puckering. The open leaf in the demonstration shows this stage before the last seam is closed.
Turn the opening’s raw edges inward and close it with small ladder stitches, catching the folded edges so the join stays discreet. Repeat for all six leaves.
Make the Berries and Attach Each Cluster
4. Gather Six Red Velvet Berries
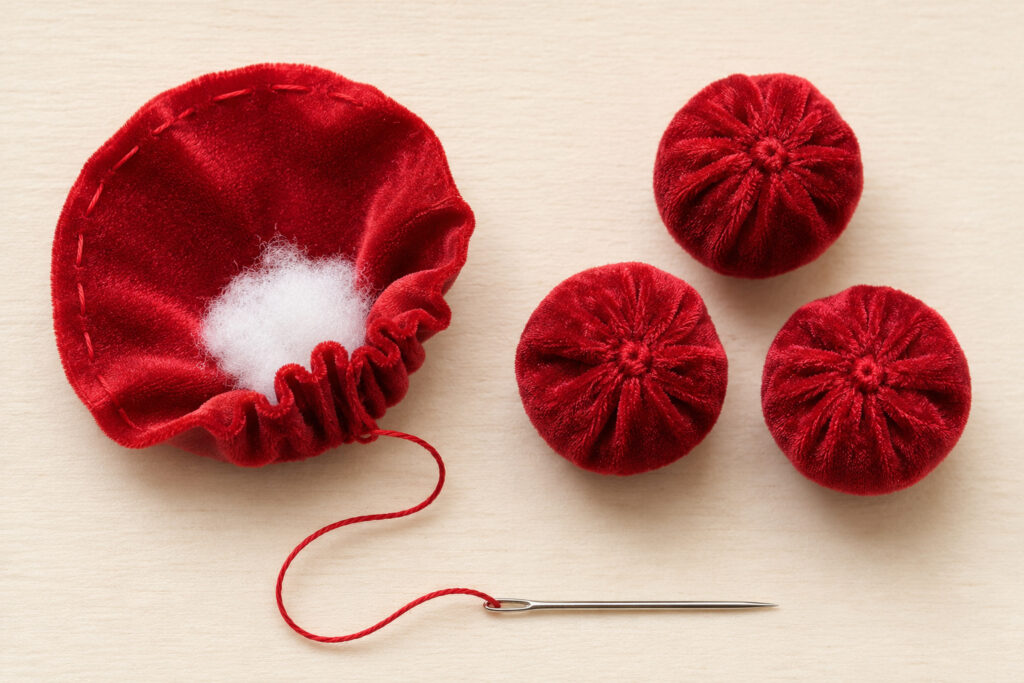
Cut six red velvet circles about 3 inches across. Sew a running stitch around each circle, about 1/4 inch from the edge. Pull the thread gently to gather the fabric into a cup, add a little stuffing, then draw the opening closed.
Take several small stitches across the gathered opening and knot securely. The finished size will vary with the fabric and filling; aim for rounded berries about an inch across rather than a precise diameter. Keep the gathered side at the back.
5. Arrange Three Leaves on Each Cord
Set a tieback around a rolled towel to roughly copy its curve around the curtain. Find the front-facing midpoint. Fan three leaves around this point, with their bases overlapping and their tips pointing outward.
Tack the leaf bases to one another first. Remove the cluster from the towel and stitch those joined bases firmly to the cord’s outer covering. Take several small passes around and through accessible cord strands without cutting them. Keep the tieback’s end loops free.
6. Cover the Join and Finish the Back
Sew three berries over each set of leaf bases. Pass the needle through their gathered backs and the joined leaf bases, keeping the stitches hidden underneath. Arrange the berries tightly enough to cover the attachment without crushing the leaves.
Cover the rough underside with a green felt circle. Hand stitch its edge to the leaf bases and add a few securing stitches around the cord. The felt is a neat backing, not the part supporting the curtain.
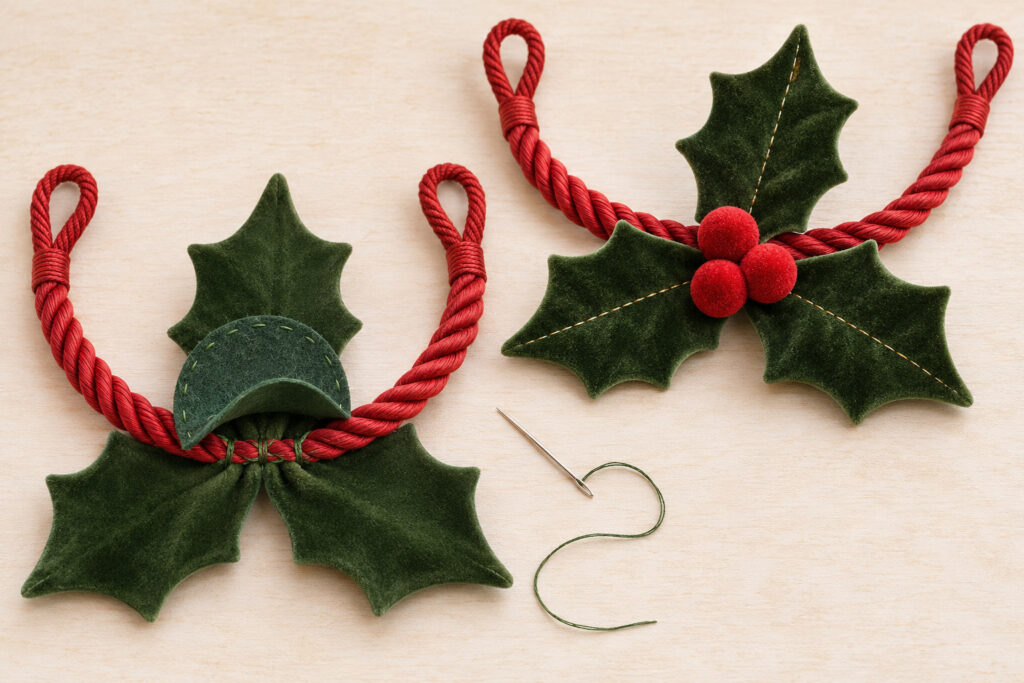
Before hanging both pieces, compare them side by side on the work surface. The leaf angles can mirror each other without being identical. Check that every berry is held by stitches, not simply trapped between its neighbors. Gently tug each attachment while supporting the cord, and add a securing stitch wherever a part shifts.
Correct Shape Problems Before Hanging
If a leaf looks blunt, check whether seam allowance is packed into the tip. Remove a little filling near it and ease the fabric gently with the blunt tool. Don’t force a sharp point through the velvet.
A leaf that twists may have uneven stuffing or stitches pulled too tight along the vein. Spread the filling with your fingers. If necessary, loosen and replace the center stitching rather than adding more stuffing to hide the twist.
If a berry sits away from the others, take another stitch through its gathered back and the leaf bases. Avoid pulling the front surface flat; the small rounded shape is what makes it read as a berry.
Keep the Color and Fullness Controlled
The red cord, berries and nearby Christmas accents provide enough repeated color. Let the leaves remain dark green so their outlines stand out against pale curtains. A warmer gold vein gives a little detail without covering the velvet.
For smaller panels, reduce the whole paper pattern and use smaller berry circles. Keep three leaves and three berries in each group so the basic construction stays the same. Try the paper version first rather than shrinking only the cord or only the berries.
Hang, Handle and Store the Tiebacks
Fit the finished tiebacks to their wall hooks and turn the clusters toward the room. Check that the padded leaves aren’t caught behind the cord. Keep the fabric away from heaters and open flames, and keep looped curtain cords out of children’s reach.
These are decorative indoor pieces. Spot clean only if the chosen fabrics allow it; the complete padded assembly isn’t being presented as machine washable. Store the clusters flat in a dry box, with tissue around the leaves so the points don’t stay folded.
Give the berries a final turn toward the room. A clear fan of leaves with a compact red center will bring the inspiration’s Christmas detail to your own window.